Plank Exercise

Plank Exercise | Early Intervention Ergonomics

What is the Plank Exercise?

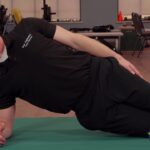
The plank exercise is a popular core-strengthening exercise that targets several muscle groups, including the abdominals, back, shoulders, and glutes. It is performed by assuming a position similar to a push-up, but instead of supporting yourself with your hands, you support your body weight on your forearms and toes.

Here’s how to perform the plank exercise:

  • Start by positioning yourself face-down on the floor or an exercise mat.
  • Bend your elbows and place your forearms on the ground, with your elbows directly beneath your shoulders.
  • Extend your legs behind you, resting your weight on your toes.
  • Your body should form a straight line from your head to your heels, with your core muscles engaged.
  • Maintain a neutral neck position by looking down at the floor, avoiding arching or rounding your back.
  • Hold this position for a specific amount of time, usually starting with 20 to 30 seconds, and gradually increasing the duration as you build strength.
  • Breathe steadily throughout the exercise.

The plank exercise is effective for building core strength, improving stability, and enhancing overall body control. It can be modified to suit different fitness levels by performing variations such as side planks, plank rotations, or incorporating movements like leg lifts or arm reaches. It’s important to maintain proper form and listen to your body, starting with shorter durations and gradually progressing as you become more comfortable and stronger.

Early Intervention Benefits of this Exercise

The plank exercise offers several early intervention health benefits. Here are some of the key advantages:

Injury prevention: A strong core and improved overall strength contribute to better stability and balance, reducing the risk of injuries, especially in the lower back and hips. The plank exercise helps develop the muscles that support and protect these areas.

Core strength: Planks primarily target the muscles of the core, including the deep abdominal muscles, obliques, and lower back muscles. By regularly performing planks, you can develop a strong and stable core, which is essential for proper posture, spinal alignment, and overall functional strength.

Improved posture: Planks engage the muscles that support the spine, helping to improve posture and reduce the risk of developing poor postural habits. Strengthening the core muscles can also alleviate lower back pain and promote better spinal alignment.

Enhanced overall strength: Planks are not just a core exercise; they also engage other major muscle groups such as the shoulders, glutes, and legs. Holding the plank position requires these muscles to work together, leading to improved overall strength and muscular endurance.

Increased flexibility: Performing planks helps to stretch and strengthen various muscle groups, including the shoulders, hamstrings, and arches of the feet. Over time, this can lead to increased flexibility and joint mobility.

Functional fitness: Planks are a functional exercise that translates to daily activities and work productivity. A strong core is vital for performing everyday tasks, such as lifting, bending, and twisting, with proper form and reduced risk of injury.

If you have an injury or illness, consult with a health care professional before attempting.

This early intervention exercise improves overall health & fitness and helps reduce work-related injuries.

The Plank exercise contributes to better stability and balance, reducing the risk of injuries, especially in the lower back and hips.


Kiss Carpal Tunnel Goodbye!

Kiss carpal tunnel goodbye with effective ways to prevent and reverse the progressive occupational illness of carpal tunnel syndrome

Past Seminar: “Kiss Carpal Tunnel Goodbye”

“Kiss Carpal Tunnel Goodbye” is designed for employers who are interested in reducing carpal tunnel syndrome from their worker’s compensation claims and OSHA logs.

Wednesday, February 1st, 2017

Missouri Employer’s Mutual Chesterfield, MO

Thursday, February 9th, 2017 8:00 am – 3:00 pm

Stoney Creek Hotel & Conference Center Columbia, MO

Wednesday, February 22nd, 2017

Missouri Employer’s Mutual Independence, MO

Learn from the disciplines of physical therapy, occupational therapy, and ergonomics on the most effective ways to prevent and reverse the progressive occupational illness of carpal tunnel syndrome.

SPEAKERS:

  • Paul Krewson, OTR, CEAS
  • Tyler Brown PT, CEAS
  • Mark Woodard Loss Prevention Specialist

TOPICS:

  • Prevention and Early Intervention of CTS
  • Post Offer Pre Employment Testing
  • Overview of Surgery and Recovery
  • HR and Work Comp Perspective

Ways to Prevent/Reverse Carpal Tunnel Syndrome

  1. Ergonomic Workstations: One of the primary contributors to CTS is poor ergonomics. Ensure your workstation is properly set up with an ergonomic chair, keyboard, and mouse. Maintain a neutral wrist position to minimize stress on the median nerve, which is responsible for CTS symptoms.
  2. Frequent Breaks and Stretching: Incorporate short breaks into your workday to stretch your wrists and hands. Simple exercises like wrist flexor and extensor stretches can help relieve tension and improve blood circulation.
  3. Proper Typing Technique: Pay attention to your typing technique. Avoid excessive force on the keys and try to keep your wrists in a neutral position while typing. A split keyboard or an ergonomic keyboard can also help.
  4. Wrist Braces and Supports: Consider wearing wrist braces or supports, especially if you’ve experienced CTS symptoms. These aids can provide stability and reduce strain on the wrists during repetitive tasks.
  5. Anti-Inflammatory Diet: Nutrition plays a role in preventing inflammation that can contribute to CTS. Incorporate foods rich in Omega-3 fatty acids, such as salmon and walnuts, to reduce inflammation and support joint health.
  6. Maintain a Healthy Weight: Excess body weight can increase the risk of CTS. Maintain a healthy weight through a balanced diet and regular exercise to reduce pressure on your wrists.
  7. Proper Hand Posture: Be mindful of your hand posture during activities. Avoid excessive flexion or extension of the wrists and maintain a neutral position when using tools or performing tasks.
  8. Stress Management: Chronic stress can exacerbate CTS symptoms. Practice stress-reduction techniques such as deep breathing, meditation, or yoga to keep stress levels in check.
  9. Professional Evaluation: If you experience persistent symptoms of CTS, consult a healthcare professional or an ergonomics expert. Early diagnosis and intervention can prevent further damage.

Things to Remember

Prioritizing ergonomics, taking regular breaks, and adopting a healthy lifestyle are essential steps in maintaining wrist health. Remember, a proactive approach to workplace safety and ergonomics can go a long way in ensuring your well-being and productivity in the long run.

More Tools & Resources from Peak Ergonomics
Contact Us About Reducing Workplace Injuries
Healthy Employees are the Bottom Line! – Learn More!

Advanced Nerve Stretch

Advanced Nerve Stretch | Early Intervention Ergonomics

What is the Advanced Nerve Stretch?

The “Advanced Nerve Stretch,” also known as the median nerve stretch, is a composite stretch that originates at the nerve roots in the neck and pulls all the way down to the median nerve that passes through the carpal tunnel. Perform this stretch to give your body rest when performing forceful gripping, repetitive gripping, awkward or sustained postures of the elbow, forearm, wrist, and hand to prevent carpal tunnel syndrome. Here is how to perform the advanced nerve stretch:

  1. Stand up straight with your feet shoulder-width apart.
  2. Extend both arms straight out to the side at shoulder level, with your palms facing up.
  3. Next, point your fingers down toward the floor. You palms should be facing away from you.
  4. Gently tilt your head slowly towards your left shoulder, aiming to bring your ear closer to the shoulder.
  5. Next, gently tilt your head slowly towards your right shoulder, aiming to bring your ear closer to the shoulder.
  6. Proceed to gently go back and forth performing about 5 repetitions each.
  7. You should feel the stretch in the opposite arm from where you tilt the head towards the shoulder.

This is an excellent stretch to replenish nutrients and re-oxygenate the distal upper extremity. The advanced nerve stretch combines lateral flexion of the neck with arm extension to stretch the muscles and nerves associated with the median nerve. It can help relieve tension and promote flexibility in the neck, shoulder, and upper limb. However, it’s important to perform the stretch gently and within your pain-free range of motion. If you experience any pain or discomfort, it’s advisable to stop and consult with a healthcare professional for further evaluation.

Early Intervention Benefits

The advanced nerve stretch provides several potential early intervention benefits for those workers who perform work-related activities that involve the elbow, forearm, wrist and hand.  Here are some of those benefits:

  • Relieving Median Nerve Compression: The stretch can help alleviate compression of the median nerve, which runs through the forearm, wrist, and hand. Conditions such as carpal tunnel syndrome, where the median nerve is compressed at the wrist, may benefit from this stretch.
  • Increasing Flexibility: Regularly performing the median nerve stretch can improve flexibility in the wrist, forearm, and hand. This increased flexibility can enhance overall range of motion and function in daily activities.
  • Alleviating Symptoms: The stretch may help alleviate symptoms associated with median nerve compression, such as pain, tingling, numbness, or weakness in the forearm, wrist, hand, and fingers. It can provide temporary relief and promote better nerve function.
  • Promoting Blood Circulation: Stretching exercises, including the median nerve stretch, can enhance blood circulation in the targeted areas. Improved blood flow aids in delivering essential nutrients and oxygen to the muscles and nerves, promoting their health and recovery.
  • Injury Prevention: Engaging in the median nerve stretch, can help prevent injuries to the distal upper extremity. It promotes flexibility and improves the overall range of motion in the wrist, forearm, and hand. Adding this stretch to your morning routine can reduce the risk of strains, sprains, and other musculoskeletal injuries during workplace activities that involve repetitive hand and wrist movements.

Things to Remember:

Remember, while the median nerve stretch can offer potential benefits, it’s important to perform it correctly, within your pain-free range of motion. Listen to your body. If you experience any pain or discomfort during the stretch or have specific concerns, it’s advisable to consult with a healthcare professional for guidance tailored to your individual needs.

These early intervention exercises are to improve overall health & fitness as well as help reduce work-related injuries.

If you have an injury or illness, consult with a health care professional before attempting.

Contact us for more information on how we can help your employees stay safe. Healthy Employees ARE the Bottom Line!

Resources

More Tools & Resources from Peak Ergonomics
Contact Us About Reducing Workplace Injuries
Healthy Employees are the Bottom Line! – Learn More!

The advanced nerve stretch can relieve tension caused by forceful or repetitive gripping and can help prevent carpal tunnel syndrome.


Superman Exercise

Superman Exercise | Prone Extension with Arm & Opposite Leg Lifts 

What is the Superman Exercise?

The prone extension with arms and opposite leg lift exercise, also known as the Superman exercise, is a core-strengthening exercise that targets the lower back, glutes, and hamstrings. Here’s how you perform the exercise:

  1. Lie face down (prone) on a mat or comfortable surface with your legs extended and arms straight out in front of you.
  2. Engage your core muscles by drawing your navel toward your spine.
  3. Simultaneously lift your right arm and left leg off the ground while keeping them straight. Keep your gaze down to maintain a neutral neck position.
  4. Hold the lifted position for a few seconds, focusing on contracting your glutes and engaging your lower back muscles.
  5. Slowly lower your right arm and left leg back to the starting position.
  6. Repeat the movement on the opposite side, lifting your left arm and right leg.
  7. Continue alternating sides for the desired number of repetitions or time.

It’s important to maintain proper form during this exercise. Avoid arching your lower back excessively or lifting your limbs too high, as this can strain your back. Start with a comfortable range of motion and gradually increase it as you build strength and stability.

Early Intervention Benefits of this Prone Extension Exercise

Here are some potential early intervention health benefits associated with this exercise:

  • Strengthening the back muscles: The prone extension exercise primarily targets the muscles of the lower back, such as the erector spinae and multifidus. Moreover, regular practice of this exercise can effectively strengthen these muscles, leading to several benefits. Firstly, it can contribute to better posture and spinal stability. Additionally, it may help reduce the risk of lower back pain.
  • Improving core stability: While performing the prone extension exercise, you engage the deep core muscles, including the transverse abdominis and the muscles of the pelvic floor. These muscles play a vital role in providing stability and support to the spine. Strengthening the core can enhance overall trunk stability and reduce the risk of injuries.
  • Enhancing shoulder stability: The arm lift component of this exercise targets the muscles of the shoulder, including the deltoids, rotator cuff muscles, and scapular stabilizers. Regular practice can help improve shoulder stability, which is important for maintaining proper posture and reducing the risk of shoulder injuries.
  • Engaging the gluteal muscles: The opposite leg lift component of the exercise activates the gluteal muscles, including the gluteus maximus, medius, and minimus. These muscles are important for hip stability and proper lower limb mechanics. Strengthening the glutes can contribute to improved posture, reduced risk of hip and knee injuries, enhanced employee workplace performance along with workplace productivity.
  • Promoting overall body coordination: The prone extension exercise involves lifting the opposite arm and leg while maintaining stability and control. This movement requires coordination and balance, which can help improve overall body awareness and neuromuscular control.

Things to remember…

It’s important to note that the health benefits may vary from individual to individual. It’s always a good idea to consult with a healthcare professional before starting a new exercise routine. If you have an injury or illness, consult with a health care professional before attempting. They can provide personalized recommendations based on your specific needs and any underlying health conditions. These early intervention exercises are to improve overall health and fitness and help reduce work-related injuries.


Seated Hamstring Stretch

Seated Hamstring Stretch for Healthy Back & Legs

What is the Seated Hamstring Stretch?

The Seated Hamstring Stretch is a simple and effective exercise that can help improve flexibility and relieve tightness in the hamstrings. To perform this stretch, start by sitting on a chair and scoot to the front of the chair. Next, extend your right leg so that your knee is completely straight. Make sure that your heel is on the ground and that your toes are pointing up in the air. Next, reach down towards your toes with both hands while keeping your knee straight.  Also, make sure that you are keeping both your chest and your head upright as you reach. Hold the stretch for 3-5 seconds, feeling the stretch in the back of your leg. Finally, repeat the stretch with your left leg.

To deepen the stretch, you can try reaching further forward or using a towel or yoga strap to help you gently pull yourself closer to your toes.

Overall, the Seated Hamstring Stretch is an excellent way to stretch and lengthen the hamstrings, which can help improve posture, reduce the risk of injury, and enhance workplace performance. This is an excellent stretch that replenishes nutrients and re-oxygenate the hamstrings muscles in the lower extremity. Perform this stretch to give your body a rest when performing activities that involve lifting, carrying, foot pedal use, prolonged standing, or prolonged walking.

Early Intervention Benefits of this Stretch

The seated hamstring stretch offers numerous early intervention health benefits that can improve your overall physical well-being.

Firstly, this stretch can increase flexibility and range of motion in the hamstrings. When you sit on the floor with your legs straight out in front of you and reach forward to touch your toes, you are lengthening and stretching the hamstring muscles. This can help to prevent injuries and improve your performance in physical activities that require a greater range of motion.

Additionally, the seated hamstring stretch can help to alleviate lower back pain. Tight hamstrings can contribute to lower back pain by placing extra stress on the lower back muscles. By stretching the hamstrings, you can relieve some of this tension and reduce the risk of developing lower back pain.

Moreover, the seated hamstring stretch can improve posture and balance. Tight hamstrings can cause an anterior pelvic tilt, which can result in poor posture and balance. By stretching the hamstrings regularly, you can correct this tilt and improve your posture and balance.

In conclusion, the seated hamstring stretch offers a range of health benefits, including increased flexibility and range of motion, relief from lower back pain, and improved posture and balance. By incorporating this stretch into your exercise routine, you can enhance your physical well-being and reduce the risk of injury.

These early intervention exercises are to improve health and fitness.
If you have an injury or illness, consult with a health care professional before attempting.

More Tools & Resources from Peak Ergonomics
Contact Us About Reducing Workplace Injuries
Healthy Employees are the Bottom Line! – Learn More!

Seated hamstring stretch is for activities that involve lifting, carrying, foot pedal use, prolonged standing, or prolonged walking.


Pull Apart: Straight & Bent Arm

Pull Apart: Straight & Bent Arm | Early Intervention Ergonomics

What is the Pull Apart: Straight & Bent Arm Stretch?

The Pull Apart: Straight & Bent Arm with a Band exercise is a resistance band exercise that primarily targets the muscles of the upper back, shoulders, and arms. It is a great exercise for improving posture, strengthening the shoulder girdle, and enhancing upper body stability.

Here’s how to perform the Pull Apart Straight & Bent Arm exercise:

  1. Start by standing with your feet shoulder-width apart and grasping a resistance band with both hands. Hold the band in front of you, keeping your palms facing downward and your arms extended straight out in front of your body.
  2. Maintain a slight bend in your elbows and engage your core for stability.
  3. Begin the exercise by simultaneously pulling the band apart with both hands, moving your arms out to the sides. Imagine squeezing your shoulder blades together as you do this, focusing on engaging the muscles of your upper back. Hold for 2-3 seconds, then relax.
  4. Another variation is to turn the band over with your palms facing up. Proceed with the stretch as instructed previous steps 1-3.
  5. Slowly return your arms back to the starting position, controlling the resistance of the band. Keep tension on the band throughout the movement.
  6. For the Bent Arm Variation,  start with palms up and hands a little closer together. Keep your elbows tight against your side.  Set your shoulder blades back again, then pull your hands apart keeping those elbows tight against your side.
  7. Repeat the exercise for 10-15 repetitions.

It’s important to maintain proper form throughout the exercise. Avoid shrugging your shoulders or letting your back excessively arch. Focus on using the targeted muscles to perform the movement.

As with any exercise, it’s recommended to start with lighter resistance bands and gradually increase the tension as your strength improves. If you’re unsure about performing this exercise or have any specific concerns, it’s always a good idea to consult with a fitness professional for guidance.

Early Intervention Benefits of this Exercise

The Pull Apart Straight Arm & Bent Arm with a Band exercise offers several early intervention benefits for the muscles targeted and overall upper body strength and stability. Here are some of the key benefits:

  • Upper back and shoulder strengthening: The exercise primarily targets the muscles of the upper back, including the rhomboids, rear deltoids, and middle trapezius. It helps to strengthen these muscles, improving posture, and promoting better upper body alignment.
  • Shoulder stability: By engaging the muscles around the shoulder girdle, including the rotator cuff muscles, the exercise enhances shoulder stability. This can be particularly beneficial for individuals involved in work activities that require overhead movements.
  • Improved posture: The exercise helps counteract the effects of rounded shoulders and forward head posture, which are common issues due to modern lifestyle factors like prolonged sitting and desk work. Strengthening the upper back muscles can promote better posture and alignment.
  • Shoulder joint mobility: Performing the exercise with a resistance band requires a controlled range of motion, which can contribute to maintaining and improving shoulder joint mobility. It helps to prevent stiffness and enhance overall shoulder flexibility.
  • Versatility and accessibility: The exercise can be performed with a resistance band, which is a portable and affordable piece of equipment. It allows for a wide range of resistance levels, making it suitable for people of different fitness levels and abilities.
  • Injury prevention: Strengthening the upper back and shoulder muscles can serve as a preventive measure against common injuries, such as shoulder impingement and postural imbalances. The exercise can also be used as part of a rehabilitation program for certain shoulder and upper back conditions.

Remember, consistency and proper form are key when performing any exercise. Gradually increasing resistance as you build strength and seeking guidance from a fitness professional can help you maximize the benefits of this exercise while minimizing the risk of injury.

If you have an injury or illness, consult with a health care professional before attempting.

These early intervention exercises are vital to improve overall health and fitness as well as reduce work-related injuries.

More Tools & Resources from Peak Ergonomics
Contact Us About Reducing Workplace Injuries
Healthy Employees are the Bottom Line! – Learn More!

Pull Apart: Straight & Bent Arm is a preventive measure against common injuries, such as shoulder impingement and postural imbalances.


Active Extensor Tendon Stretch

Active Extensor Tendon Stretch | Early Intervention Ergonomics

What is the Active Extensor Tendon Stretch?

The Active Extensor Tendon Stretch is an excellent stretch to replenish nutrients and re-oxygenate the distal upper extremity. This composite stretch originates at the common wrist extensor tendon of the lateral epicondyle and pulls all the way down to the extensor hood mechanism of the fingers. Perform this stretch to give your body rest when performing forceful gripping, repetitive gripping, awkward or sustained postures of the elbow, forearm, wrist, and hand to prevent common disorders such as tennis elbow, tendinitis, tendinosis, and muscle strain.

This stretch is a type of exercise that targets the extensor muscles in the arms and hands. These muscles are responsible for opening the hand and extending the wrist.

Here’s how to perform an active extensor tendon stretch:

  1. Sit or stand with good posture, with your arms at your sides and your palms facing inwards.
  2. Slowly raise your arms out to the side, keeping them straight, until they are level with your shoulders.
  3. Turn your palms to face the floor, and then slowly extend your wrists so that your fingers point upwards.
  4. Hold this position for a few seconds, feeling the stretch in your forearms and hands.
  5. Slowly lower your arms back down to your sides, and then repeat the exercise for several repetitions.

It’s important to perform this exercise slowly and carefully, without over-stretching the muscles. Stop if you feel any pain or discomfort, and don’t force the stretch beyond your limits. You can perform this exercise as part of a warm-up routine before engaging in any activities that require hand and wrist movement, such as sports or typing.

Early Intervention Benefits of this Stretch

Firstly, the Active Extensor Tendon Stretch can help improve grip strength. By stretching the extensor tendons, you can increase the strength of your grip. Additionally, this exercise can reduce the risk of injuries such as tennis elbow and golfer’s elbow, which can be caused by tight extensor tendons.

Moreover, regular practice of the this stretch can increase your range of motion in your wrist and fingers. This benefit is especially useful for athletes and manual laborers. Lastly, if you experience pain in your forearm or wrist, this exercise can help alleviate the pain by loosening tight muscles and tendons.

Overall, the Active Extensor Tendon Stretch is a simple but powerful exercise that can have a significant impact on your forearm, wrist, and hand health.

These early intervention exercises are to improve health and fitness.
It is important to note, if you have an injury or illness, consult with a health care professional before attempting.

Resources

More Tools & Resources from Peak Ergonomics
Contact Us About Reducing Workplace Injuries
Healthy Employees are the Bottom Line! – Learn More!

Active Extensor Tendon Stretch can reduce the risk of injuries such as tennis elbow and golfer's elbow, which can be caused by tight extensor tendons.


Side Plank

Side Plank Exercise for a Healthy Spine & Core

What is the Side Plank?

The side plank is an effective variation of the plank exercise that specifically targets the obliques, hips, and shoulders. To start, lie on your side with your legs extended and stacked. Then, use your forearm to prop yourself up, ensuring that your elbow is aligned with your shoulder. Engage your core muscles and lift your hips off the ground to create a straight line from your head to your heels. Hold this position for 30 seconds to 1 minute before switching sides.

By adding variations to the side plank such as lifting a leg, lifting an arm, or incorporating hip dips or rotations, you can engage different muscles and increase the challenge. The side plank is a core-strengthening exercise that can enhance your balance, stability, and alleviate lower back pain.

What are the Early Intervention Benefits?

This exercise provides numerous early intervention benefits for the body, making it an ideal addition to any fitness routine. By specifically targeting the obliques, hips, and shoulders, it can help to tone and strengthen these areas. This exercise also improves core stability and balance, making it a great way to prevent lower back pain and injury.

In addition, this exercise offers versatility by allowing you to perform variations such as lifting a leg, lifting an arm, or incorporating hip dips or rotations. These modifications can help to engage different muscle groups and increase the challenge level.

Overall, the side plank is an effective and accessible exercise that offers significant benefits for your body. By incorporating it into your routine, you can improve your core strength, balance, and stability while reducing the risk of injury.

These exercises are to improve health and fitness.
If you have an injury or illness, consult with a health care professional before attempting.

More Tools & Resources from Peak Ergonomics
Contact Us About Reducing Workplace Injuries
Healthy Employees are the Bottom Line!

The side plank can improve your core strength, balance, and stability while reducing the risk of injury.


Wide Stance Power Lift

Wide Stance Power Lift

What is the Wide Stance Power Lift?

The wide stance powerlift refers to a style of lifting where the lifter positions their feet wider apart than shoulder-width, with toes pointing outwards. This wider stance helps to engage the hips, glutes, and hamstrings more effectively, allowing for safe lifting of heavy objects. The wide stance can be used as an effective training technique to improve overall strength and power.

Early Intervention Benefits of this Lifting Technique

  • Reduced stress on the lower back: By engaging the hips, glutes, and hamstrings more effectively, the wide stance powerlift can help reduce stress on the lower back during lifting, making it a safer option for people with a history of lower back pain or injury.
  • Increased muscle activation: The wider stance helps to activate more muscle fibers, especially in the glutes and hamstrings, which can help to improve overall lower body strength and power.
  • Improved joint stability: The wide stance powerlift requires strong hip and knee stability, which can help to improve joint health and reduce the risk of injury.
  • Better posture and alignment: Performing the wide stance powerlift with proper technique can help to improve posture and alignment, reducing the risk of strain or injury to the neck, shoulders, and upper back.
  • Increased bone density: The high levels of force and stress placed on the bones during the wide stance powerlift can help to improve bone density, reducing the risk of osteoporosis and other bone-related conditions.

It’s important to note that the wide stance powerlift, like any exercise, can be risky if performed improperly. It’s essential to use proper technique, appropriate weight loads, and gradually progress to more challenging weights to minimize the risk of injury.

Things to Remember

It’s important to note that while these exercises can be beneficial, it’s crucial to perform them with proper form and within your pain-free range of motion. If you have any underlying back or hip conditions, it’s advisable to consult with a healthcare professional or a physical therapist before incorporating these exercises into your routine.

If you experience any pain or discomfort during the exercise or have specific concerns, it’s advisable to consult with a healthcare professional for guidance tailored to your individual needs.

These early intervention exercises are to improve overall health & fitness as well as help reduce work-related injuries.

If you have an injury or illness, consult with a health care professional before attempting.

Contact us for more information on how we can help your employees stay safe. Healthy Employees ARE the Bottom Line!

More Tools & Resources from Peak Ergonomics
Contact Us About Reducing Workplace Injuries
Healthy Employees are the Bottom Line! – Learn More!

Wide Stance Power Lift for safely lifting heavy objects.


Dead Bug Exercise

Dead Bug Exercise  |  Early Intervention Ergonomics

What is the Dead Bug Exercise?

The Dead Bug Exercise is a popular core exercise that targets the muscles of the abdominal area and lower back. Furthermore, it is commonly used in fitness training, physical therapy, and rehabilitation programs. Interestingly, the exercise gets its name from the way it resembles a dead bug lying on its back with its legs and arms in the air.

Here’s how to perform the Dead Bug Exercise:

  1. Start by lying flat on your back on a mat or the floor. Bend your knees and lift your legs so that your thighs are perpendicular to the floor. Your lower legs should be parallel to the floor, creating a 90-degree angle at the knees.
  2. Raise your arms straight up toward the ceiling, extending them directly above your shoulders. Additionally, ensure that your palms are facing each other.
  3. Brace your core muscles by drawing your belly button in toward your spine. This will help stabilize your spine throughout the exercise.
  4. Begin the movement by simultaneously extending your right leg forward and lowering your left arm overhead until they are a few inches above the floor. Keep your lower back pressed into the floor throughout the movement to maintain stability.
  5. Return your leg and arm back to the starting position and repeat the movement on the opposite side, extending your left leg and lowering your right arm.
  6. Continue alternating sides in a controlled manner, maintaining proper form and alignment. Exhale as you extend your leg and arm, and inhale as you return to the starting position.

This exercise helps to strengthen the deep core muscles, improve stability, and promote better posture. It can be modified to suit different fitness levels by adjusting the range of motion or adding resistance, such as holding a stability ball or using resistance bands.

Early Intervention Benefits

The Dead Bug Exercise offers several early intervention benefits. Here are some of them:

  • Core Strengthening: The Dead Bug Exercise primarily targets the muscles of the core, including the rectus abdominis, transverse abdominis, and obliques. By engaging these muscles, it helps improve core strength and stability. A strong core is essential for maintaining proper posture, supporting the spine, and enhancing overall functional movement.
  • Spinal Stability: The exercise promotes spinal stability by challenging the muscles that surround and support the spine. It helps develop a strong and stable core, which can reduce the risk of back pain and injuries. By improving spinal stability, this exercise can also contribute to better posture and alignment.
  • Balance and Coordination: The alternating leg and arm movements in the Dead Bug Exercise require coordination and balance. Moreover, regularly practicing this exercise can enhance neuromuscular coordination, thereby helping you improve your balance and body control not only in the workplace but also in various other activities.
  • Injury Prevention: The Dead Bug Exercise can help prevent injuries by strengthening the core and improving stability. Moreover, a strong core provides a solid foundation for movements, thereby reducing the risk of excessive strain on the lower back. Additionally, it can help improve body mechanics and decrease the likelihood of overcompensation by other muscles, ultimately minimizing imbalances and potential injuries.
  • Rehabilitation and Posture Correction: The Dead Bug Exercise is commonly used in physical therapy and rehabilitation programs. It can be effective in rehabilitating and strengthening the core muscles after certain injuries or surgeries. Additionally, by targeting the muscles responsible for maintaining good posture, the exercise can assist in correcting postural imbalances and promoting a more aligned and stable body position.

Things to Remember

It’s important to perform the Dead Bug Exercise with control and avoid arching your back or allowing your lower back to lift off the floor. As always, consult with a qualified fitness professional or healthcare provider before starting any new exercise program.

Remember, while the Dead Bug Exercise offers numerous benefits, it’s important to perform it with proper form and technique to maximize its effectiveness and minimize the risk of injury. If you have any specific concerns or pre-existing conditions, consult with a qualified fitness professional or healthcare provider to ensure it’s suitable for you.

These early intervention exercises are to improve overall health & fitness as well as help reduce work-related injuries.

If you have an injury or illness, consult with a health care professional before attempting.

Contact us for more information on how we can help your employees stay safe.

Resources

More Tools & Resources from Peak Ergonomics
Contact Us About Reducing Workplace Injuries
Healthy Employees are the Bottom Line! – Learn More!

The Dead Bug Exercise can help prevent injuries by strengthening the core and improving stability. A strong core reduces lower back strain.


Supine Crunch Exercise

Supine Crunch Exercise for Healthy Back & Abs

What is a Supine Crunch?

A supine crunch is an effective core strengthening exercise that targets the rectus abdominis muscle group. This exercise is performed while lying on your back with your knees bent and your feet flat on the floor. The supine crunch involves lifting your upper back off the floor towards your knees while keeping your lower back in contact with the floor.

To perform a supine crunch, start by lying on your back with your knees bent and your feet flat on the floor. Place your hands behind your head and contract your abdominal muscles to lift your head and shoulders off the ground. Keep your elbows wide and pointing outwards to prevent your neck from straining.

Exhale as you lift your head and shoulders, and inhale as you lower them back to the starting position. Focus on engaging your abs and avoiding any jerky or sudden movements. Repeat for the desired number of repetitions.

Supine crunches are a great way to improve core strength and stability, which can help prevent back pain and improve posture. They are also a low-impact exercise that can be modified to suit your fitness level. Beginners can start with fewer repetitions and work up to more as they gain strength. Advanced exercisers can add weight or resistance to increase the challenge.

Note:  you can also do an oblique crunch by reaching the outside of the opposite side of one knee. Typically hold it for 2-3 seconds. Do the entire sequence on each side for 5 repetitions.

Early Intervention Benefits of this Exercise

The supine crunch exercise primarily targets the abdominal muscles. By performing it regularly, several early intervention health benefits can be offered, such as:

  1. Improved core strength. The supine crunch exercise engages the rectus abdominis, obliques, and other core muscles, leading to a stronger and more stable core.
  2. Increased flexibility. The exercise involves moving the upper and lower body simultaneously, which can improve flexibility and range of motion in the hips and lower back.
  3. Reduced risk of injury. A strong core can help stabilize the spine, reducing the risk of lower back pain and injury.
  4. Better posture. Strong core muscles help support the spine and improve posture, reducing the risk of neck and shoulder pain caused by poor posture.
  5. Improved athletic performance. A strong core is essential for most athletic activities. Furthermore, by incorporating supine crunches into a regular exercise routine, one can improve overall athletic performance.
  6. Weight loss and improved body composition. As a resistance exercise, the supine crunch can help build lean muscle mass in the abdominal area, which leads to improved body composition and weight loss over time.

While the supine crunch can be a beneficial exercise, it should be performed correctly to avoid injury. It’s recommended to consult with a qualified fitness professional to ensure proper form and technique.

These early intervention exercises are to improve health and fitness.
If you have an injury or illness, consult with a health care professional before attempting.

More Tools & Resources from Peak Ergonomics
Contact Us About Reducing Workplace Injuries
Healthy Employees are the Bottom Line! – Learn More!

Supine Crunch Exercise

Hamstring Stretch

Hamstring Stretch |  Early Intervention Ergonomics

What is the Hamstring Stretch?

The hamstring stretch is a popular exercise that targets the hamstring muscles, which are located at the back of the thigh. This stretch is performed in a standing position, making it convenient and accessible for people of all fitness levels. By incorporating this stretch into your routine, you can improve flexibility, reduce muscle tension, and potentially alleviate lower back pain.

This is an excellent stretch that replenishes nutrients and re-oxygenate the hamstring muscles in the lower extremity. Perform this stretch to give your body a rest when performing activities that involve lifting, carrying, foot pedal use, prolonged standing or prolonged walking.

To perform the hamstring stretch, follow these simple steps:

  1. Please use a chair or a countertop to maintain your balance.
  2. Begin by standing up straight with your feet hip-width apart.
  3. Take a step forward with your right foot, keeping both legs straight.
  4. Place your left hand on the chair for safety & stability.
  5. Slowly hinge forward at the hips, maintaining a flat back and keeping your chest lifted.
  6. Continue bending forward until you feel a gentle stretch in the back of your right thigh.
  7. Hold the stretch for 3-5 seconds and relax.
  8. Repeat the stretch on the other leg by stepping forward with your left foot.

Early Intervention Benefits

The hamstring stretch offers numerous early intervention benefits for your overall well-being and safety. By incorporating this stretch into your morning exercise routine, you can enjoy improved flexibility, reduced muscle tension, enhanced work performance, and potentially decreased risk of hamstring injuries. Stretching your hamstrings regularly can also help alleviate lower back pain, promote better posture, and increase blood flow to the muscles. Discover the advantages of this stretch and how it can contribute to your overall fitness goals and injury prevention strategies.

Things to Remember

Remember, it’s essential to perform the hamstring stretch safely and avoid bouncing or jerking movements, as this can lead to injury. Additionally, if you have any pre-existing conditions or concerns, consult with a healthcare professional before incorporating this stretch into your routine.

Incorporating this stretch into your exercise regimen can help enhance your overall flexibility and promote healthy muscle function. Add this stretch to your warm-up or cooldown routine for optimal results. Enjoy the benefits of improved hamstring flexibility and greater mobility in your daily activities!

These exercises are to improve overall health & fitness as well as reduce work-related injuries.
If you have an injury or illness, consult with a health care professional before attempting.

Contact us for more information on how we can help your employees stay safe.

More Tools & Resources from Peak Ergonomics
Contact Us About Reducing Workplace Injuries
Healthy Employees are the Bottom Line! – Learn More!

Safely improve your mobility, flexibility and prevent injuries with the hamstring stretch. Perform this stretch correctly for optimal results.


Hip Hinge

Hip Hinge Technique  |  Early Intervention Ergonomics

What is the Hip Hinge Technique?

The Hip Hinge Technique targets the hamstrings, glutes, and lower back. By incorporating this stretch into your routine, you can improve flexibility, mobility, and stability in the hip joint. Follow these steps to perform the Hip Hinge technique with a stick:

  1. Stand tall with feet shoulder-width apart, holding a stick against your back.
  2. Initiate the movement by hinging forward at the hips while maintaining a straight back and stick contact.
  3. Continue hinging until you feel a gentle stretch in your hamstrings.
  4. Hold the position briefly, focusing on core engagement and proper alignment.
  5. Return to the starting position by engaging your glutes and driving your hips forward.

Incorporating the Hip Hinge stretch with a stick can contribute to your overall fitness and flexibility goals. Remember to prioritize proper form and listen to your body’s limits. If you experience any discomfort, it’s advisable to consult a fitness professional or healthcare provider.

The video above illustrates a technique of maintaining a neutral spine when lifting an object from the floor.

Early Intervention Benefits

The hip hinge stretch with a stick offers numerous early intervention benefits for individuals looking to improve their flexibility, mobility, and overall fitness. Incorporating this exercise into your routine can provide the following advantages:

  • Increased flexibility: The hip hinge stretch targets the hamstrings, glutes, and lower back, helping to enhance the flexibility of these muscle groups. Improved flexibility can lead to better athletic performance and reduced risk of injuries.
  • Enhanced hip mobility: This stretch specifically focuses on the hip joint, promoting increased range of motion and mobility. Better hip mobility is crucial for activities like squatting, running, and performing various lower body movements.
  • Improved posture and spinal alignment: By maintaining a straight back and proper alignment during the hip hinge stretch, you can improve your posture and spinal alignment. This can alleviate tension in the lower back and contribute to better overall posture.
  • Core stabilization: The hip hinge stretch requires engaging the core muscles to maintain stability and proper form. Regular practice of this exercise can help strengthen the core, leading to improved stability and balance in daily activities and workouts.
  • Injury prevention: By improving flexibility, mobility, and core stability, the hip hinge stretch with a stick can help reduce the risk of injuries, particularly in the lower back, hips, and hamstrings. It can also help alleviate tightness and imbalances in these areas, which are common contributors to injuries.

These exercises are to improve overall health & fitness as well as reduce work-related injuries.
If you have an injury or illness, consult with a health care professional before attempting.  Contact us for more information on how we can help your employees stay safe.

More Tools & Resources from Peak Ergonomics
Contact Us About Reducing Workplace Injuries
Healthy Employees are the Bottom Line! – Learn More!

The Hip Hinge technique targets the hamstrings, glutes, and lower back. By incorporating this stretch into your routine, you can improve flexibility, mobility, and stability in the hip joint.


Frisbee Lift

Frisbee Lift  |  Early Intervention Ergonomics

What is the Frisbee Lift?

The Frisbee Lift is a safe way of picking up a frisbee from the ground using basic ergonomic principles.  What we DO NOT want to see is bending over with the frisbee way out in front of you.  This will put a lot of stress on your knees and cause your back to hurt.  With a proper Frisbee Lift, what you want to do is bring that frisbee closer to you within your base of support.  Next, you want to flip that frisbee up with your feet thereby decreasing how far you have to reach down.  Finally, you want to squat down and bridge on that leg to decrease the weight of the frisbee as you stand up again.  The video above does a great job of showing how to do an ergonomically safe lift of the frisbee.

Early Intervention Benefits

Using safe lifting techniques when lifting small objects from the ground offers several early intervention benefits, including:

  1. Injury Prevention: Safe lifting techniques help reduce the risk of injuries, particularly strains, sprains, and back injuries. Lifting objects improperly or using incorrect form can strain muscles, ligaments, and the spine. By following safe lifting practices, you can minimize the chances of these injuries occurring.
  2. Back Health: Proper lifting techniques promote good back health. Lifting heavy objects incorrectly or with poor form can put excessive stress on the spine, leading to back pain and potential long-term issues. Using safe lifting techniques ensures that your back is properly supported and aligned during the lifting process.
  3. Increased Strength and Endurance: Safe lifting techniques engage the appropriate muscles, allowing you to build strength and endurance over time. By utilizing your legs, core, and larger muscle groups instead of relying solely on your back, you distribute the workload and reduce strain on specific areas.
  4. Improved Posture: Following safe lifting practices promotes proper posture, both during the lift and throughout your daily activities. Maintaining a neutral spine alignment and using the correct muscle groups to lift objects trains your body to adopt better posture habits, reducing the risk of musculoskeletal issues in the long run.
  5. Enhanced Efficiency: Safe lifting techniques are not only about injury prevention but also efficiency. By utilizing your body’s biomechanics effectively, you can optimize your lifting capacity and minimize wasted effort or energy.
  6. Transferable Skills: The safe lifting techniques you learn for small objects can be applied to various lifting tasks in different contexts. Whether it’s moving furniture, carrying groceries, or handling other objects in your daily life, the principles of safe lifting remain consistent.

Things to Remember

Remember that these benefits apply not only to small objects but to lifting in general. Practicing safe lifting techniques is essential for overall physical well-being and minimizing the risk of acute or chronic injuries.

Remember, it’s always important to consider the specific requirements of the lifting task, seek assistance when needed, and listen to your body’s limits to ensure safe and effective lifting practices.

These lifting techniques are to help reduce work-related injuries, and to improve overall health & fitness.

Contact us today for more information on how we can help you reduce work-related injuries throughout your organization. Healthy Employees ARE the Bottom Line!

If you have an injury or illness, consult with a health care professional before attempting.  

More Tools & Resources from Peak Ergonomics
Contact Us About Reducing Workplace Injuries
Healthy Employees are the Bottom Line! – Learn More!

The Frisbee Lift technique will help prevent injuries by reducing the stress on your knees & prevent back pain by using your base of support.


Easy Nerve Glides

Easy Nerve Glides  |  Early Intervention Ergonomics

What are Easy Nerve Glides?

Nerve glides, also known as neural glides or nerve flossing, are exercises that help mobilize and stretch the nerves in the body. Nerve glides floss the median nerve in the carpal tunnel and promote healthy neural tension of the nervous system. This composite stretch originates at the nerve roots in the brachial plexus and pulls all the way down to the median nerve that passes through the carpal tunnel. Perform this stretch to give your body rest when performing forceful gripping, repetitive gripping, awkward or sustained postures of the elbow, forearm, wrist, and hand to prevent carpal tunnel syndrome. They can be beneficial for individuals experiencing nerve-related pain, tingling, or numbness.  Here is how to perform easy nerve glides:

  1. Starting with the right side, bend at the elbow and bend at the wrist like you are holding a baby.
  2. Next, slowly glide your arm out and up with your palm facing away as if you are stopping a car.
  3. Repeat again with “hold the baby” and “stop the car.”
  4. Each stretch should take 3-5 seconds
  5. Repeat on the left side.

Early Intervention Benefits

Performing nerve glides offers several early intervention benefits, including improved nerve mobility, reduced pain, enhanced circulation, and injury prevention.

Firstly, engaging in nerve glides helps improve nerve mobility. By gently moving and stretching the nerves, these exercises promote healthy nerve gliding, preventing them from becoming compressed or stuck. This improved mobility can alleviate symptoms such as pain, tingling, and numbness associated with nerve entrapment or irritation.

Moreover, nerve glides can help reduce pain. The controlled movements involved in nerve glide exercises can stimulate the release of endorphins, the body’s natural pain-relieving chemicals. Additionally, by promoting proper nerve function and reducing nerve compression, these exercises can alleviate discomfort caused by conditions like carpal tunnel syndrome, sciatica, or brachial plexopathy.

Furthermore, nerve glides contribute to enhanced circulation. As the nerves are gently stretched and mobilized, blood flow to the surrounding tissues increases. Improved circulation delivers essential nutrients and oxygen to the nerves, aiding in their healing and overall health.

In addition to the aforementioned benefits, performing nerve glides can also play a preventive role in injury management. By maintaining optimal nerve mobility, individuals are less prone to developing chronic nerve-related conditions or experiencing further injury. Regularly incorporating these exercises into a comprehensive rehabilitation or wellness routine can help safeguard against future nerve entrapments or injuries.

Things to Remember

Remember, it’s crucial to perform nerve glide exercises gently and within your comfort level. If you experience increased pain or discomfort during the exercises, it’s best to stop immediately and consult with a healthcare professional.

These stretching exercises are to improve overall health & fitness as well as reduce work-related injuries.
If you have an injury or illness, consult with a health care professional before attempting.

Contact us for more information on how we can help your employees stay safe. Healthy Employees ARE the Bottom Line!

More Tools & Resources from Peak Ergonomics
Contact Us About Reducing Workplace Injuries
Healthy Employees are the Bottom Line! – Learn More!

Easy Nerve Glides can benefit workers who experience nerve-related pain, tingling, or numbness by mobilizing and stretching the nerves.


Wrist/Forearm/Elbow Band Strengthening

Wrist/Forearm/Elbow Band Strengthening  |  Early Intervention Ergonomics

What are the Wrist/Forearm/Elbow Band Strengthening Exercises?

The wrist/forearm/elbow band strengthening exercises are also known as eccentric and concentric wrist extension exercises. They can be beneficial for strengthening the wrist extensor muscles and improving wrist stability. Here are examples of both types of exercises, both utilizing a therapy band:

Eccentric Wrist Extension Exercise:
  • Start by sitting in a chair or standing with your forearm supported on a table, palm facing downwards.
  • Wrap the therapy band around your hand, securing it around your fingers.
  • Begin with your wrist flexed (bent) and the band taut.
  • Slowly and gradually extend your wrist against the resistance of the band, moving your hand towards a neutral position (parallel to the floor).
  • Once you reach the neutral position, release the tension on the band and return to the starting position with your wrist flexed.
  • Repeat this movement for a specific number of repetitions, focusing on controlling the motion during the release phase.
Concentric Wrist Extension Exercise:
  • Assume the same starting position as the eccentric exercise, with your forearm supported and palm facing downwards.
  • Wrap the therapy band around your hand, securing it around your fingers.
  • Begin with your wrist in a flexed position.
  • In this exercise, you’ll be actively contracting the wrist extensor muscles to overcome the resistance of the band.
  • Extend your wrist against the resistance of the band, moving your hand towards a neutral position.
  • Hold the end position for a brief moment, focusing on the contraction of the wrist extensors.
  • Slowly release the tension on the band and return to the starting position with your wrist flexed.
  • Repeat this movement for a specific number of repetitions, maintaining control throughout the exercise.

Remember to start with a resistance level that is manageable for you and gradually increase it as your strength improves. If you have any pre-existing wrist conditions or injuries, it is advisable to consult with a healthcare professional or physical therapist before starting any new exercise program.

Early Intervention Benefits

Eccentric and concentric wrist extension exercises using a therapy band offer several early intervention health benefits and can help prevent injuries. Here are some of the key advantages:

Health Benefits
  1. Strengthening: These exercises target the wrist extensor muscles, such as the extensor carpi radialis brevis and longus, and the extensor digitorum. By strengthening these muscles, you can improve the overall stability and functionality of your wrists.
  2. Muscle Balance: Eccentric and concentric exercises help promote muscle balance between the wrist flexors (muscles responsible for bending the wrist) and extensors (muscles responsible for extending the wrist). Achieving a balanced muscle development can enhance joint stability and reduce the risk of imbalances or overuse injuries.
  3. Improved Grip Strength: Strong wrist extensor muscles contribute to better grip strength. This can be beneficial in various activities and sports that involve gripping objects, such as weightlifting, racket sports, and rock climbing.
Injury Prevention Benefits
  1. Reduced Risk of Wrist Injuries: Strengthening the wrist extensors can provide stability and support to the wrist joint, reducing the likelihood of wrist injuries like sprains and strains. Stronger muscles can better withstand external forces and provide better control during activities that stress the wrists.
  2. Overuse Injury Prevention: Repetitive activities or sports that involve excessive wrist flexion can lead to overuse injuries, such as tendinitis or carpal tunnel syndrome. By strengthening the wrist extensors through eccentric and concentric exercises, you can help prevent imbalances and excessive strain on the flexor muscles, reducing the risk of overuse injuries.
  3. Rehabilitation Support: Eccentric exercises, in particular, are commonly used in rehabilitation programs to aid in the recovery of various wrist injuries. They can help improve tendon health, promote tissue remodeling, and enhance overall wrist function.

Things to Remember

It’s important to note that while these exercises can be beneficial, it’s crucial to perform them with proper form and within your pain-free range of motion. If you have any underlying wrist conditions, it’s advisable to consult with a healthcare professional or a physical therapist before incorporating these exercises into your routine.

If you experience any pain or discomfort during the stretch or have specific concerns, it’s advisable to consult with a healthcare professional for guidance tailored to your individual needs.

These early intervention exercises are to improve overall health & fitness as well as help reduce work-related injuries.

If you have an injury or illness, consult with a health care professional before attempting.

Contact us for more information on how we can help your employees stay safe. Healthy Employees ARE the Bottom Line!

Resources

More Tools & Resources from Peak Ergonomics
Contact Us About Reducing Workplace Injuries
Healthy Employees are the Bottom Line! – Learn More!

Wrist/forearm/elbow band strengthening exercises can provide stability and support to the wrist joint, thus reducing work-related injuries.


Shoulder Stick Stretch

Shoulder Stick Stretch

What is the Shoulder Stick Stretch?

The shoulder stick stretch is an effective exercise for improving shoulder mobility and flexibility while relieving tension in the upper back and shoulders. To perform this stretch, you’ll need a long stick or dowel. Start by standing with your feet shoulder-width apart and holding the stick with an overhand grip, with your hands slightly wider than shoulder-width apart. Lift the stick overhead and behind your head, keeping your elbows straight. Slowly lower the stick down your back as far as you comfortably can, without allowing your elbows to bend or your lower back to arch. Hold the stretch for several seconds, then raise the stick back up overhead to the starting position. Repeat this stretch for several repetitions, being careful not to push yourself beyond your comfort level. If you experience any discomfort or pain, stop the exercise and consult a qualified fitness professional or healthcare provider.

Early Intervention Benefits of this Stretch

This stretch is a beneficial exercise that can help improve shoulder mobility, flexibility, and range of motion. This stretch specifically targets the shoulders and upper back muscles, helping to relieve tension and improve posture. The early intervention benefit of this exercise is that it can help reduce the risk of injury by improving shoulder mobility and flexibility. By performing this stretch regularly, you can help reduce tension in the shoulders and upper back muscles, which can help improve posture and reduce the risk of strain and injury. Additionally, the Shoulder Stick Stretch can help increase blood flow to the shoulders and upper back, promoting healing and reducing inflammation that can lead to injury. By incorporating the Shoulder Stick Stretch into your fitness routine, you can help prevent common shoulder injuries such as rotator cuff strain, impingement, and tendinitis.

This is an excellent stretch that replenishes nutrients and re-oxygenate the muscles of the shoulder complex. Perform this stretch to give your body a rest when performing activities that involve awkward postures of the shoulder such as reaching away from the body, hunching the shoulder, lifting or carrying.

These early intervention exercises are to improve health and fitness.
If you have an injury or illness, consult with a health care professional before attempting.

More Tools & Resources from Peak Ergonomics
Contact Us About Reducing Workplace Injuries
Healthy Employees are the Bottom Line!

The Shoulder Stick Stretch is an exercise that can help reduce the risk of injury by improving shoulder mobility and flexibility


Grip Putty

Grip Putty  |  Early Intervention Ergonomics

What is Grip Putty? How do I use it?

Grip putty is a malleable substance similar to clay or putty that can be squeezed, stretched, or molded to exercise the muscles in your hands and fingers. Also known as hand therapy putty, it is commonly used as a rehabilitation tool to improve hand strength and dexterity.

Here’s a simple grip putty exercise you can try:

  1. Start by warming up your hands with some light stretching exercises.
  2. Take a small amount of grip putty and roll it into a ball.
  3. Squeeze the grip putty ball as hard as you can, using all your fingers and thumb.
  4. Hold the squeeze for a few seconds and then release.
  5. Repeat the squeezing and releasing motion for a set of repetitions, gradually increasing the number as your hand strength improves.
  6. You can also try different variations such as pinching the putty between your fingers, rolling it into thin ropes, or using it to strengthen individual fingers.
  7. Perform these exercises regularly to improve grip strength and finger dexterity.

Early Intervention Benefits

Using grip putty as an exercise and rehabilitation tool offers several early intervention benefits. Its malleable nature allows for targeted hand and finger movements, promoting strength, flexibility, and dexterity. Incorporating these exercises into your morning routine can be beneficial for workers who perform activities involving forceful or repetitive gripping.

  • Improved Hand Strength: these exercises engage the muscles in your hands, fingers, and forearms, leading to enhanced grip strength. Regular use can strengthen these muscles, making daily activities that require a strong grip easier to perform.
  • Increased Finger Dexterity: Manipulating the grip putty challenges your finger coordination and control. Engaging in activities that require precise finger movements, such as playing a musical instrument or performing delicate tasks, can particularly benefit individuals.
  • Injury Prevention: grip putty is commonly used in hand therapy and rehabilitation settings to aid in the recovery of hand injuries or surgeries. It promotes circulation, reduces stiffness, and assists in regaining range of motion. Additionally, using it as a preventive measure can help reduce the risk of hand and wrist injuries by improving overall hand strength and flexibility.
  • Stress Relief: Engaging in these exercises can provide a therapeutic effect, serving as a stress-relieving activity. The repetitive squeezing and releasing motions can help relax the muscles and relieve tension in the hands and forearms. This makes it an excellent tool for individuals looking to unwind and alleviate stress.
  • Versatility and Convenience: Grip putty is a versatile tool that can be used virtually anywhere, making it highly convenient for individuals with busy schedules. It is portable and lightweight, allowing for on-the-go use, whether at home, in the office, or while traveling.

Things to Remember

Incorporating grip putty exercises into your routine offers a range of health benefits, including improved hand strength, increased finger dexterity, rehabilitation and injury prevention, stress relief, and convenient usability.

Remember to start with appropriate resistance levels and gradually increase the intensity as your hand strength and flexibility improve. If you have any underlying hand or wrist conditions, it’s advisable to consult a healthcare professional before starting grip putty exercises to ensure safety and proper guidance.

Remember, if you have any pre-existing hand or wrist conditions or if you experience pain during the exercises, it’s best to consult a healthcare professional before proceeding. They can provide you with specific recommendations and guidance based on your individual needs.

These early intervention exercises are to improve overall health & fitness as well as reduce work-related injuries.

If you have an injury or illness, consult with a health care professional before attempting.

Contact us for more information on how we can help your employees stay safe.

More Tools & Resources from Peak Ergonomics
Contact Us About Reducing Workplace Injuries
Healthy Employees are the Bottom Line! – Learn More!

Grip putty is a malleable substance similar to clay that can be squeezed, stretched, or molded to exercise muscles in your hands & fingers.