Hammer Exercise

Hammer Exercise  |  Early Intervention Ergonomics

What is the Hammer Exercise?

The wrist pronation and supination exercise with a hammer is a beneficial exercise that targets the muscles in your forearms. It involves using a hammer as a weight to perform controlled movements that rotate your wrist.

Here’s a step-by-step guide to performing the wrist pronation and supination exercise with a hammer:

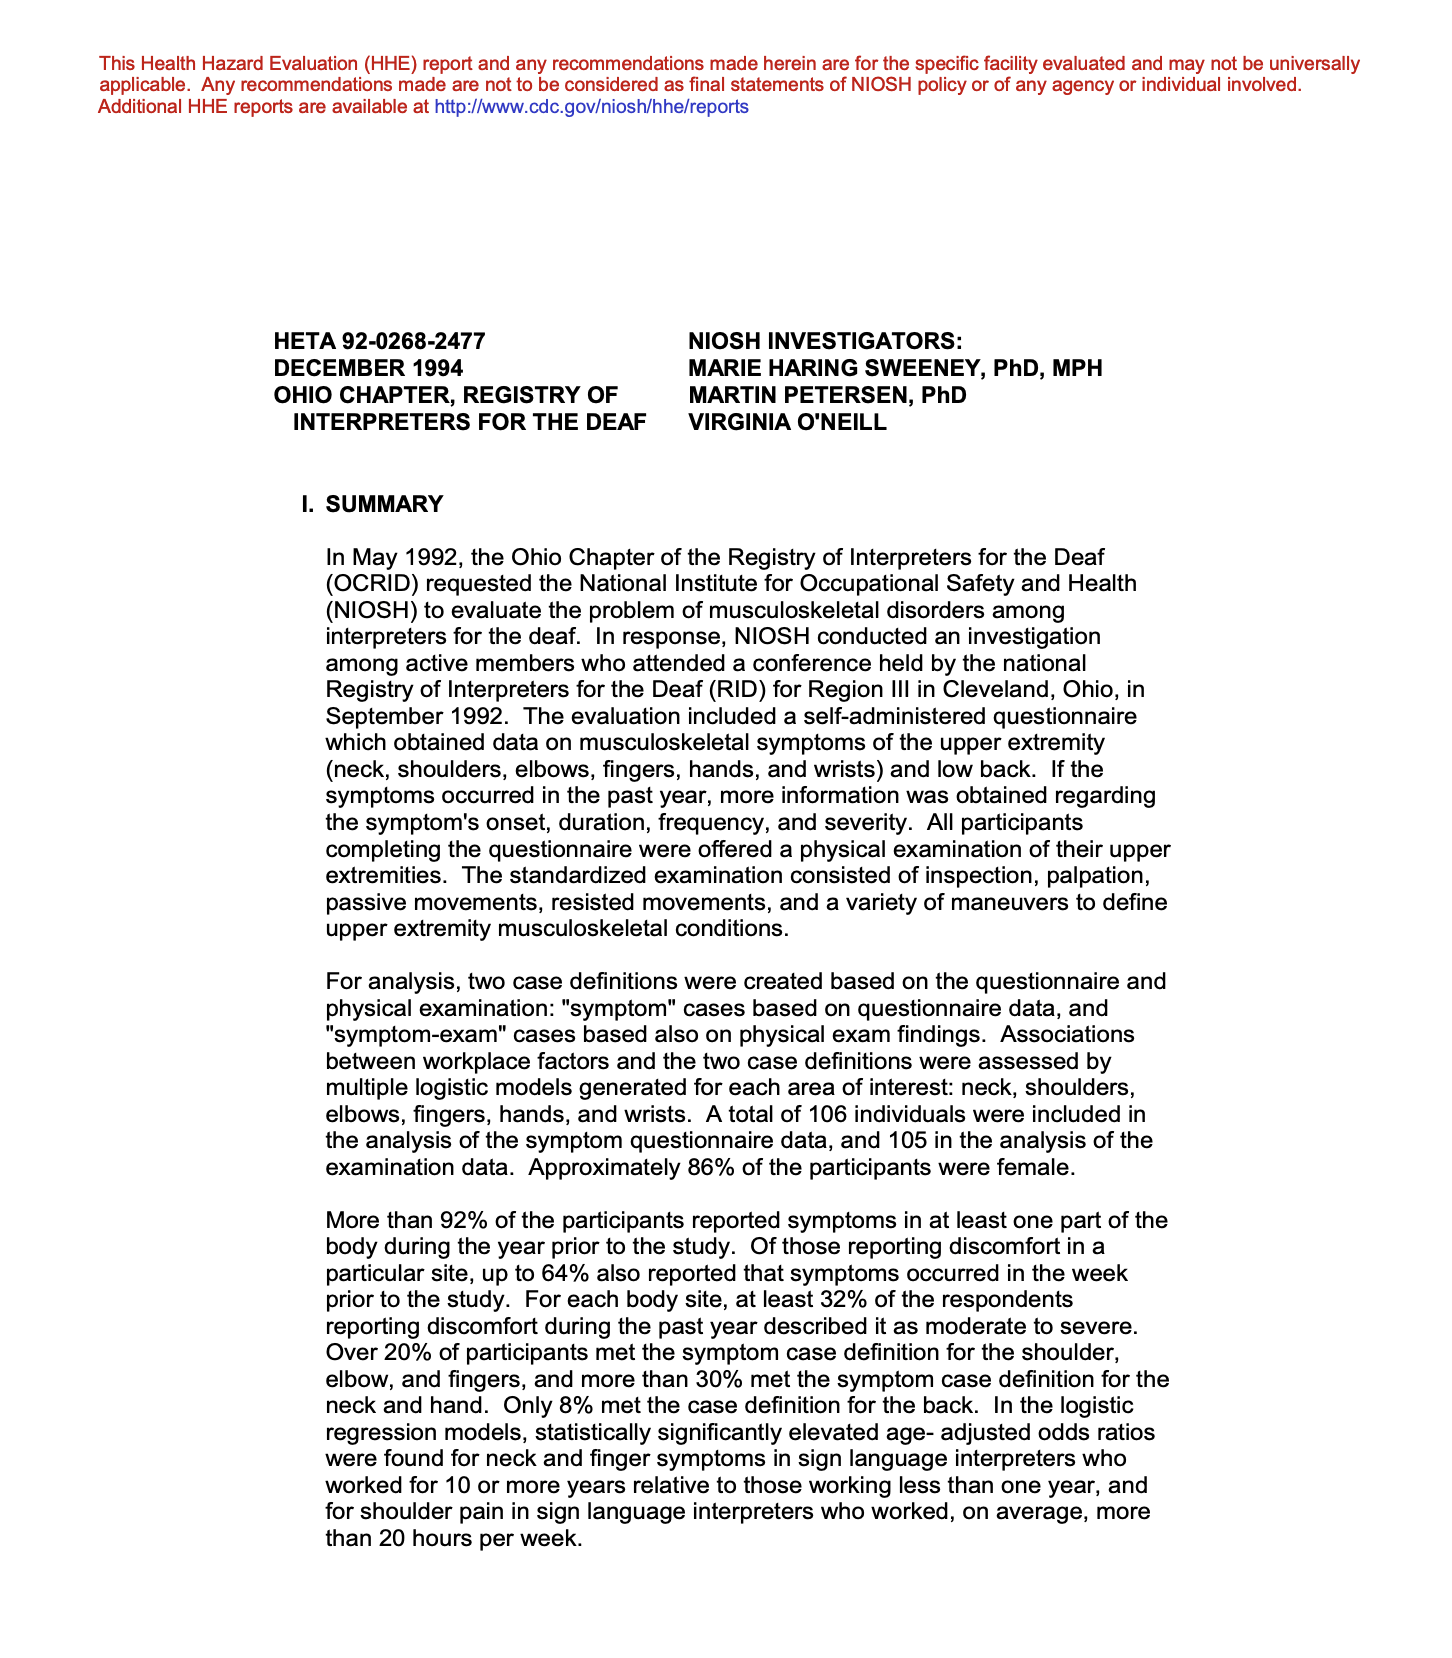
  1. Begin by sitting on a chair or standing upright with your arm extended in front of you, holding a hammer with an overhand grip. Your palm should be facing downward.
  2. Keep your forearm stable and slowly rotate your wrist to the left, allowing the hammerhead to point towards the floor. This movement is called pronation.
  3. Hold the pronated position for a moment, feeling the stretch in your forearm muscles.
  4. Return to the starting position and then rotate your wrist to the right, this time moving the hammerhead upwards. This movement is called supination.
  5. Hold the supinated position for a brief moment, focusing on the contraction in your forearm muscles.
  6. Repeat the pronation and supination movements for 10-30 repetitions on each side.

This exercise will help strengthen your forearm, wrist and hand for those work-related activities that involve forceful gripping or repetitive gripping of the forearm, wrist, or hand.

Early Intervention Benefits

The hammer exercise offers a wide range of early intervention benefits, including increased forearm and wrist strength, improved grip strength, enhanced wrist mobility, reduced risk of injuries, and better overall functionality in daily tasks. By regularly incorporating this exercise into your morning routine, you can promote injury prevention, reduce the likelihood of strains and sprains, and support optimal performance in workplace activities that involve forearm and wrist movements. This exercise contributes to well-rounded arm development while simultaneously providing the advantages of injury prevention and reduced risk of injuries.

Things to Remember

When performing this exercise, it’s essential to maintain control and avoid jerking or swinging the hammer. The motion should be smooth and deliberate, targeting the muscles in your forearm effectively.

Remember to start by gripping the hammer in the middle which allows you to maintain proper form with a safe amount of resistance. Then gradually increase the resistance by gripping further away from the center of the hammer as you become more comfortable and stronger. If you experience any pain or discomfort during the exercise, stop immediately and consult with a healthcare professional.

These exercises are to improve overall health & fitness as well as reduce work-related injuries.
If you have an injury or illness, consult with a health care professional before attempting.

Contact us for more information on how we can help your employees stay safe.

More Tools & Resources from Peak Ergonomics
Contact Us About Reducing Workplace Injuries
Healthy Employees are the Bottom Line! – Learn More!

The hammer exercise helps strengthen your forearm, wrist and hand for those work activities that involve forceful or repetitive gripping.


Health Hazard Evaluation Report

Click to Download

Lower Trunk Rotation Stretch

Lower Trunk Rotation Stretch  |  Early Intervention Ergonomics

What is the Lower Trunk Rotation with Supine IR Quadratus Stretch?

The Lower Trunk Rotation with Supine Internal Rotation (IR) Quadratus Stretch is an effective stretching exercise that specifically targets the muscles in the lower trunk and hips. This exercise is frequently employed in rehabilitation and sports training settings to improve mobility and flexibility in the hip and lower back regions. To perform this stretch, follow this step-by-step guide:

  • Begin by lying on your back in a supine position on a flat surface like a mat or a bed.
  • Extend both legs fully along the floor.
  • Bend your right knee and place your right foot flat on the floor, while keeping your left leg extended.
  • Extend your arms straight out to the sides, parallel to the floor.
  • Slowly and gently lower your right knee across your body towards the left side, while ensuring your shoulders and left foot stay in contact with the surface.
  • Maintain a relaxed and comfortable position, avoiding excessive twisting or strain in your lower back.
  • Hold the stretch for 15 to 30 seconds, experiencing a gentle stretch in the muscles of your lower back and hip.
  • Return your right knee to the starting position and repeat the stretch on the opposite side.

A Beneficial Addition to this Stretch

For an added benefit, you can incorporate supine internal rotation of the quadratus lumborum (QL) muscle:

  • After lowering your right knee towards the left side, keep your right foot in contact with the surface and internally rotate your right hip.
  • This movement will cause a slight rotation of your lower trunk, effectively targeting the quadratus lumborum muscle on the right side.
  • Hold the stretch with the internal rotation for 15 to 30 seconds.
  • Return your right knee to the starting position and repeat the stretch on the opposite side, incorporating internal rotation as well.

It’s crucial to note that if you have any pre-existing injuries or medical conditions, or if you feel pain or discomfort while performing this stretch, it is advisable to consult a qualified healthcare professional or physical therapist before attempting it. They can provide personalized guidance based on your specific needs, ensuring that you execute the exercise correctly and safely.

Early Intervention Benefits

The Lower Trunk Rotation with Supine Internal Rotation (IR) Quadratus Stretch offers several early intervention benefits. Here are some of the key advantages:

  • Improved lower back and hip flexibility: By regularly performing this stretch, you can effectively target the muscles in the lower trunk and hips, including the quadratus lumborum. This muscle plays a crucial role in the lateral flexion and rotation of the spine. As a result, you can experience an increase in flexibility and range of motion in these areas. This, in turn, reduces the risk of stiffness and facilitates improved movement patterns.
  • Enhanced spinal mobility: The rotational aspect of this stretch helps improve spinal mobility, particularly in the lower back region. It allows for greater rotation and movement between the vertebrae, which can contribute to a healthier and more functional spine.
  • Injury prevention: By increasing flexibility, range of motion, and spinal mobility, the Lower Trunk Rotation with Supine IR Quadratus Stretch can help prevent injuries, especially in the lower back, hips, and surrounding muscles. The tightness and limited mobility in these areas can have adverse effects, such as compensatory movements and excessive stress on other structures. As a result, this increases the vulnerability to strains, sprains, and various musculoskeletal issues. However, by regularly incorporating this stretch into your routine, you can effectively counteract these risks. This stretch helps in maintaining optimal mobility and thereby significantly reduces the likelihood of experiencing such injuries.
  • Core muscle activation and stability: During this stretch, your core muscles, including the abdominals and obliques, work to stabilize the pelvis and spine. By engaging these muscles, you can improve core strength and stability, which are crucial for maintaining proper posture and preventing excessive strain on the lower back.

Things to Remember

It is vital to perform this stretch with proper technique and actively avoid any movements or positions that induce pain or discomfort. Moreover, if you have any underlying medical conditions or concerns, it is highly recommended to consult with a healthcare professional or a qualified physical therapist. Their expertise can provide personalized guidance, ensuring the exercise is suitable for your specific needs and circumstances.

These early intervention exercises are to improve overall health & fitness as well as help reduce work-related injuries.
If you have an injury or illness, consult with a health care professional before attempting.

More Tools & Resources from Peak Ergonomics
Contact Us About Reducing Workplace Injuries
Healthy Employees are the Bottom Line! – Learn More!

The Lower Trunk Rotation Stretch can help prevent injuries by increasing flexibility, range of motion and spinal stability.


Seated Hip Rotator Stretch

Seated Hip Rotator Stretch – Early Intervention Ergonomics

What is the Seated Hip Rotator Stretch?

The seated hip rotator stretch is a highly effective stretching exercise that can help increase flexibility and mobility in your hip joints. To perform this stretch, start by sitting on a sturdy chair. Cross your right leg over your left, placing your ankle on your left knee. Grab the right knee with both hands and pull it gently towards your left shoulder. Hold for 3-5 seconds and repeat on the opposite side. Perform this stretch to give your body a rest when performing activities that involve lifting, carrying, foot pedal use, prolonged standing, prolonged sitting or prolonged walking. This stretch is particularly useful for individuals who spend extended periods of time sitting, as it can help alleviate stiffness and tension in the hips.

Early Intervention Benefits of this Stretch

The seated hip rotator stretch is an excellent early intervention exercise that can help strengthen the hip muscles thus improving stability and preventing injuries in the hips, knees, and ankles. Strong hip muscles can also reduce knee pain and lower back pain. Stretches can help to improve hip flexibility and range of motion.
In addition to the benefits mentioned above, studies have found that greater hip external rotator strength allows better dynamic control and hip function upon landing.

Insufficient hip internal rotation can lead to gait issues. When other parts of the lower body compensate for insufficient hip internal rotation, it might increase your risk of an injury. Some hip internal rotation exercises and stretches can put pressure on your knees. If you feel pain in your knee at any time, you should stop immediately.

If you have an injury or illness, consult with a health care professional before attempting.

These early intervention exercises are to improve overall health and fitness.

More Tools & Resources from Peak Ergonomics
Contact Us About Reducing Workplace Injuries
Healthy Employees are the Bottom Line! – Learn More!

Seated hip rotator stretch is for those who spend extended periods of time sitting, as it can alleviate stiffness and tension in the hips.


Wall Squat

Wall Squat  |  Early Intervention Ergonomics

What is the Wall Squat?

This exercise promotes strength for the hips and knees. Wall squats are an effective exercise for building strength in your glutes, hamstrings, and quadriceps—especially your inner thighs. In addition to the legs, wall squats also activate your abdominal muscles to help build core strength. They help build muscular endurance as well since they are an isometric exercise, meaning the body remains in a static position throughout the workout. Wall squats are also a convenient home workout.

To perform a wall squat, you stand with your back against a wall, feet shoulder-width apart, and slide your back down the wall until your thighs are parallel to the floor. Your knees should be bent at a 90-degree angle, and your back should be flat against the wall. You hold this position for a set amount of time or until your muscles fatigue. This exercise is a great way to build lower body strength and endurance.

Early Intervention Benefits

Wall squats have several benefits, including:

  • Strengthening of the leg muscles: Wall squats are an effective way to strengthen the muscles in your legs, including your quadriceps, hamstrings, and glutes. These muscles are essential for activities like walking, running, and jumping.
  • Improved posture: Wall squats help to improve your posture by engaging the muscles in your back and core. By keeping your back flat against the wall and maintaining proper alignment, you can help to prevent back pain and improve your overall posture.
  • Increased joint mobility: Squats can help to increase the mobility of your hip, knee, and ankle joints. This increased mobility can help to reduce the risk of injury and improve your overall range of motion.
  • Enhanced balance and stability: Wall squats require you to maintain your balance and stability, which can help to improve your overall balance and stability. This can be particularly beneficial for older adults, as it can help to reduce the risk of falls.
  • Improved bone density: Weight-bearing exercises like wall squats can help to improve bone density, which can reduce the risk of osteoporosis and other bone-related conditions.

Overall, wall squats are a great exercise for improving lower body strength, balance, and stability, and can provide several important health benefits.

Things to Remember

It’s important to note that while these exercises can be beneficial, it’s crucial to perform them with proper form and within your pain-free range of motion. If you have any underlying back, knee or hip conditions, it’s advisable to consult with a healthcare professional or a physical therapist before incorporating these exercises into your routine.

If you experience any pain or discomfort during the exercise or have specific concerns, it’s advisable to consult with a healthcare professional for guidance tailored to your individual needs.

These early intervention exercises are to improve overall health & fitness as well as help reduce work-related injuries.

If you have an injury or illness, consult with a health care professional before attempting.

Contact us for more information on how we can help your employees stay safe.

Healthy Employees ARE the Bottom Line!

More Tools & Resources from Peak Ergonomics
Contact Us About Reducing Workplace Injuries
Healthy Employees are the Bottom Line! – Learn More!

Wall squats are an effective way to strengthen the muscles in your legs, including your quadriceps, hamstrings, and glutes. These muscles are essential for activities like walking, running, and jumping.


Active Neck Stretch

Active Neck Stretch | Early Intervention Ergonomics

What is the Active Neck Stretch?

The active neck stretch is a beneficial exercise that helps relieve tension and improve flexibility in the neck muscles. It involves gentle movements that target the muscles in the neck and upper back, promoting relaxation and reducing stiffness. Incorporating the active neck stretch into your routine can be particularly helpful if you spend long hours sitting at a desk or engaging in work-related activities that strain the neck.

This is an excellent stretch to replenish nutrients and re-oxygenate the structures of the neck and shoulder complex. Perform the active neck stretch to give your body a rest when performing activities that involve awkward postures of the neck, such as looking down, looking up, twisting the neck, or hunching the shoulders.

To perform the active neck stretch, follow these simple steps:

  1. Stand comfortably, ensuring good posture with your shoulders relaxed and down.
  2. Start by placing your right hand on your left shoulder. Use that right hand to keep your left shoulder from elevating as you do this stretch.
  3. Gently tilt your head to the right and hold for 3 seconds.
  4. From there you need to turn your head and look down to the outside of your right foot. Hold for 3 seconds.
  5. Finally turn your head and look up and over your left shoulder. Hold for 3 seconds then relax.
  6. Repeat steps 1-5 using your left hand on your right shoulder.

Remember to perform the active neck stretch in a controlled and gradual manner, avoiding any sudden or forceful movements. If you experience pain or discomfort during the stretch, stop immediately and consult a healthcare professional.

Early Intervention Benefits

The active neck stretch offers numerous early intervention health benefits and plays a crucial role in reducing workplace injuries. By incorporating this exercise into your daily routine, you can experience the following advantages:

  • Improved Flexibility: The active neck stretch targets the muscles in the neck and upper back, helping to enhance flexibility and range of motion. Increased flexibility can contribute to better posture and reduced muscle stiffness.
  • Tension Relief: Regularly performing the active neck stretch helps alleviate tension and tightness in the neck muscles, which commonly occur due to prolonged sitting, stress, or poor posture. It promotes relaxation and can provide relief from discomfort caused by muscle tension.
  • Reduced Neck Pain: Neck pain is a common issue caused by factors such as muscle strain, poor ergonomics, or repetitive activities. The active neck stretch helps to alleviate and prevent neck pain by improving blood circulation, reducing muscle imbalances, and releasing built-up tension.
  • Enhanced Posture: Poor posture is a leading cause of neck and back pain. This stretch aids in correcting posture by strengthening the neck and upper back muscles. It encourages proper alignment of the spine and promotes an upright posture, reducing the risk of developing chronic pain or injuries.
  • Injury Prevention: Engaging in regular active neck stretches can help prevent injuries related to the neck and upper back. By increasing the flexibility and strength of the neck muscles, you can minimize the risk of strains, sprains, and other soft tissue injuries.
  • Stress Reduction: This stretch involves slow and controlled movements combined with deep breathing, which can have a calming effect on the mind and body. It helps reduce stress and tension, promoting overall well-being.

Important Things to Remember

Incorporating this stretch into your daily routine can help improve neck mobility, reduce muscle tension, and enhance overall neck health. If you have specific concerns or persistent neck pain, it’s recommended to consult with a qualified healthcare provider for an accurate diagnosis and appropriate treatment.

If you experience any pain or discomfort during the stretch or have specific concerns, it’s advisable to consult with a healthcare professional for guidance tailored to your individual needs.

These early intervention exercises are to improve overall health & fitness as well as help reduce work-related injuries.

If you have an injury or illness, consult with a health care professional before attempting.

Contact us for more information on how we can help your employees stay safe. Healthy Employees ARE the Bottom Line!

Resources

More Tools & Resources from Peak Ergonomics
Contact Us About Reducing Workplace Injuries
Healthy Employees are the Bottom Line! – Learn More!

Perform the active neck stretch to give your body a rest when performing activities that involve awkward postures of the neck, such as looking down, looking up, twisting the neck, or hunching the shoulders.


Tennis Elbow: Isometric

Tennis Elbow Isometric  |  Early Intervention Ergonomics

What Exactly is Tennis Elbow?

Tennis elbow, also known as lateral epicondylitis, is a painful condition that affects the outer part of the elbow. It is commonly caused by repetitive motion of the wrist and arm. This can lead to small tears in the tendons that attach to the lateral epicondyle (the bony bump on the outer part of the elbow).

Some common causes of tennis elbow include:

  1. Overuse: Activities that involve repetitive motion of the wrist and arm. Typing on a computer or using hand tools can cause small tears in the tendons over time.
  2. Improper technique: Poor technique while performing manual labor can put extra stress on the elbow joint and lead to injury.
  3. Age: As people age, the tendons in their arms become less flexible and more prone to injury.
  4. Genetics: Some people may be genetically predisposed to developing tennis elbow.
  5. Injury: A direct blow to the elbow or sudden forceful movement can also cause this condition.
  6. Medical conditions: Certain medical conditions, such as rheumatoid arthritis, can also increase the risk of developing tennis elbow.

Overall, this condition is caused by repetitive stress on the tendons that attach to the lateral epicondyle, leading to microtears and inflammation. By identifying the cause of the injury, individuals can take steps to prevent future occurrences and manage their symptoms effectively.

Early Intervention Benefits of Isometric Exercise

Tennis elbow isometric exercises can provide several early intervention health benefits, including:

  1. Strengthening: Isometric exercises are static exercises that involve holding a muscle in a contracted position without movement. These exercises can help to strengthen the muscles around the elbow joint, which can improve the overall stability of the joint.
  2. Pain relief: Isometric exercises can help to reduce pain and inflammation associated with tennis elbow by increasing blood flow to the affected area and promoting the release of endorphins, the body’s natural painkillers.
  3. Improved range of motion: Isometric exercises can help to improve the range of motion in the elbow joint by increasing the flexibility of the muscles and tendons around the joint.
  4. Prevention of future injuries: Strengthening the muscles around the elbow joint through isometric exercises can help to prevent future injuries and reduce the risk of re-injury.

Overall, incorporating isometric exercises into a tennis elbow rehabilitation program can be an effective way to improve strength, reduce pain, improve range of motion, and prevent future injuries. However, it is important to consult with a healthcare professional before starting any exercise program to ensure that it is safe and appropriate for your individual needs.

These early intervention exercises are to improve health and fitness.
If you have an injury or illness, consult with a health care professional before attempting.

More Tools & Resources from Peak Ergonomics
Contact Us About Reducing Workplace Injuries
Healthy Employees are the Bottom Line! – Learn More!

Tennis Elbow Isometric Exercise - Strengthening the muscles around the elbow joint through isometric exercises can help to prevent future injuries and reduce the risk of re-injury


Evaluation of Carpal Tunnel Syndrome and Other Musculoskeletal Disorders among Employees at a Poultry Processing Plant

Click to Download

Dead Bug with Band

Dead Bug with Band  |  Early Intervention Ergonomics

What is the Dead Bug with Band Exercise?

The dead bug with band exercise is beneficial for core stability and strength, as well as improving coordination and balance. The resistance band adds an extra challenge by providing tension that you must work against. It also helps engage the muscles of the upper body while performing the exercise.

To perform the dead bug with a band exercise, you will need an exercise resistance band like a therapy band.                            Here’s how to do it:

  1. Start by lying on your back on an exercise mat or the floor. Bend your knees and bring them up so that your thighs are perpendicular to the floor. Your lower legs should be parallel to the floor, with your calves parallel to the ceiling.
  2. Hold the exercise resistance band with both hands, and wrap it around a solid stable surface. This creates tension in the band.
  3. Begin the exercise by engaging the latissimus dorsi muscle by pulling the band down to where your hands and arms are perpendicular to the floor (see video above) so that you feel that your abs are nice and tight.
  4. Bring one knee up then the other knee up. Keep them both bent. This is the beginning position of the exercise.
  5. Keeping everything tight and engaged, slowly bring one heel down and touch the floor and then back up.
  6. Repeat the movement on the opposite heel.  Do both sides for the desired amount of repetitions.
  7. As your muscles grow stronger, you can straighten out your leg a little more when touching the heel to the floor.

Early Intervention Benefits

The dead bug with band exercise offers numerous early intervention benefits. By incorporating this exercise into your routine, you can enhance core strength, improve stability, and promote overall body coordination and balance. Let’s delve into the specific advantages of this exercise:

  1. Core Strengthening: The dead bug with band targets the muscles of your core, including the abdominal muscles, lower back, and hip flexors. Strengthening these muscles can help improve posture, stabilize the spine, and enhance overall functional strength.
  2. Injury Prevention: A strong core plays a crucial role in injury prevention. By strengthening the muscles around your spine and pelvis, this exercise can help reduce the risk of back pain and injuries. It also improves the stability of your hips, which can contribute to better movement mechanics and lower the likelihood of hip-related issues.
  3. Improved Stability and Balance: The dead bug exercise challenges your core stability and requires coordination between the upper and lower body. By practicing this exercise regularly, you can enhance your body’s ability to stabilize and maintain balance, reducing the risk of falls or injuries during your daily work activities.
  4. Enhanced Performance: The dead bug with band exercise is beneficial for athletes and fitness enthusiasts. It helps improve overall body control, stability, and coordination, which can translate into better performance in various work activities.
  5. Increased Body Awareness: Performing the dead bug exercise requires conscious engagement of specific muscle groups. This increased body awareness can carry over into your daily life, helping you maintain proper posture, move efficiently, and make conscious choices about body alignment and positioning during other exercises or work activities.

Things to Remember

As with any exercise, it’s essential to maintain proper form and start with a resistance level that is appropriate for your fitness level. If you’re new to this exercise, you may want to begin without the resistance band and gradually incorporate it as you become more comfortable and stronger. Be sure to maintain proper form throughout the entire exercise. As with any exercise, consult with a qualified fitness professional if you have any underlying health conditions or concerns. 

These early intervention exercises are to improve overall health & fitness as well as help reduce work-related injuries. If you have an injury or illness, consult with a health care professional before attempting.

Contact us for more information on how we can help your employees stay safe.

Resources

More Tools & Resources from Peak Ergonomics
Contact Us About Reducing Workplace Injuries
Healthy Employees are the Bottom Line! – Learn More!

By strengthening the muscles around your spine and pelvis, the dead bug with band exercise can help reduce the risk of back pain and injuries.


Side Lying Thoracic Rotation

Side Lying Thoracic Rotation & Overhead Sweep

What is the Side Lying Thoracic Rotation exercise?

The Side Lying Thoracic Rotation is an effective exercise for targeting the thoracic spine, shoulders, and hips. To perform this exercise, lie on your side with your bottom arm extended in front of you and your top arm resting on your hip. Bend your knees at a 90-degree angle and keep your feet together on the ground. Slowly rotate your top arm towards the ceiling while lifting your top knee towards the ceiling, all while keeping your eyes on your hand. Hold the stretch for a few seconds, then slowly lower your arm and leg to the starting position. Repeat the exercise on the other side. This low-impact exercise is ideal for improving thoracic mobility, increasing shoulder range of motion, and reducing the risk of upper body injury. You can modify this exercise to suit all fitness levels with regular practice.

Early Intervention Benefits of this Exercise

The Side Lying Thoracic Rotation exercise offers numerous early intervention health benefits, making it an excellent addition to any exercise routine. It specifically targets the thoracic spine, improving its flexibility and mobility, while also increasing shoulder range of motion and hip mobility. Additionally, this exercise strengthens and stabilizes the upper body muscles, reducing the risk of injuries to the shoulders, back, and neck. By regularly practicing this exercise, you can improve your overall posture and reduce the risk of postural imbalances. Overall, this exercise is a low-impact exercise that can be modified to fit any fitness level and is highly recommended for anyone looking to improve their mobility and reduce the risk of injury.

These early intervention exercises are to improve health and fitness.
If you have an injury or illness, consult with a health care professional before attempting.

More Tools & Resources from Peak Ergonomics
Contact Us About Reducing Workplace Injuries
Healthy Employees are the Bottom Line!

The Side Lying Thoracic Rotation is an effective exercise for targeting the thoracic spine, shoulders, and hips.


Keeping Your Employees Healthy & Safe

Columbia: MEM 101 N Keene St. Columbia, MO Thursday, April 4th, 2013

Chesterfield: MEM 663 Trade Ctr Blvd. Chesterfield, MO Thursday, April 11th, 2013 8:00am to 3:00pm

How to Create an Effective Employee Wellness Program

Steve Potje, RN, CCP, HPC, BS/BA Executive Director National Association of Disease Management & Wellness Professionals

The Prevention & Early Intervention of Common Musculoskeletal Disorders

Paul Krewson, OTR/L, CEAS III Occupational Therapist & Ergonomist Peak Ergonomics, Inc.

Safety Inspections: Find Hazards Before They Find You!

Mark Woodward Loss Prevention Trainer Missouri Employer’s Mutual

The Use of Ergonomic Evaluation in Medical Causation

Vic Zuccarello, OTR/L, C.E.A.S. II, ABDA Owner & Vice President Bio-Ergonomics, Inc.

Rotator Cuff Stretch

Rotator Cuff Stretch  |  Early Intervention Ergonomics

What is the Rotator Cuff Stretch?

The rotator cuff stretch is an early intervention exercise that involves stretching the muscles and tendons around the shoulder joint. To perform this stretch, reach your hands up behind your head, bringing your hands to your shoulder blades. Next, reach down your back as far as you can, then hold this stretch for 3-5 seconds and then relax. Repeat one more time.

Another variation of the stretch you can do involves stretching in a different direction.  Reach your hands up behind your back. Next, slide your hands up your spine as far up as you can reach. Hold for 3-5 seconds then relax and repeat one more time.

Moreover, it is essential to ensure that you’re using proper form during the stretch to avoid injury. The rotator cuff stretch can help improve flexibility, range of motion, and reduce the risk of shoulder injuries. It’s an excellent exercise for employees who work in factories, construction, the office or anyone who wants to maintain good shoulder health.

Early Intervention Benefits of this Stretch

Regularly performing the rotator cuff stretch can offer numerous early intervention benefits, including:

Firstly, it can help increase the flexibility of the muscles and tendons around the shoulder joint, making it easier to perform a wide range of movements. By improving flexibility, the rotator cuff stretch can also increase the range of motion in your shoulders, which can be particularly beneficial for factory workers, construction workers or anyone who performs activities that require a lot of shoulder movement.

Secondly, stretching the rotator cuff muscles can help reduce the risk of injury, such as rotator cuff tears or strains. Tight muscles and tendons in the shoulders can increase the risk of such injuries, but regularly performing the this stretch can help prevent this.

Finally, this stretch can help improve posture by loosening up tight muscles in the shoulders. Poor posture can lead to neck and back pain, so promoting better posture is a significant benefit of this exercise.

In conclusion, the rotator cuff stretch is a simple and effective exercise that provides numerous benefits, such as improving flexibility and range of motion, reducing the risk of injury, improving posture, and enhancing athletic performance.

This is an excellent stretch that replenishes nutrients and re-oxygenate the muscles of the shoulder complex. Perform this stretch to give your body a rest when performing activities that involve awkward postures of the shoulder such as reaching away from the body, hunching the shoulder, lifting or carrying.

These early intervention exercises are to improve overall health and fitness.
If you have an injury or illness, consult with a health care professional before attempting.

More Tools & Resources from Peak Ergonomics
Contact Us About Reducing Workplace Injuries
Healthy Employees are the Bottom Line! – Learn More!

The Rotator Cuff Stretch can help relieve tightness and reduce the risk of injury of the shoulder muscles.


Tendon Glides

Tendon Glides for Healthy Hands

Tendon Glides Explained

Tendon Glides are range-of-motion exercises that are often used to improve flexibility and reduce stiffness in the fingers and hands. These exercises are particularly helpful for people who are recovering from injuries or surgeries that have affected their hand or wrist mobility.

To perform one of the Tendon Glides, follow these steps:

  1. Begin by holding your hand out in front of you with your palm facing down.
  2. Slowly bend your fingers down towards your palm, keeping your thumb straight.
  3. Hold this position for a few seconds, then slowly straighten your fingers back out.
  4. Next, bend your fingers down towards your palm again, but this time, keep your fingers straight and only bend at the knuckles.
  5. Hold this position for a few seconds, then slowly straighten your fingers back out.
  6. Finally, make a fist with your hand, then slowly open your hand back up and stretch your fingers out.
  7. Repeat this exercise several times a day, gradually increasing the number of repetitions as your hand becomes stronger and more flexible.

Tendon Glides help to stretch and strengthen the tendons in the fingers and hands, improving overall flexibility and range of motion. It is a simple and effective exercise that can be done anywhere, anytime, and does not require any special equipment.

Early Intervention Benefits

The Tendon Glide exercise has several early intervention health benefits for the hands and fingers. Here are some of the key benefits:

  1. Improves flexibility: The Tendon Glide exercise is an excellent way to increase the flexibility of the tendons in your fingers and hands. By performing this exercise regularly, you can help reduce stiffness and improve your range of motion.
  2. Increases strength: The Tendon Glide exercise also helps to strengthen the tendons in your fingers and hands. This can be especially helpful for people who are recovering from injuries or surgeries and need to rebuild their strength.
  3. Reduces pain: People with conditions like arthritis or carpal tunnel syndrome often experience pain and discomfort in their hands and fingers. The Tendon Glide exercise can help reduce pain by improving flexibility and reducing stiffness.
  4. Prevents injuries: By keeping your hands and fingers flexible and strong, the Tendon Glide exercise can help prevent injuries like strains, sprains, and repetitive strain injuries.
  5. Improves dexterity: The Tendon Glide exercise can also improve your dexterity and fine motor skills. This can be especially beneficial for people who work with their hands, such as musicians or artists.

Overall, the Tendon Glide exercise is a simple and effective way to improve the health and function of your hands and fingers. It is easy to perform and can be done anywhere, making it a great addition to any exercise routine.

These early intervention exercises are to improve health and fitness.
If you have an injury or illness, consult with a health care professional before attempting.

More Tools & Resources from Peak Ergonomics
Contact Us About Reducing Workplace Injuries
Healthy Employees are the Bottom Line! – Learn More!

Tendon Glides are a simple and effective way to improve the health and function of your hands and fingers. It is easy to perform and can be done anywhere, making it a great addition to any exercise routine


Pelvic Tilt

Pelvic Tilt | Early Intervention Ergonomics

What is the Pelvic Tilt exercise?

The pelvic tilt exercise is a simple and effective exercise that targets the muscles in the lower back and the core. It helps to improve posture, strengthen the abdominal muscles, and stabilize the pelvis. Here’s how you can perform the pelvic tilt exercise:

  1. Lie on your back on a mat or a comfortable surface with your knees bent and feet flat on the floor, hip-width apart. Keep your arms relaxed at your sides.
  2. Take a deep breath in and, as you exhale, gently press your lower back into the floor, tilting your pelvis backward. Imagine flattening your lower back against the mat.
  3. Hold this position for a few seconds while maintaining a relaxed breathing pattern. Focus on engaging your abdominal muscles during the hold.
  4. Slowly release the tilt and return to the starting position.
  5. Repeat the exercise for a desired number of repetitions.

It’s important to note that the pelvic tilt exercise should be performed with control and without straining. Avoid excessive arching of the back or lifting the hips off the floor. Start with a few repetitions and gradually increase as your strength improves. If you have any underlying medical conditions or concerns, it’s always a good idea to consult with a healthcare professional before starting a new exercise routine.

Early Intervention Benefits

Performing the pelvic tilt exercise can also be beneficial in reducing work-related injuries. Here are some early intervention benefits of this exercise:

  • Core Stability for Heavy Lifting: Many work environments involve lifting, carrying, or moving heavy objects, which can put strain on the lower back. The pelvic tilt exercise strengthens the core muscles, including the deep abdominal muscles, providing stability and support during lifting tasks. This can help reduce the risk of lower back injuries and strains.
  • Improved Posture during Desk Work: For individuals who spend long hours sitting at a desk, maintaining proper posture is crucial in preventing work-related injuries such as back pain, neck strain, and postural imbalances. Regularly practicing pelvic tilts can help improve posture by promoting a neutral pelvis position, reducing the likelihood of slouching and related issues.
  • Reduced Risk of Musculoskeletal Disorders: Work-related musculoskeletal disorders (MSDs) are common among individuals who perform repetitive tasks or have poor ergonomics at their workplace. The pelvic tilt exercise enhances body awareness and encourages proper alignment of the spine, reducing the strain on muscles, joints, and ligaments. This can help mitigate the risk of MSDs such as lower back pain, hip discomfort, and muscle imbalances.
  • Increased Body Mechanics Awareness: By engaging the core muscles and focusing on proper pelvic alignment, the pelvic tilt exercise promotes body mechanics awareness. This heightened awareness can translate into improved movement patterns and mechanics during work activities, reducing the risk of acute injuries and chronic strain on the body.
  • Injury Rehabilitation and Prevention: For individuals recovering from work-related injuries or looking to prevent them, the pelvic tilt exercise can be part of a comprehensive rehabilitation or prehabilitation program. It gently activates the core muscles, aids in recovery, and promotes stability and strength in the lower back, reducing the chances of reinjury or further strain.

Things to Remember

It’s important to note that while the pelvic tilt exercise can be beneficial for reducing work-related injuries, it is advisable to consider other ergonomic factors. For example, using proper lifting techniques, adjusting workstations, and incorporating regular breaks and stretching routines into your daily work routine. Contact us here at Peak Ergonomics for more information and further assistance in reducing work-related injuries.

The Pelvic Tilt exercise can help reduce the risk of MSDs such as lower back pain, hip discomfort, and muscle imbalances.

These early intervention exercises are to improve overall health & fitness and help reduce work-related injuries.

If you have an injury or illness, consult with a health care professional before attempting.


This is NOT an Ergonomic Chair

Conference Room Chairs are NOT for Prolonged Sitting

Frequently I see workers sitting in conference room chairs for 6 to 8 hours a day as their computer workstation task chair. Conference room chairs are designed for a person to sit in for a short duration and for the person to be conversing and not working on a computer. In order for a chair to be ergonomic, it must be fully adjustable, and the adjustments should be easy to make from a seated position.

This is not an ergonomic chair. It is a simple conference room chair not designed for prolonged sitting and it is not fully adjustable.

Features to look for in an Ergonomic Chair in Order of Importance:

Appropriate Weight Limit Capacity:

Given the potential for a catastrophic injury due to a collapsed chair and the obesity epidemic in the United States, I place this at the top of the list. Most chairs have a weight capacity of 250 to 300 pounds. You may need to get a bariatric ergonomic chair for employees who weigh more than the average chair’s capacity.

Height Adjustable:

The feet must be firmly on the floor, and the hip should be slightly higher than the knee. If the worker is short, use a footrest. For tall workers, use a tall cylinder.

Adjustable Lumbar Support:

The worker should have firm support in the curve of the low back, and the lumbar support should be vertically adjustable. Additionally, the attached air pump allows users to adjust the pressure entering the spine.

Adjustable Seat Pan Depth:

Many times, the seat pan is too deep, and this prevents the worker from sitting fully back into the chair and having the lumbar spine supported. An appropriate seat pan depth will prevent people from perching on the front part of the chair. There should be 2-4 fingers width between the front of the chair and the back of the knees.

Adjustable Back Rest Tilt:

The backrest should have the ability to change angles from an upright seated position to a reclined position. It should also have a locking mechanism allowing the worker to lean back into the chair without the back-rest reclining.

Adjustable Arm Rests:

Keep arms close to the body and ensure armrests can move in and out for wide or narrow frames. Additionally, the armrests should move vertically to accommodate torso length and require padding with gel or memory foam. A nice additional feature is for them to slide forward, backward and tilt towards the keyboard.

Also, I highly recommend finding a vendor who is an expert in ergonomic products and not just a salesperson. There is a big difference and it is challenging to find the former. I recommend finding a local vendor as well; someone who can bring you samples and sell you used chairs is ideal. If you could pay $600 for an excellent used ergonomic chair, that is much better than paying $300 for a brand-new mediocre chair. A high-quality ergonomic chair will last for many years, sometimes decades. My personal chair is over 10 years old and in perfect condition, aside from expected superficial damage, and continues to be fully functional and supportive. There are a lot of high-quality chairs to choose from, and finding the right one can be difficult. Feel free to send a message to me if you have any questions or would like further assistance.

An article by Paul Krewson, Founder & Chairman of Peak Ergonomics, Inc.

Levator Scapula Stretch

Levator Scapula Stretch  |  Early Intervention Ergonomics

What is the Levator Scapula Stretch?

The levator scapula stretch replenishes nutrients and re-oxygenates the deep muscles of the neck. Perform this stretch to give your body a rest when performing activities that involve awkward postures of the neck, such as looking down, looking up, twisting the neck, or hunching the shoulders.

The Levator Scapula stretch targets the levator scapulae muscle, relieving neck and upper back tension. Follow these steps to perform the stretch:

  1. Turn your head to the left and look down almost like you’re looking into your left armpit.
  2. With the left arm, you’re going to reach up and grab a hold of the back of your head as you gently pull down into that angle.
  3. Hold for 5 seconds and repeat on the other side.
  4. Consult a professional if you experience pain or discomfort.
  5. Seek professional advice before starting any new exercise routine.

Remember, proper form and caution are essential to prevent injury.

Early Intervention Benefits

The levator scapula stretch offers several early intervention health benefits, including:

  1. Relieving tension and tightness in the neck and upper back.
  2. Improving flexibility and range of motion in the neck and shoulders.
  3. Promoting relaxation and reducing stress.
  4. Enhancing posture by elongating the muscles and reducing hunching.
  5. Alleviating discomfort caused by poor posture or sedentary lifestyles.
  6. Assisting in the prevention of neck and shoulder injuries.
  7. Complementing physical therapy or rehabilitation programs for neck-related conditions.

Incorporating this stretch into your routine can contribute to improved overall neck and upper back health.

Injury Prevention | Early Intervention Ergonomics

The levator scapula stretch can help reduce injuries in the following ways:

  • Increased flexibility and range of motion in the neck and shoulders can enhance the body’s ability to adapt to sudden movements or stresses, reducing the risk of strains or tears.
  • By relieving tension and tightness in the neck and upper back, the stretch promotes better posture and alignment, which can reduce the strain on muscles, tendons, and ligaments, minimizing the likelihood of overuse injuries.
  • Regularly performing the stretch can help improve muscle balance and symmetry in the neck and shoulders, reducing the risk of muscle imbalances that can lead to injuries.
  • The stretch promotes relaxation and reduces stress, which can help prevent tension-related injuries or conditions such as muscle spasms or nerve impingements.
  • Incorporating the levator scapula stretch as part of a comprehensive exercise routine can contribute to overall body strength and stability, making the neck and shoulders more resilient to injuries during physical activities.

It’s important to note that while the levator scapula stretch can be beneficial in injury prevention, it should be performed correctly and in conjunction with a well-rounded fitness program. If you have any specific concerns or pre-existing conditions, it’s advisable to consult a healthcare professional or a qualified trainer for personalized guidance.

These exercises are to improve overall health & fitness as well as reduce work-related injuries.
If you have an injury or illness, consult with a health care professional before attempting.

More Tools & Resources from Peak Ergonomics
Contact Us About Reducing Workplace Injuries
Healthy Employees are the Bottom Line! – Learn More!

The levator scapula stretch replenishes nutrients and re-oxygenates the deep muscles of the neck. Perform this stretch to give your body a rest when performing activities that involve awkward postures of the neck, such as looking down, looking up, twisting the neck, or hunching the shoulders.


Shoulder Adduction Stretch

Shoulder Adduction Stretch

What is the Shoulder Adduction Stretch?

The Shoulder Adduction Stretch is an effective exercise that can help you improve your upper body mobility and flexibility. Perform this stretch to give your body a rest when performing activities that involve awkward postures of the shoulder such as reaching away from the body, hunching the shoulder, lifting or carrying.

To perform this stretch, begin by standing upright with your feet shoulder-width apart and your arms at your sides. Next, raise your arms out to the sides until they are at shoulder level, then bring them across your chest, crossing one arm over the other. Use your opposite hand to gently pull your elbow towards your chest, feeling a stretch in your shoulder and upper back. Hold the stretch for 3-5 seconds, then release and repeat on the other side.

Early Intervention Benefits of this Stretch

The Shoulder Adduction Stretch offers numerous early intervention health benefits that make it a valuable exercise for employees or individuals looking to improve their upper body mobility and overall well-being. This stretch helps to improve the range of motion in the shoulders and upper back, which can reduce stiffness and improve flexibility. By performing this stretch regularly, you can also strengthen the muscles in the upper body and improve posture, which can reduce the risk of injury and alleviate pain in the neck and shoulders.

Workers and individuals who engage in repetitive overhead movements can also benefit from the Shoulder Adduction Stretch. It can help prevent injuries and improve performance by increasing mobility and range of motion in the shoulders, which can enhance employee performance and reduce the risk of overuse injuries.

In addition to its physical benefits, the Shoulder Adduction Stretch can also have mental health benefits. Stretching can help reduce stress and promote relaxation, which can improve mental clarity and reduce tension in the body.

Overall, the Shoulder Adduction Stretch is a versatile exercise that offers a range of physical and mental health benefits. By incorporating this stretch into your regular exercise routine, you can improve your upper body mobility, reduce stiffness and pain, and promote overall well-being.

These early intervention exercises are to improve health and fitness.
If you have an injury or illness, consult with a health care professional before attempting.

More Tools & Resources from Peak Ergonomics
Contact Us About Reducing Workplace Injuries
Healthy Employees are the Bottom Line! – Learn More!

Shoulder adduction stretch is helpful for reducing injuries caused by awkward postures of the shoulder such as hunching shoulders & reaching.


Knee to Chest Stretch (Single/Double)

Knee to Chest Stretch

What is the Knee to Chest Stretch?

This stretch is an early intervention stretching exercise that targets the lower back and hips.

Here’s how to do it:

  1. Lie down on your back on a comfortable surface, such as a yoga mat or a carpeted floor.
  2. Bend your knees and plant your feet firmly on the ground.
  3. Take a deep breath in, and as you exhale, slowly lift one knee towards your chest.
  4. Use your hands to gently pull your knee towards your chest. Gently pull until you feel a stretch in your lower back and hip.
  5. Hold the stretch for 3-5 seconds.
  6. Slowly release your leg and return it to the starting position.
  7. Repeat on the other leg.

You can perform this stretch a few times on each leg, depending on your comfort level. This stretch can help improve flexibility, reduce tension in the lower back, and improve circulation to the hips and legs.  If you have an injury or illness, consult with a health care professional before attempting.

What are the Early Intervention Benefits of this Stretch?

The knee to chest stretch provides a variety of early intervention health benefits, including:

  1. Improved flexibility: Firstly, it can improve flexibility by targeting the lower back, hips, and glutes, thereby increasing range of motion and flexibility in these areas.
  2. Reduced tension and pain: Additionally, this stretch can reduce tension and pain by gently stretching the muscles in the lower back and hips, providing relief from discomfort.
  3. Improved posture: Furthermore, tight muscles in the lower back and hips can contribute to poor posture, which can be improved by regularly performing this stretch.
  4. Increased circulation: Moreover, this stretch can increase circulation by helping blood flow to the hips and legs, which can promote healing and reduce inflammation.
  5. Stress relief: Finally, the deep breathing and gentle stretching involved in the knee to chest stretch can also provide stress relief and promote relaxation.

These early intervention exercises are to improve health and fitness.

It’s important to note that while the knee to chest stretch is generally safe for most people, it may not be appropriate for those with certain injuries or medical conditions. If you have any concerns about the safety of this stretch, be sure to consult with a healthcare provider.

More Tools & Resources from Peak Ergonomics
Contact Us About Reducing Workplace Injuries
Healthy Employees are the Bottom Line! – Learn More!

Knee to chest stretch helps promote range of motion and flexibility to the lower back and hips