Supine Crunch Exercise

Supine Crunch Exercise for Healthy Back & Abs

What is a Supine Crunch?

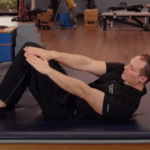
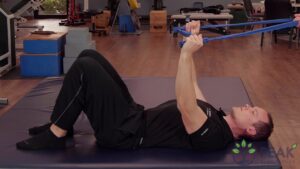
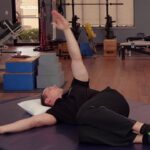
A supine crunch is an effective core strengthening exercise that targets the rectus abdominis muscle group. This exercise is performed while lying on your back with your knees bent and your feet flat on the floor. The supine crunch involves lifting your upper back off the floor towards your knees while keeping your lower back in contact with the floor.

To perform a supine crunch, start by lying on your back with your knees bent and your feet flat on the floor. Place your hands behind your head and contract your abdominal muscles to lift your head and shoulders off the ground. Keep your elbows wide and pointing outwards to prevent your neck from straining.

Exhale as you lift your head and shoulders, and inhale as you lower them back to the starting position. Focus on engaging your abs and avoiding any jerky or sudden movements. Repeat for the desired number of repetitions.

Supine crunches are a great way to improve core strength and stability, which can help prevent back pain and improve posture. They are also a low-impact exercise that can be modified to suit your fitness level. Beginners can start with fewer repetitions and work up to more as they gain strength. Advanced exercisers can add weight or resistance to increase the challenge.

Note:  you can also do an oblique crunch by reaching the outside of the opposite side of one knee. Typically hold it for 2-3 seconds. Do the entire sequence on each side for 5 repetitions.

Early Intervention Benefits of this Exercise

The supine crunch exercise primarily targets the abdominal muscles. By performing it regularly, several early intervention health benefits can be offered, such as:

  1. Improved core strength. The supine crunch exercise engages the rectus abdominis, obliques, and other core muscles, leading to a stronger and more stable core.
  2. Increased flexibility. The exercise involves moving the upper and lower body simultaneously, which can improve flexibility and range of motion in the hips and lower back.
  3. Reduced risk of injury. A strong core can help stabilize the spine, reducing the risk of lower back pain and injury.
  4. Better posture. Strong core muscles help support the spine and improve posture, reducing the risk of neck and shoulder pain caused by poor posture.
  5. Improved athletic performance. A strong core is essential for most athletic activities. Furthermore, by incorporating supine crunches into a regular exercise routine, one can improve overall athletic performance.
  6. Weight loss and improved body composition. As a resistance exercise, the supine crunch can help build lean muscle mass in the abdominal area, which leads to improved body composition and weight loss over time.

While the supine crunch can be a beneficial exercise, it should be performed correctly to avoid injury. It’s recommended to consult with a qualified fitness professional to ensure proper form and technique.

These early intervention exercises are to improve health and fitness.
If you have an injury or illness, consult with a health care professional before attempting.

More Tools & Resources from Peak Ergonomics
Contact Us About Reducing Workplace Injuries
Healthy Employees are the Bottom Line! – Learn More!

Supine Crunch Exercise

Hamstring Stretch

Hamstring Stretch |  Early Intervention Ergonomics

What is the Hamstring Stretch?

The hamstring stretch is a popular exercise that targets the hamstring muscles, which are located at the back of the thigh. This stretch is performed in a standing position, making it convenient and accessible for people of all fitness levels. By incorporating this stretch into your routine, you can improve flexibility, reduce muscle tension, and potentially alleviate lower back pain.

This is an excellent stretch that replenishes nutrients and re-oxygenate the hamstring muscles in the lower extremity. Perform this stretch to give your body a rest when performing activities that involve lifting, carrying, foot pedal use, prolonged standing or prolonged walking.

To perform the hamstring stretch, follow these simple steps:

  1. Please use a chair or a countertop to maintain your balance.
  2. Begin by standing up straight with your feet hip-width apart.
  3. Take a step forward with your right foot, keeping both legs straight.
  4. Place your left hand on the chair for safety & stability.
  5. Slowly hinge forward at the hips, maintaining a flat back and keeping your chest lifted.
  6. Continue bending forward until you feel a gentle stretch in the back of your right thigh.
  7. Hold the stretch for 3-5 seconds and relax.
  8. Repeat the stretch on the other leg by stepping forward with your left foot.

Early Intervention Benefits

The hamstring stretch offers numerous early intervention benefits for your overall well-being and safety. By incorporating this stretch into your morning exercise routine, you can enjoy improved flexibility, reduced muscle tension, enhanced work performance, and potentially decreased risk of hamstring injuries. Stretching your hamstrings regularly can also help alleviate lower back pain, promote better posture, and increase blood flow to the muscles. Discover the advantages of this stretch and how it can contribute to your overall fitness goals and injury prevention strategies.

Things to Remember

Remember, it’s essential to perform the hamstring stretch safely and avoid bouncing or jerking movements, as this can lead to injury. Additionally, if you have any pre-existing conditions or concerns, consult with a healthcare professional before incorporating this stretch into your routine.

Incorporating this stretch into your exercise regimen can help enhance your overall flexibility and promote healthy muscle function. Add this stretch to your warm-up or cooldown routine for optimal results. Enjoy the benefits of improved hamstring flexibility and greater mobility in your daily activities!

These exercises are to improve overall health & fitness as well as reduce work-related injuries.
If you have an injury or illness, consult with a health care professional before attempting.

Contact us for more information on how we can help your employees stay safe.

More Tools & Resources from Peak Ergonomics
Contact Us About Reducing Workplace Injuries
Healthy Employees are the Bottom Line! – Learn More!

Safely improve your mobility, flexibility and prevent injuries with the hamstring stretch. Perform this stretch correctly for optimal results.


Hip Hinge

Hip Hinge Technique  |  Early Intervention Ergonomics

What is the Hip Hinge Technique?

The Hip Hinge Technique targets the hamstrings, glutes, and lower back. By incorporating this stretch into your routine, you can improve flexibility, mobility, and stability in the hip joint. Follow these steps to perform the Hip Hinge technique with a stick:

  1. Stand tall with feet shoulder-width apart, holding a stick against your back.
  2. Initiate the movement by hinging forward at the hips while maintaining a straight back and stick contact.
  3. Continue hinging until you feel a gentle stretch in your hamstrings.
  4. Hold the position briefly, focusing on core engagement and proper alignment.
  5. Return to the starting position by engaging your glutes and driving your hips forward.

Incorporating the Hip Hinge stretch with a stick can contribute to your overall fitness and flexibility goals. Remember to prioritize proper form and listen to your body’s limits. If you experience any discomfort, it’s advisable to consult a fitness professional or healthcare provider.

The video above illustrates a technique of maintaining a neutral spine when lifting an object from the floor.

Early Intervention Benefits

The hip hinge stretch with a stick offers numerous early intervention benefits for individuals looking to improve their flexibility, mobility, and overall fitness. Incorporating this exercise into your routine can provide the following advantages:

  • Increased flexibility: The hip hinge stretch targets the hamstrings, glutes, and lower back, helping to enhance the flexibility of these muscle groups. Improved flexibility can lead to better athletic performance and reduced risk of injuries.
  • Enhanced hip mobility: This stretch specifically focuses on the hip joint, promoting increased range of motion and mobility. Better hip mobility is crucial for activities like squatting, running, and performing various lower body movements.
  • Improved posture and spinal alignment: By maintaining a straight back and proper alignment during the hip hinge stretch, you can improve your posture and spinal alignment. This can alleviate tension in the lower back and contribute to better overall posture.
  • Core stabilization: The hip hinge stretch requires engaging the core muscles to maintain stability and proper form. Regular practice of this exercise can help strengthen the core, leading to improved stability and balance in daily activities and workouts.
  • Injury prevention: By improving flexibility, mobility, and core stability, the hip hinge stretch with a stick can help reduce the risk of injuries, particularly in the lower back, hips, and hamstrings. It can also help alleviate tightness and imbalances in these areas, which are common contributors to injuries.

These exercises are to improve overall health & fitness as well as reduce work-related injuries.
If you have an injury or illness, consult with a health care professional before attempting.  Contact us for more information on how we can help your employees stay safe.

More Tools & Resources from Peak Ergonomics
Contact Us About Reducing Workplace Injuries
Healthy Employees are the Bottom Line! – Learn More!

The Hip Hinge technique targets the hamstrings, glutes, and lower back. By incorporating this stretch into your routine, you can improve flexibility, mobility, and stability in the hip joint.


Frisbee Lift

Frisbee Lift  |  Early Intervention Ergonomics

What is the Frisbee Lift?

The Frisbee Lift is a safe way of picking up a frisbee from the ground using basic ergonomic principles.  What we DO NOT want to see is bending over with the frisbee way out in front of you.  This will put a lot of stress on your knees and cause your back to hurt.  With a proper Frisbee Lift, what you want to do is bring that frisbee closer to you within your base of support.  Next, you want to flip that frisbee up with your feet thereby decreasing how far you have to reach down.  Finally, you want to squat down and bridge on that leg to decrease the weight of the frisbee as you stand up again.  The video above does a great job of showing how to do an ergonomically safe lift of the frisbee.

Early Intervention Benefits

Using safe lifting techniques when lifting small objects from the ground offers several early intervention benefits, including:

  1. Injury Prevention: Safe lifting techniques help reduce the risk of injuries, particularly strains, sprains, and back injuries. Lifting objects improperly or using incorrect form can strain muscles, ligaments, and the spine. By following safe lifting practices, you can minimize the chances of these injuries occurring.
  2. Back Health: Proper lifting techniques promote good back health. Lifting heavy objects incorrectly or with poor form can put excessive stress on the spine, leading to back pain and potential long-term issues. Using safe lifting techniques ensures that your back is properly supported and aligned during the lifting process.
  3. Increased Strength and Endurance: Safe lifting techniques engage the appropriate muscles, allowing you to build strength and endurance over time. By utilizing your legs, core, and larger muscle groups instead of relying solely on your back, you distribute the workload and reduce strain on specific areas.
  4. Improved Posture: Following safe lifting practices promotes proper posture, both during the lift and throughout your daily activities. Maintaining a neutral spine alignment and using the correct muscle groups to lift objects trains your body to adopt better posture habits, reducing the risk of musculoskeletal issues in the long run.
  5. Enhanced Efficiency: Safe lifting techniques are not only about injury prevention but also efficiency. By utilizing your body’s biomechanics effectively, you can optimize your lifting capacity and minimize wasted effort or energy.
  6. Transferable Skills: The safe lifting techniques you learn for small objects can be applied to various lifting tasks in different contexts. Whether it’s moving furniture, carrying groceries, or handling other objects in your daily life, the principles of safe lifting remain consistent.

Things to Remember

Remember that these benefits apply not only to small objects but to lifting in general. Practicing safe lifting techniques is essential for overall physical well-being and minimizing the risk of acute or chronic injuries.

Remember, it’s always important to consider the specific requirements of the lifting task, seek assistance when needed, and listen to your body’s limits to ensure safe and effective lifting practices.

These lifting techniques are to help reduce work-related injuries, and to improve overall health & fitness.

Contact us today for more information on how we can help you reduce work-related injuries throughout your organization. Healthy Employees ARE the Bottom Line!

If you have an injury or illness, consult with a health care professional before attempting.  

More Tools & Resources from Peak Ergonomics
Contact Us About Reducing Workplace Injuries
Healthy Employees are the Bottom Line! – Learn More!

The Frisbee Lift technique will help prevent injuries by reducing the stress on your knees & prevent back pain by using your base of support.


Easy Nerve Glides

Easy Nerve Glides  |  Early Intervention Ergonomics

What are Easy Nerve Glides?

Nerve glides, also known as neural glides or nerve flossing, are exercises that help mobilize and stretch the nerves in the body. Nerve glides floss the median nerve in the carpal tunnel and promote healthy neural tension of the nervous system. This composite stretch originates at the nerve roots in the brachial plexus and pulls all the way down to the median nerve that passes through the carpal tunnel. Perform this stretch to give your body rest when performing forceful gripping, repetitive gripping, awkward or sustained postures of the elbow, forearm, wrist, and hand to prevent carpal tunnel syndrome. They can be beneficial for individuals experiencing nerve-related pain, tingling, or numbness.  Here is how to perform easy nerve glides:

  1. Starting with the right side, bend at the elbow and bend at the wrist like you are holding a baby.
  2. Next, slowly glide your arm out and up with your palm facing away as if you are stopping a car.
  3. Repeat again with “hold the baby” and “stop the car.”
  4. Each stretch should take 3-5 seconds
  5. Repeat on the left side.

Early Intervention Benefits

Performing nerve glides offers several early intervention benefits, including improved nerve mobility, reduced pain, enhanced circulation, and injury prevention.

Firstly, engaging in nerve glides helps improve nerve mobility. By gently moving and stretching the nerves, these exercises promote healthy nerve gliding, preventing them from becoming compressed or stuck. This improved mobility can alleviate symptoms such as pain, tingling, and numbness associated with nerve entrapment or irritation.

Moreover, nerve glides can help reduce pain. The controlled movements involved in nerve glide exercises can stimulate the release of endorphins, the body’s natural pain-relieving chemicals. Additionally, by promoting proper nerve function and reducing nerve compression, these exercises can alleviate discomfort caused by conditions like carpal tunnel syndrome, sciatica, or brachial plexopathy.

Furthermore, nerve glides contribute to enhanced circulation. As the nerves are gently stretched and mobilized, blood flow to the surrounding tissues increases. Improved circulation delivers essential nutrients and oxygen to the nerves, aiding in their healing and overall health.

In addition to the aforementioned benefits, performing nerve glides can also play a preventive role in injury management. By maintaining optimal nerve mobility, individuals are less prone to developing chronic nerve-related conditions or experiencing further injury. Regularly incorporating these exercises into a comprehensive rehabilitation or wellness routine can help safeguard against future nerve entrapments or injuries.

Things to Remember

Remember, it’s crucial to perform nerve glide exercises gently and within your comfort level. If you experience increased pain or discomfort during the exercises, it’s best to stop immediately and consult with a healthcare professional.

These stretching exercises are to improve overall health & fitness as well as reduce work-related injuries.
If you have an injury or illness, consult with a health care professional before attempting.

Contact us for more information on how we can help your employees stay safe. Healthy Employees ARE the Bottom Line!

More Tools & Resources from Peak Ergonomics
Contact Us About Reducing Workplace Injuries
Healthy Employees are the Bottom Line! – Learn More!

Easy Nerve Glides can benefit workers who experience nerve-related pain, tingling, or numbness by mobilizing and stretching the nerves.


Wrist/Forearm/Elbow Band Strengthening

Wrist/Forearm/Elbow Band Strengthening  |  Early Intervention Ergonomics

What are the Wrist/Forearm/Elbow Band Strengthening Exercises?

The wrist/forearm/elbow band strengthening exercises are also known as eccentric and concentric wrist extension exercises. They can be beneficial for strengthening the wrist extensor muscles and improving wrist stability. Here are examples of both types of exercises, both utilizing a therapy band:

Eccentric Wrist Extension Exercise:
  • Start by sitting in a chair or standing with your forearm supported on a table, palm facing downwards.
  • Wrap the therapy band around your hand, securing it around your fingers.
  • Begin with your wrist flexed (bent) and the band taut.
  • Slowly and gradually extend your wrist against the resistance of the band, moving your hand towards a neutral position (parallel to the floor).
  • Once you reach the neutral position, release the tension on the band and return to the starting position with your wrist flexed.
  • Repeat this movement for a specific number of repetitions, focusing on controlling the motion during the release phase.
Concentric Wrist Extension Exercise:
  • Assume the same starting position as the eccentric exercise, with your forearm supported and palm facing downwards.
  • Wrap the therapy band around your hand, securing it around your fingers.
  • Begin with your wrist in a flexed position.
  • In this exercise, you’ll be actively contracting the wrist extensor muscles to overcome the resistance of the band.
  • Extend your wrist against the resistance of the band, moving your hand towards a neutral position.
  • Hold the end position for a brief moment, focusing on the contraction of the wrist extensors.
  • Slowly release the tension on the band and return to the starting position with your wrist flexed.
  • Repeat this movement for a specific number of repetitions, maintaining control throughout the exercise.

Remember to start with a resistance level that is manageable for you and gradually increase it as your strength improves. If you have any pre-existing wrist conditions or injuries, it is advisable to consult with a healthcare professional or physical therapist before starting any new exercise program.

Early Intervention Benefits

Eccentric and concentric wrist extension exercises using a therapy band offer several early intervention health benefits and can help prevent injuries. Here are some of the key advantages:

Health Benefits
  1. Strengthening: These exercises target the wrist extensor muscles, such as the extensor carpi radialis brevis and longus, and the extensor digitorum. By strengthening these muscles, you can improve the overall stability and functionality of your wrists.
  2. Muscle Balance: Eccentric and concentric exercises help promote muscle balance between the wrist flexors (muscles responsible for bending the wrist) and extensors (muscles responsible for extending the wrist). Achieving a balanced muscle development can enhance joint stability and reduce the risk of imbalances or overuse injuries.
  3. Improved Grip Strength: Strong wrist extensor muscles contribute to better grip strength. This can be beneficial in various activities and sports that involve gripping objects, such as weightlifting, racket sports, and rock climbing.
Injury Prevention Benefits
  1. Reduced Risk of Wrist Injuries: Strengthening the wrist extensors can provide stability and support to the wrist joint, reducing the likelihood of wrist injuries like sprains and strains. Stronger muscles can better withstand external forces and provide better control during activities that stress the wrists.
  2. Overuse Injury Prevention: Repetitive activities or sports that involve excessive wrist flexion can lead to overuse injuries, such as tendinitis or carpal tunnel syndrome. By strengthening the wrist extensors through eccentric and concentric exercises, you can help prevent imbalances and excessive strain on the flexor muscles, reducing the risk of overuse injuries.
  3. Rehabilitation Support: Eccentric exercises, in particular, are commonly used in rehabilitation programs to aid in the recovery of various wrist injuries. They can help improve tendon health, promote tissue remodeling, and enhance overall wrist function.

Things to Remember

It’s important to note that while these exercises can be beneficial, it’s crucial to perform them with proper form and within your pain-free range of motion. If you have any underlying wrist conditions, it’s advisable to consult with a healthcare professional or a physical therapist before incorporating these exercises into your routine.

If you experience any pain or discomfort during the stretch or have specific concerns, it’s advisable to consult with a healthcare professional for guidance tailored to your individual needs.

These early intervention exercises are to improve overall health & fitness as well as help reduce work-related injuries.

If you have an injury or illness, consult with a health care professional before attempting.

Contact us for more information on how we can help your employees stay safe. Healthy Employees ARE the Bottom Line!

Resources

More Tools & Resources from Peak Ergonomics
Contact Us About Reducing Workplace Injuries
Healthy Employees are the Bottom Line! – Learn More!

Wrist/forearm/elbow band strengthening exercises can provide stability and support to the wrist joint, thus reducing work-related injuries.


Shoulder Stick Stretch

Shoulder Stick Stretch

What is the Shoulder Stick Stretch?

The shoulder stick stretch is an effective exercise for improving shoulder mobility and flexibility while relieving tension in the upper back and shoulders. To perform this stretch, you’ll need a long stick or dowel. Start by standing with your feet shoulder-width apart and holding the stick with an overhand grip, with your hands slightly wider than shoulder-width apart. Lift the stick overhead and behind your head, keeping your elbows straight. Slowly lower the stick down your back as far as you comfortably can, without allowing your elbows to bend or your lower back to arch. Hold the stretch for several seconds, then raise the stick back up overhead to the starting position. Repeat this stretch for several repetitions, being careful not to push yourself beyond your comfort level. If you experience any discomfort or pain, stop the exercise and consult a qualified fitness professional or healthcare provider.

Early Intervention Benefits of this Stretch

This stretch is a beneficial exercise that can help improve shoulder mobility, flexibility, and range of motion. This stretch specifically targets the shoulders and upper back muscles, helping to relieve tension and improve posture. The early intervention benefit of this exercise is that it can help reduce the risk of injury by improving shoulder mobility and flexibility. By performing this stretch regularly, you can help reduce tension in the shoulders and upper back muscles, which can help improve posture and reduce the risk of strain and injury. Additionally, the Shoulder Stick Stretch can help increase blood flow to the shoulders and upper back, promoting healing and reducing inflammation that can lead to injury. By incorporating the Shoulder Stick Stretch into your fitness routine, you can help prevent common shoulder injuries such as rotator cuff strain, impingement, and tendinitis.

This is an excellent stretch that replenishes nutrients and re-oxygenate the muscles of the shoulder complex. Perform this stretch to give your body a rest when performing activities that involve awkward postures of the shoulder such as reaching away from the body, hunching the shoulder, lifting or carrying.

These early intervention exercises are to improve health and fitness.
If you have an injury or illness, consult with a health care professional before attempting.

More Tools & Resources from Peak Ergonomics
Contact Us About Reducing Workplace Injuries
Healthy Employees are the Bottom Line!

The Shoulder Stick Stretch is an exercise that can help reduce the risk of injury by improving shoulder mobility and flexibility


Grip Putty

Grip Putty  |  Early Intervention Ergonomics

What is Grip Putty? How do I use it?

Grip putty is a malleable substance similar to clay or putty that can be squeezed, stretched, or molded to exercise the muscles in your hands and fingers. Also known as hand therapy putty, it is commonly used as a rehabilitation tool to improve hand strength and dexterity.

Here’s a simple grip putty exercise you can try:

  1. Start by warming up your hands with some light stretching exercises.
  2. Take a small amount of grip putty and roll it into a ball.
  3. Squeeze the grip putty ball as hard as you can, using all your fingers and thumb.
  4. Hold the squeeze for a few seconds and then release.
  5. Repeat the squeezing and releasing motion for a set of repetitions, gradually increasing the number as your hand strength improves.
  6. You can also try different variations such as pinching the putty between your fingers, rolling it into thin ropes, or using it to strengthen individual fingers.
  7. Perform these exercises regularly to improve grip strength and finger dexterity.

Early Intervention Benefits

Using grip putty as an exercise and rehabilitation tool offers several early intervention benefits. Its malleable nature allows for targeted hand and finger movements, promoting strength, flexibility, and dexterity. Incorporating these exercises into your morning routine can be beneficial for workers who perform activities involving forceful or repetitive gripping.

  • Improved Hand Strength: these exercises engage the muscles in your hands, fingers, and forearms, leading to enhanced grip strength. Regular use can strengthen these muscles, making daily activities that require a strong grip easier to perform.
  • Increased Finger Dexterity: Manipulating the grip putty challenges your finger coordination and control. Engaging in activities that require precise finger movements, such as playing a musical instrument or performing delicate tasks, can particularly benefit individuals.
  • Injury Prevention: grip putty is commonly used in hand therapy and rehabilitation settings to aid in the recovery of hand injuries or surgeries. It promotes circulation, reduces stiffness, and assists in regaining range of motion. Additionally, using it as a preventive measure can help reduce the risk of hand and wrist injuries by improving overall hand strength and flexibility.
  • Stress Relief: Engaging in these exercises can provide a therapeutic effect, serving as a stress-relieving activity. The repetitive squeezing and releasing motions can help relax the muscles and relieve tension in the hands and forearms. This makes it an excellent tool for individuals looking to unwind and alleviate stress.
  • Versatility and Convenience: Grip putty is a versatile tool that can be used virtually anywhere, making it highly convenient for individuals with busy schedules. It is portable and lightweight, allowing for on-the-go use, whether at home, in the office, or while traveling.

Things to Remember

Incorporating grip putty exercises into your routine offers a range of health benefits, including improved hand strength, increased finger dexterity, rehabilitation and injury prevention, stress relief, and convenient usability.

Remember to start with appropriate resistance levels and gradually increase the intensity as your hand strength and flexibility improve. If you have any underlying hand or wrist conditions, it’s advisable to consult a healthcare professional before starting grip putty exercises to ensure safety and proper guidance.

Remember, if you have any pre-existing hand or wrist conditions or if you experience pain during the exercises, it’s best to consult a healthcare professional before proceeding. They can provide you with specific recommendations and guidance based on your individual needs.

These early intervention exercises are to improve overall health & fitness as well as reduce work-related injuries.

If you have an injury or illness, consult with a health care professional before attempting.

Contact us for more information on how we can help your employees stay safe.

More Tools & Resources from Peak Ergonomics
Contact Us About Reducing Workplace Injuries
Healthy Employees are the Bottom Line! – Learn More!

Grip putty is a malleable substance similar to clay that can be squeezed, stretched, or molded to exercise muscles in your hands & fingers.


Hammer Exercise

Hammer Exercise  |  Early Intervention Ergonomics

What is the Hammer Exercise?

The wrist pronation and supination exercise with a hammer is a beneficial exercise that targets the muscles in your forearms. It involves using a hammer as a weight to perform controlled movements that rotate your wrist.

Here’s a step-by-step guide to performing the wrist pronation and supination exercise with a hammer:

  1. Begin by sitting on a chair or standing upright with your arm extended in front of you, holding a hammer with an overhand grip. Your palm should be facing downward.
  2. Keep your forearm stable and slowly rotate your wrist to the left, allowing the hammerhead to point towards the floor. This movement is called pronation.
  3. Hold the pronated position for a moment, feeling the stretch in your forearm muscles.
  4. Return to the starting position and then rotate your wrist to the right, this time moving the hammerhead upwards. This movement is called supination.
  5. Hold the supinated position for a brief moment, focusing on the contraction in your forearm muscles.
  6. Repeat the pronation and supination movements for 10-30 repetitions on each side.

This exercise will help strengthen your forearm, wrist and hand for those work-related activities that involve forceful gripping or repetitive gripping of the forearm, wrist, or hand.

Early Intervention Benefits

The hammer exercise offers a wide range of early intervention benefits, including increased forearm and wrist strength, improved grip strength, enhanced wrist mobility, reduced risk of injuries, and better overall functionality in daily tasks. By regularly incorporating this exercise into your morning routine, you can promote injury prevention, reduce the likelihood of strains and sprains, and support optimal performance in workplace activities that involve forearm and wrist movements. This exercise contributes to well-rounded arm development while simultaneously providing the advantages of injury prevention and reduced risk of injuries.

Things to Remember

When performing this exercise, it’s essential to maintain control and avoid jerking or swinging the hammer. The motion should be smooth and deliberate, targeting the muscles in your forearm effectively.

Remember to start by gripping the hammer in the middle which allows you to maintain proper form with a safe amount of resistance. Then gradually increase the resistance by gripping further away from the center of the hammer as you become more comfortable and stronger. If you experience any pain or discomfort during the exercise, stop immediately and consult with a healthcare professional.

These exercises are to improve overall health & fitness as well as reduce work-related injuries.
If you have an injury or illness, consult with a health care professional before attempting.

Contact us for more information on how we can help your employees stay safe.

More Tools & Resources from Peak Ergonomics
Contact Us About Reducing Workplace Injuries
Healthy Employees are the Bottom Line! – Learn More!

The hammer exercise helps strengthen your forearm, wrist and hand for those work activities that involve forceful or repetitive gripping.


Lower Trunk Rotation Stretch

Lower Trunk Rotation Stretch  |  Early Intervention Ergonomics

What is the Lower Trunk Rotation with Supine IR Quadratus Stretch?

The Lower Trunk Rotation with Supine Internal Rotation (IR) Quadratus Stretch is an effective stretching exercise that specifically targets the muscles in the lower trunk and hips. This exercise is frequently employed in rehabilitation and sports training settings to improve mobility and flexibility in the hip and lower back regions. To perform this stretch, follow this step-by-step guide:

  • Begin by lying on your back in a supine position on a flat surface like a mat or a bed.
  • Extend both legs fully along the floor.
  • Bend your right knee and place your right foot flat on the floor, while keeping your left leg extended.
  • Extend your arms straight out to the sides, parallel to the floor.
  • Slowly and gently lower your right knee across your body towards the left side, while ensuring your shoulders and left foot stay in contact with the surface.
  • Maintain a relaxed and comfortable position, avoiding excessive twisting or strain in your lower back.
  • Hold the stretch for 15 to 30 seconds, experiencing a gentle stretch in the muscles of your lower back and hip.
  • Return your right knee to the starting position and repeat the stretch on the opposite side.

A Beneficial Addition to this Stretch

For an added benefit, you can incorporate supine internal rotation of the quadratus lumborum (QL) muscle:

  • After lowering your right knee towards the left side, keep your right foot in contact with the surface and internally rotate your right hip.
  • This movement will cause a slight rotation of your lower trunk, effectively targeting the quadratus lumborum muscle on the right side.
  • Hold the stretch with the internal rotation for 15 to 30 seconds.
  • Return your right knee to the starting position and repeat the stretch on the opposite side, incorporating internal rotation as well.

It’s crucial to note that if you have any pre-existing injuries or medical conditions, or if you feel pain or discomfort while performing this stretch, it is advisable to consult a qualified healthcare professional or physical therapist before attempting it. They can provide personalized guidance based on your specific needs, ensuring that you execute the exercise correctly and safely.

Early Intervention Benefits

The Lower Trunk Rotation with Supine Internal Rotation (IR) Quadratus Stretch offers several early intervention benefits. Here are some of the key advantages:

  • Improved lower back and hip flexibility: By regularly performing this stretch, you can effectively target the muscles in the lower trunk and hips, including the quadratus lumborum. This muscle plays a crucial role in the lateral flexion and rotation of the spine. As a result, you can experience an increase in flexibility and range of motion in these areas. This, in turn, reduces the risk of stiffness and facilitates improved movement patterns.
  • Enhanced spinal mobility: The rotational aspect of this stretch helps improve spinal mobility, particularly in the lower back region. It allows for greater rotation and movement between the vertebrae, which can contribute to a healthier and more functional spine.
  • Injury prevention: By increasing flexibility, range of motion, and spinal mobility, the Lower Trunk Rotation with Supine IR Quadratus Stretch can help prevent injuries, especially in the lower back, hips, and surrounding muscles. The tightness and limited mobility in these areas can have adverse effects, such as compensatory movements and excessive stress on other structures. As a result, this increases the vulnerability to strains, sprains, and various musculoskeletal issues. However, by regularly incorporating this stretch into your routine, you can effectively counteract these risks. This stretch helps in maintaining optimal mobility and thereby significantly reduces the likelihood of experiencing such injuries.
  • Core muscle activation and stability: During this stretch, your core muscles, including the abdominals and obliques, work to stabilize the pelvis and spine. By engaging these muscles, you can improve core strength and stability, which are crucial for maintaining proper posture and preventing excessive strain on the lower back.

Things to Remember

It is vital to perform this stretch with proper technique and actively avoid any movements or positions that induce pain or discomfort. Moreover, if you have any underlying medical conditions or concerns, it is highly recommended to consult with a healthcare professional or a qualified physical therapist. Their expertise can provide personalized guidance, ensuring the exercise is suitable for your specific needs and circumstances.

These early intervention exercises are to improve overall health & fitness as well as help reduce work-related injuries.
If you have an injury or illness, consult with a health care professional before attempting.

More Tools & Resources from Peak Ergonomics
Contact Us About Reducing Workplace Injuries
Healthy Employees are the Bottom Line! – Learn More!

The Lower Trunk Rotation Stretch can help prevent injuries by increasing flexibility, range of motion and spinal stability.


Seated Hip Rotator Stretch

Seated Hip Rotator Stretch – Early Intervention Ergonomics

What is the Seated Hip Rotator Stretch?

The seated hip rotator stretch is a highly effective stretching exercise that can help increase flexibility and mobility in your hip joints. To perform this stretch, start by sitting on a sturdy chair. Cross your right leg over your left, placing your ankle on your left knee. Grab the right knee with both hands and pull it gently towards your left shoulder. Hold for 3-5 seconds and repeat on the opposite side. Perform this stretch to give your body a rest when performing activities that involve lifting, carrying, foot pedal use, prolonged standing, prolonged sitting or prolonged walking. This stretch is particularly useful for individuals who spend extended periods of time sitting, as it can help alleviate stiffness and tension in the hips.

Early Intervention Benefits of this Stretch

The seated hip rotator stretch is an excellent early intervention exercise that can help strengthen the hip muscles thus improving stability and preventing injuries in the hips, knees, and ankles. Strong hip muscles can also reduce knee pain and lower back pain. Stretches can help to improve hip flexibility and range of motion.
In addition to the benefits mentioned above, studies have found that greater hip external rotator strength allows better dynamic control and hip function upon landing.

Insufficient hip internal rotation can lead to gait issues. When other parts of the lower body compensate for insufficient hip internal rotation, it might increase your risk of an injury. Some hip internal rotation exercises and stretches can put pressure on your knees. If you feel pain in your knee at any time, you should stop immediately.

If you have an injury or illness, consult with a health care professional before attempting.

These early intervention exercises are to improve overall health and fitness.

More Tools & Resources from Peak Ergonomics
Contact Us About Reducing Workplace Injuries
Healthy Employees are the Bottom Line! – Learn More!

Seated hip rotator stretch is for those who spend extended periods of time sitting, as it can alleviate stiffness and tension in the hips.


Wall Squat

Wall Squat  |  Early Intervention Ergonomics

What is the Wall Squat?

This exercise promotes strength for the hips and knees. Wall squats are an effective exercise for building strength in your glutes, hamstrings, and quadriceps—especially your inner thighs. In addition to the legs, wall squats also activate your abdominal muscles to help build core strength. They help build muscular endurance as well since they are an isometric exercise, meaning the body remains in a static position throughout the workout. Wall squats are also a convenient home workout.

To perform a wall squat, you stand with your back against a wall, feet shoulder-width apart, and slide your back down the wall until your thighs are parallel to the floor. Your knees should be bent at a 90-degree angle, and your back should be flat against the wall. You hold this position for a set amount of time or until your muscles fatigue. This exercise is a great way to build lower body strength and endurance.

Early Intervention Benefits

Wall squats have several benefits, including:

  • Strengthening of the leg muscles: Wall squats are an effective way to strengthen the muscles in your legs, including your quadriceps, hamstrings, and glutes. These muscles are essential for activities like walking, running, and jumping.
  • Improved posture: Wall squats help to improve your posture by engaging the muscles in your back and core. By keeping your back flat against the wall and maintaining proper alignment, you can help to prevent back pain and improve your overall posture.
  • Increased joint mobility: Squats can help to increase the mobility of your hip, knee, and ankle joints. This increased mobility can help to reduce the risk of injury and improve your overall range of motion.
  • Enhanced balance and stability: Wall squats require you to maintain your balance and stability, which can help to improve your overall balance and stability. This can be particularly beneficial for older adults, as it can help to reduce the risk of falls.
  • Improved bone density: Weight-bearing exercises like wall squats can help to improve bone density, which can reduce the risk of osteoporosis and other bone-related conditions.

Overall, wall squats are a great exercise for improving lower body strength, balance, and stability, and can provide several important health benefits.

Things to Remember

It’s important to note that while these exercises can be beneficial, it’s crucial to perform them with proper form and within your pain-free range of motion. If you have any underlying back, knee or hip conditions, it’s advisable to consult with a healthcare professional or a physical therapist before incorporating these exercises into your routine.

If you experience any pain or discomfort during the exercise or have specific concerns, it’s advisable to consult with a healthcare professional for guidance tailored to your individual needs.

These early intervention exercises are to improve overall health & fitness as well as help reduce work-related injuries.

If you have an injury or illness, consult with a health care professional before attempting.

Contact us for more information on how we can help your employees stay safe.

Healthy Employees ARE the Bottom Line!

More Tools & Resources from Peak Ergonomics
Contact Us About Reducing Workplace Injuries
Healthy Employees are the Bottom Line! – Learn More!

Wall squats are an effective way to strengthen the muscles in your legs, including your quadriceps, hamstrings, and glutes. These muscles are essential for activities like walking, running, and jumping.


Active Neck Stretch

Active Neck Stretch | Early Intervention Ergonomics

What is the Active Neck Stretch?

The active neck stretch is a beneficial exercise that helps relieve tension and improve flexibility in the neck muscles. It involves gentle movements that target the muscles in the neck and upper back, promoting relaxation and reducing stiffness. Incorporating the active neck stretch into your routine can be particularly helpful if you spend long hours sitting at a desk or engaging in work-related activities that strain the neck.

This is an excellent stretch to replenish nutrients and re-oxygenate the structures of the neck and shoulder complex. Perform the active neck stretch to give your body a rest when performing activities that involve awkward postures of the neck, such as looking down, looking up, twisting the neck, or hunching the shoulders.

To perform the active neck stretch, follow these simple steps:

  1. Stand comfortably, ensuring good posture with your shoulders relaxed and down.
  2. Start by placing your right hand on your left shoulder. Use that right hand to keep your left shoulder from elevating as you do this stretch.
  3. Gently tilt your head to the right and hold for 3 seconds.
  4. From there you need to turn your head and look down to the outside of your right foot. Hold for 3 seconds.
  5. Finally turn your head and look up and over your left shoulder. Hold for 3 seconds then relax.
  6. Repeat steps 1-5 using your left hand on your right shoulder.

Remember to perform the active neck stretch in a controlled and gradual manner, avoiding any sudden or forceful movements. If you experience pain or discomfort during the stretch, stop immediately and consult a healthcare professional.

Early Intervention Benefits

The active neck stretch offers numerous early intervention health benefits and plays a crucial role in reducing workplace injuries. By incorporating this exercise into your daily routine, you can experience the following advantages:

  • Improved Flexibility: The active neck stretch targets the muscles in the neck and upper back, helping to enhance flexibility and range of motion. Increased flexibility can contribute to better posture and reduced muscle stiffness.
  • Tension Relief: Regularly performing the active neck stretch helps alleviate tension and tightness in the neck muscles, which commonly occur due to prolonged sitting, stress, or poor posture. It promotes relaxation and can provide relief from discomfort caused by muscle tension.
  • Reduced Neck Pain: Neck pain is a common issue caused by factors such as muscle strain, poor ergonomics, or repetitive activities. The active neck stretch helps to alleviate and prevent neck pain by improving blood circulation, reducing muscle imbalances, and releasing built-up tension.
  • Enhanced Posture: Poor posture is a leading cause of neck and back pain. This stretch aids in correcting posture by strengthening the neck and upper back muscles. It encourages proper alignment of the spine and promotes an upright posture, reducing the risk of developing chronic pain or injuries.
  • Injury Prevention: Engaging in regular active neck stretches can help prevent injuries related to the neck and upper back. By increasing the flexibility and strength of the neck muscles, you can minimize the risk of strains, sprains, and other soft tissue injuries.
  • Stress Reduction: This stretch involves slow and controlled movements combined with deep breathing, which can have a calming effect on the mind and body. It helps reduce stress and tension, promoting overall well-being.

Important Things to Remember

Incorporating this stretch into your daily routine can help improve neck mobility, reduce muscle tension, and enhance overall neck health. If you have specific concerns or persistent neck pain, it’s recommended to consult with a qualified healthcare provider for an accurate diagnosis and appropriate treatment.

If you experience any pain or discomfort during the stretch or have specific concerns, it’s advisable to consult with a healthcare professional for guidance tailored to your individual needs.

These early intervention exercises are to improve overall health & fitness as well as help reduce work-related injuries.

If you have an injury or illness, consult with a health care professional before attempting.

Contact us for more information on how we can help your employees stay safe. Healthy Employees ARE the Bottom Line!

Resources

More Tools & Resources from Peak Ergonomics
Contact Us About Reducing Workplace Injuries
Healthy Employees are the Bottom Line! – Learn More!

Perform the active neck stretch to give your body a rest when performing activities that involve awkward postures of the neck, such as looking down, looking up, twisting the neck, or hunching the shoulders.


Tennis Elbow: Isometric

Tennis Elbow Isometric  |  Early Intervention Ergonomics

What Exactly is Tennis Elbow?

Tennis elbow, also known as lateral epicondylitis, is a painful condition that affects the outer part of the elbow. It is commonly caused by repetitive motion of the wrist and arm. This can lead to small tears in the tendons that attach to the lateral epicondyle (the bony bump on the outer part of the elbow).

Some common causes of tennis elbow include:

  1. Overuse: Activities that involve repetitive motion of the wrist and arm. Typing on a computer or using hand tools can cause small tears in the tendons over time.
  2. Improper technique: Poor technique while performing manual labor can put extra stress on the elbow joint and lead to injury.
  3. Age: As people age, the tendons in their arms become less flexible and more prone to injury.
  4. Genetics: Some people may be genetically predisposed to developing tennis elbow.
  5. Injury: A direct blow to the elbow or sudden forceful movement can also cause this condition.
  6. Medical conditions: Certain medical conditions, such as rheumatoid arthritis, can also increase the risk of developing tennis elbow.

Overall, this condition is caused by repetitive stress on the tendons that attach to the lateral epicondyle, leading to microtears and inflammation. By identifying the cause of the injury, individuals can take steps to prevent future occurrences and manage their symptoms effectively.

Early Intervention Benefits of Isometric Exercise

Tennis elbow isometric exercises can provide several early intervention health benefits, including:

  1. Strengthening: Isometric exercises are static exercises that involve holding a muscle in a contracted position without movement. These exercises can help to strengthen the muscles around the elbow joint, which can improve the overall stability of the joint.
  2. Pain relief: Isometric exercises can help to reduce pain and inflammation associated with tennis elbow by increasing blood flow to the affected area and promoting the release of endorphins, the body’s natural painkillers.
  3. Improved range of motion: Isometric exercises can help to improve the range of motion in the elbow joint by increasing the flexibility of the muscles and tendons around the joint.
  4. Prevention of future injuries: Strengthening the muscles around the elbow joint through isometric exercises can help to prevent future injuries and reduce the risk of re-injury.

Overall, incorporating isometric exercises into a tennis elbow rehabilitation program can be an effective way to improve strength, reduce pain, improve range of motion, and prevent future injuries. However, it is important to consult with a healthcare professional before starting any exercise program to ensure that it is safe and appropriate for your individual needs.

These early intervention exercises are to improve health and fitness.
If you have an injury or illness, consult with a health care professional before attempting.

More Tools & Resources from Peak Ergonomics
Contact Us About Reducing Workplace Injuries
Healthy Employees are the Bottom Line! – Learn More!

Tennis Elbow Isometric Exercise - Strengthening the muscles around the elbow joint through isometric exercises can help to prevent future injuries and reduce the risk of re-injury


Dead Bug with Band

Dead Bug with Band  |  Early Intervention Ergonomics

What is the Dead Bug with Band Exercise?

The dead bug with band exercise is beneficial for core stability and strength, as well as improving coordination and balance. The resistance band adds an extra challenge by providing tension that you must work against. It also helps engage the muscles of the upper body while performing the exercise.

To perform the dead bug with a band exercise, you will need an exercise resistance band like a therapy band.                            Here’s how to do it:

  1. Start by lying on your back on an exercise mat or the floor. Bend your knees and bring them up so that your thighs are perpendicular to the floor. Your lower legs should be parallel to the floor, with your calves parallel to the ceiling.
  2. Hold the exercise resistance band with both hands, and wrap it around a solid stable surface. This creates tension in the band.
  3. Begin the exercise by engaging the latissimus dorsi muscle by pulling the band down to where your hands and arms are perpendicular to the floor (see video above) so that you feel that your abs are nice and tight.
  4. Bring one knee up then the other knee up. Keep them both bent. This is the beginning position of the exercise.
  5. Keeping everything tight and engaged, slowly bring one heel down and touch the floor and then back up.
  6. Repeat the movement on the opposite heel.  Do both sides for the desired amount of repetitions.
  7. As your muscles grow stronger, you can straighten out your leg a little more when touching the heel to the floor.

Early Intervention Benefits

The dead bug with band exercise offers numerous early intervention benefits. By incorporating this exercise into your routine, you can enhance core strength, improve stability, and promote overall body coordination and balance. Let’s delve into the specific advantages of this exercise:

  1. Core Strengthening: The dead bug with band targets the muscles of your core, including the abdominal muscles, lower back, and hip flexors. Strengthening these muscles can help improve posture, stabilize the spine, and enhance overall functional strength.
  2. Injury Prevention: A strong core plays a crucial role in injury prevention. By strengthening the muscles around your spine and pelvis, this exercise can help reduce the risk of back pain and injuries. It also improves the stability of your hips, which can contribute to better movement mechanics and lower the likelihood of hip-related issues.
  3. Improved Stability and Balance: The dead bug exercise challenges your core stability and requires coordination between the upper and lower body. By practicing this exercise regularly, you can enhance your body’s ability to stabilize and maintain balance, reducing the risk of falls or injuries during your daily work activities.
  4. Enhanced Performance: The dead bug with band exercise is beneficial for athletes and fitness enthusiasts. It helps improve overall body control, stability, and coordination, which can translate into better performance in various work activities.
  5. Increased Body Awareness: Performing the dead bug exercise requires conscious engagement of specific muscle groups. This increased body awareness can carry over into your daily life, helping you maintain proper posture, move efficiently, and make conscious choices about body alignment and positioning during other exercises or work activities.

Things to Remember

As with any exercise, it’s essential to maintain proper form and start with a resistance level that is appropriate for your fitness level. If you’re new to this exercise, you may want to begin without the resistance band and gradually incorporate it as you become more comfortable and stronger. Be sure to maintain proper form throughout the entire exercise. As with any exercise, consult with a qualified fitness professional if you have any underlying health conditions or concerns. 

These early intervention exercises are to improve overall health & fitness as well as help reduce work-related injuries. If you have an injury or illness, consult with a health care professional before attempting.

Contact us for more information on how we can help your employees stay safe.

Resources

More Tools & Resources from Peak Ergonomics
Contact Us About Reducing Workplace Injuries
Healthy Employees are the Bottom Line! – Learn More!

By strengthening the muscles around your spine and pelvis, the dead bug with band exercise can help reduce the risk of back pain and injuries.


Side Lying Thoracic Rotation

Side Lying Thoracic Rotation & Overhead Sweep

What is the Side Lying Thoracic Rotation exercise?

The Side Lying Thoracic Rotation is an effective exercise for targeting the thoracic spine, shoulders, and hips. To perform this exercise, lie on your side with your bottom arm extended in front of you and your top arm resting on your hip. Bend your knees at a 90-degree angle and keep your feet together on the ground. Slowly rotate your top arm towards the ceiling while lifting your top knee towards the ceiling, all while keeping your eyes on your hand. Hold the stretch for a few seconds, then slowly lower your arm and leg to the starting position. Repeat the exercise on the other side. This low-impact exercise is ideal for improving thoracic mobility, increasing shoulder range of motion, and reducing the risk of upper body injury. You can modify this exercise to suit all fitness levels with regular practice.

Early Intervention Benefits of this Exercise

The Side Lying Thoracic Rotation exercise offers numerous early intervention health benefits, making it an excellent addition to any exercise routine. It specifically targets the thoracic spine, improving its flexibility and mobility, while also increasing shoulder range of motion and hip mobility. Additionally, this exercise strengthens and stabilizes the upper body muscles, reducing the risk of injuries to the shoulders, back, and neck. By regularly practicing this exercise, you can improve your overall posture and reduce the risk of postural imbalances. Overall, this exercise is a low-impact exercise that can be modified to fit any fitness level and is highly recommended for anyone looking to improve their mobility and reduce the risk of injury.

These early intervention exercises are to improve health and fitness.
If you have an injury or illness, consult with a health care professional before attempting.

More Tools & Resources from Peak Ergonomics
Contact Us About Reducing Workplace Injuries
Healthy Employees are the Bottom Line!

The Side Lying Thoracic Rotation is an effective exercise for targeting the thoracic spine, shoulders, and hips.


Rotator Cuff Stretch

Rotator Cuff Stretch  |  Early Intervention Ergonomics

What is the Rotator Cuff Stretch?

The rotator cuff stretch is an early intervention exercise that involves stretching the muscles and tendons around the shoulder joint. To perform this stretch, reach your hands up behind your head, bringing your hands to your shoulder blades. Next, reach down your back as far as you can, then hold this stretch for 3-5 seconds and then relax. Repeat one more time.

Another variation of the stretch you can do involves stretching in a different direction.  Reach your hands up behind your back. Next, slide your hands up your spine as far up as you can reach. Hold for 3-5 seconds then relax and repeat one more time.

Moreover, it is essential to ensure that you’re using proper form during the stretch to avoid injury. The rotator cuff stretch can help improve flexibility, range of motion, and reduce the risk of shoulder injuries. It’s an excellent exercise for employees who work in factories, construction, the office or anyone who wants to maintain good shoulder health.

Early Intervention Benefits of this Stretch

Regularly performing the rotator cuff stretch can offer numerous early intervention benefits, including:

Firstly, it can help increase the flexibility of the muscles and tendons around the shoulder joint, making it easier to perform a wide range of movements. By improving flexibility, the rotator cuff stretch can also increase the range of motion in your shoulders, which can be particularly beneficial for factory workers, construction workers or anyone who performs activities that require a lot of shoulder movement.

Secondly, stretching the rotator cuff muscles can help reduce the risk of injury, such as rotator cuff tears or strains. Tight muscles and tendons in the shoulders can increase the risk of such injuries, but regularly performing the this stretch can help prevent this.

Finally, this stretch can help improve posture by loosening up tight muscles in the shoulders. Poor posture can lead to neck and back pain, so promoting better posture is a significant benefit of this exercise.

In conclusion, the rotator cuff stretch is a simple and effective exercise that provides numerous benefits, such as improving flexibility and range of motion, reducing the risk of injury, improving posture, and enhancing athletic performance.

This is an excellent stretch that replenishes nutrients and re-oxygenate the muscles of the shoulder complex. Perform this stretch to give your body a rest when performing activities that involve awkward postures of the shoulder such as reaching away from the body, hunching the shoulder, lifting or carrying.

These early intervention exercises are to improve overall health and fitness.
If you have an injury or illness, consult with a health care professional before attempting.

More Tools & Resources from Peak Ergonomics
Contact Us About Reducing Workplace Injuries
Healthy Employees are the Bottom Line! – Learn More!

The Rotator Cuff Stretch can help relieve tightness and reduce the risk of injury of the shoulder muscles.


Tendon Glides

Tendon Glides for Healthy Hands

Tendon Glides Explained

Tendon Glides are range-of-motion exercises that are often used to improve flexibility and reduce stiffness in the fingers and hands. These exercises are particularly helpful for people who are recovering from injuries or surgeries that have affected their hand or wrist mobility.

To perform one of the Tendon Glides, follow these steps:

  1. Begin by holding your hand out in front of you with your palm facing down.
  2. Slowly bend your fingers down towards your palm, keeping your thumb straight.
  3. Hold this position for a few seconds, then slowly straighten your fingers back out.
  4. Next, bend your fingers down towards your palm again, but this time, keep your fingers straight and only bend at the knuckles.
  5. Hold this position for a few seconds, then slowly straighten your fingers back out.
  6. Finally, make a fist with your hand, then slowly open your hand back up and stretch your fingers out.
  7. Repeat this exercise several times a day, gradually increasing the number of repetitions as your hand becomes stronger and more flexible.

Tendon Glides help to stretch and strengthen the tendons in the fingers and hands, improving overall flexibility and range of motion. It is a simple and effective exercise that can be done anywhere, anytime, and does not require any special equipment.

Early Intervention Benefits

The Tendon Glide exercise has several early intervention health benefits for the hands and fingers. Here are some of the key benefits:

  1. Improves flexibility: The Tendon Glide exercise is an excellent way to increase the flexibility of the tendons in your fingers and hands. By performing this exercise regularly, you can help reduce stiffness and improve your range of motion.
  2. Increases strength: The Tendon Glide exercise also helps to strengthen the tendons in your fingers and hands. This can be especially helpful for people who are recovering from injuries or surgeries and need to rebuild their strength.
  3. Reduces pain: People with conditions like arthritis or carpal tunnel syndrome often experience pain and discomfort in their hands and fingers. The Tendon Glide exercise can help reduce pain by improving flexibility and reducing stiffness.
  4. Prevents injuries: By keeping your hands and fingers flexible and strong, the Tendon Glide exercise can help prevent injuries like strains, sprains, and repetitive strain injuries.
  5. Improves dexterity: The Tendon Glide exercise can also improve your dexterity and fine motor skills. This can be especially beneficial for people who work with their hands, such as musicians or artists.

Overall, the Tendon Glide exercise is a simple and effective way to improve the health and function of your hands and fingers. It is easy to perform and can be done anywhere, making it a great addition to any exercise routine.

These early intervention exercises are to improve health and fitness.
If you have an injury or illness, consult with a health care professional before attempting.

More Tools & Resources from Peak Ergonomics
Contact Us About Reducing Workplace Injuries
Healthy Employees are the Bottom Line! – Learn More!

Tendon Glides are a simple and effective way to improve the health and function of your hands and fingers. It is easy to perform and can be done anywhere, making it a great addition to any exercise routine