Back Stretches

Back Stretches  |  Early Intervention Ergonomics

What are Back Stretches?

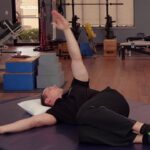
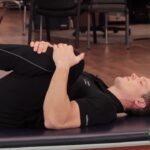
Back stretches are exercises or movements specifically designed to stretch and elongate the muscles and soft tissues in the back. These stretches help improve flexibility, relieve muscle tension, and reduce the risk of back pain and injury. Back stretches target various areas of the back, including the lower back (lumbar region), upper back (thoracic region), and the muscles along the sides of the spine.

Back stretches can involve bending, twisting, and elongating the spine, as well as stretching the surrounding muscles and connective tissues. They may be performed in standing, sitting, or lying positions, depending on the specific stretch.

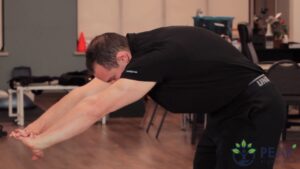
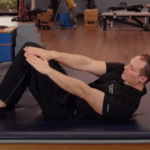
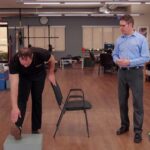
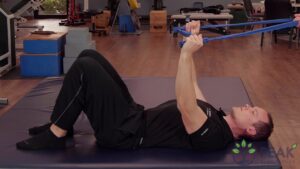
These stretches as shown in the video above, replenish nutrients and re-oxygenate the structures of the back. Perform these stretches to give your body a rest when performing activities that involve awkward postures of the back, such as bending forward, bending backward, side bending, or twisting. These are also good to do after prolonged sitting.

Early Intervention Benefits

Regularly incorporating back stretches into your routine can have several early intervention benefits, such as:

  • Increasing flexibility: Stretching helps improve the range of motion in your back, making everyday movements easier and reducing the risk of muscle strains.
  • Relieving muscle tension: Back stretches help relax and release tension in the muscles of the back, reducing stiffness and promoting relaxation.
  • Improving posture: Stretching the muscles in the back can help lengthen tight muscles and strengthen weak ones, leading to better posture and spinal alignment.
  • Promoting spinal health: Back stretches can help maintain the health and mobility of the spine by reducing the risk of disc compression and promoting optimal spinal alignment.
  • Preventing back pain and injury: Regular back stretching can help prevent muscle imbalances, strain, and injuries, particularly in people who have sedentary lifestyles or perform repetitive tasks that strain the back.

Things to Remember

Remember to perform back stretches in a controlled and gradual manner, avoiding any sudden or jerky movements. It’s essential to listen to your body and not push beyond your comfort level or into pain. If you have any pre-existing back conditions or concerns, it’s advisable to consult with a healthcare professional or a physical therapist before starting a new stretching routine. These early intervention exercises are to improve overall health & fitness as well as help reduce work-related injuries.

If you have an injury or illness, consult with a health care professional before attempting.

Contact us for more information on how we can help your employees stay safe. Healthy Employees ARE the Bottom Line!

Resources

More Tools & Resources from Peak Ergonomics
Contact Us About Reducing Workplace Injuries
Healthy Employees are the Bottom Line! – Learn More!

Back stretches can help muscle imbalances, strains, and injuries, in people who have work-related repetitive tasks that can strain the back.


Plank Exercise

Plank Exercise | Early Intervention Ergonomics

What is the Plank Exercise?

The plank exercise is a popular core-strengthening exercise that targets several muscle groups, including the abdominals, back, shoulders, and glutes. It is performed by assuming a position similar to a push-up, but instead of supporting yourself with your hands, you support your body weight on your forearms and toes.

Here’s how to perform the plank exercise:

  • Start by positioning yourself face-down on the floor or an exercise mat.
  • Bend your elbows and place your forearms on the ground, with your elbows directly beneath your shoulders.
  • Extend your legs behind you, resting your weight on your toes.
  • Your body should form a straight line from your head to your heels, with your core muscles engaged.
  • Maintain a neutral neck position by looking down at the floor, avoiding arching or rounding your back.
  • Hold this position for a specific amount of time, usually starting with 20 to 30 seconds, and gradually increasing the duration as you build strength.
  • Breathe steadily throughout the exercise.

The plank exercise is effective for building core strength, improving stability, and enhancing overall body control. It can be modified to suit different fitness levels by performing variations such as side planks, plank rotations, or incorporating movements like leg lifts or arm reaches. It’s important to maintain proper form and listen to your body, starting with shorter durations and gradually progressing as you become more comfortable and stronger.

Early Intervention Benefits of this Exercise

The plank exercise offers several early intervention health benefits. Here are some of the key advantages:

Injury prevention: A strong core and improved overall strength contribute to better stability and balance, reducing the risk of injuries, especially in the lower back and hips. The plank exercise helps develop the muscles that support and protect these areas.

Core strength: Planks primarily target the muscles of the core, including the deep abdominal muscles, obliques, and lower back muscles. By regularly performing planks, you can develop a strong and stable core, which is essential for proper posture, spinal alignment, and overall functional strength.

Improved posture: Planks engage the muscles that support the spine, helping to improve posture and reduce the risk of developing poor postural habits. Strengthening the core muscles can also alleviate lower back pain and promote better spinal alignment.

Enhanced overall strength: Planks are not just a core exercise; they also engage other major muscle groups such as the shoulders, glutes, and legs. Holding the plank position requires these muscles to work together, leading to improved overall strength and muscular endurance.

Increased flexibility: Performing planks helps to stretch and strengthen various muscle groups, including the shoulders, hamstrings, and arches of the feet. Over time, this can lead to increased flexibility and joint mobility.

Functional fitness: Planks are a functional exercise that translates to daily activities and work productivity. A strong core is vital for performing everyday tasks, such as lifting, bending, and twisting, with proper form and reduced risk of injury.

If you have an injury or illness, consult with a health care professional before attempting.

This early intervention exercise improves overall health & fitness and helps reduce work-related injuries.

The Plank exercise contributes to better stability and balance, reducing the risk of injuries, especially in the lower back and hips.


Superman Exercise

Superman Exercise | Prone Extension with Arm & Opposite Leg Lifts 

What is the Superman Exercise?

The prone extension with arms and opposite leg lift exercise, also known as the Superman exercise, is a core-strengthening exercise that targets the lower back, glutes, and hamstrings. Here’s how you perform the exercise:

  1. Lie face down (prone) on a mat or comfortable surface with your legs extended and arms straight out in front of you.
  2. Engage your core muscles by drawing your navel toward your spine.
  3. Simultaneously lift your right arm and left leg off the ground while keeping them straight. Keep your gaze down to maintain a neutral neck position.
  4. Hold the lifted position for a few seconds, focusing on contracting your glutes and engaging your lower back muscles.
  5. Slowly lower your right arm and left leg back to the starting position.
  6. Repeat the movement on the opposite side, lifting your left arm and right leg.
  7. Continue alternating sides for the desired number of repetitions or time.

It’s important to maintain proper form during this exercise. Avoid arching your lower back excessively or lifting your limbs too high, as this can strain your back. Start with a comfortable range of motion and gradually increase it as you build strength and stability.

Early Intervention Benefits of this Prone Extension Exercise

Here are some potential early intervention health benefits associated with this exercise:

  • Strengthening the back muscles: The prone extension exercise primarily targets the muscles of the lower back, such as the erector spinae and multifidus. Moreover, regular practice of this exercise can effectively strengthen these muscles, leading to several benefits. Firstly, it can contribute to better posture and spinal stability. Additionally, it may help reduce the risk of lower back pain.
  • Improving core stability: While performing the prone extension exercise, you engage the deep core muscles, including the transverse abdominis and the muscles of the pelvic floor. These muscles play a vital role in providing stability and support to the spine. Strengthening the core can enhance overall trunk stability and reduce the risk of injuries.
  • Enhancing shoulder stability: The arm lift component of this exercise targets the muscles of the shoulder, including the deltoids, rotator cuff muscles, and scapular stabilizers. Regular practice can help improve shoulder stability, which is important for maintaining proper posture and reducing the risk of shoulder injuries.
  • Engaging the gluteal muscles: The opposite leg lift component of the exercise activates the gluteal muscles, including the gluteus maximus, medius, and minimus. These muscles are important for hip stability and proper lower limb mechanics. Strengthening the glutes can contribute to improved posture, reduced risk of hip and knee injuries, enhanced employee workplace performance along with workplace productivity.
  • Promoting overall body coordination: The prone extension exercise involves lifting the opposite arm and leg while maintaining stability and control. This movement requires coordination and balance, which can help improve overall body awareness and neuromuscular control.

Things to remember…

It’s important to note that the health benefits may vary from individual to individual. It’s always a good idea to consult with a healthcare professional before starting a new exercise routine. If you have an injury or illness, consult with a health care professional before attempting. They can provide personalized recommendations based on your specific needs and any underlying health conditions. These early intervention exercises are to improve overall health and fitness and help reduce work-related injuries.


Seated Hamstring Stretch

Seated Hamstring Stretch for Healthy Back & Legs

What is the Seated Hamstring Stretch?

The Seated Hamstring Stretch is a simple and effective exercise that can help improve flexibility and relieve tightness in the hamstrings. To perform this stretch, start by sitting on a chair and scoot to the front of the chair. Next, extend your right leg so that your knee is completely straight. Make sure that your heel is on the ground and that your toes are pointing up in the air. Next, reach down towards your toes with both hands while keeping your knee straight.  Also, make sure that you are keeping both your chest and your head upright as you reach. Hold the stretch for 3-5 seconds, feeling the stretch in the back of your leg. Finally, repeat the stretch with your left leg.

To deepen the stretch, you can try reaching further forward or using a towel or yoga strap to help you gently pull yourself closer to your toes.

Overall, the Seated Hamstring Stretch is an excellent way to stretch and lengthen the hamstrings, which can help improve posture, reduce the risk of injury, and enhance workplace performance. This is an excellent stretch that replenishes nutrients and re-oxygenate the hamstrings muscles in the lower extremity. Perform this stretch to give your body a rest when performing activities that involve lifting, carrying, foot pedal use, prolonged standing, or prolonged walking.

Early Intervention Benefits of this Stretch

The seated hamstring stretch offers numerous early intervention health benefits that can improve your overall physical well-being.

Firstly, this stretch can increase flexibility and range of motion in the hamstrings. When you sit on the floor with your legs straight out in front of you and reach forward to touch your toes, you are lengthening and stretching the hamstring muscles. This can help to prevent injuries and improve your performance in physical activities that require a greater range of motion.

Additionally, the seated hamstring stretch can help to alleviate lower back pain. Tight hamstrings can contribute to lower back pain by placing extra stress on the lower back muscles. By stretching the hamstrings, you can relieve some of this tension and reduce the risk of developing lower back pain.

Moreover, the seated hamstring stretch can improve posture and balance. Tight hamstrings can cause an anterior pelvic tilt, which can result in poor posture and balance. By stretching the hamstrings regularly, you can correct this tilt and improve your posture and balance.

In conclusion, the seated hamstring stretch offers a range of health benefits, including increased flexibility and range of motion, relief from lower back pain, and improved posture and balance. By incorporating this stretch into your exercise routine, you can enhance your physical well-being and reduce the risk of injury.

These early intervention exercises are to improve health and fitness.
If you have an injury or illness, consult with a health care professional before attempting.

More Tools & Resources from Peak Ergonomics
Contact Us About Reducing Workplace Injuries
Healthy Employees are the Bottom Line! – Learn More!

Seated hamstring stretch is for activities that involve lifting, carrying, foot pedal use, prolonged standing, or prolonged walking.


Side Plank

Side Plank Exercise for a Healthy Spine & Core

What is the Side Plank?

The side plank is an effective variation of the plank exercise that specifically targets the obliques, hips, and shoulders. To start, lie on your side with your legs extended and stacked. Then, use your forearm to prop yourself up, ensuring that your elbow is aligned with your shoulder. Engage your core muscles and lift your hips off the ground to create a straight line from your head to your heels. Hold this position for 30 seconds to 1 minute before switching sides.

By adding variations to the side plank such as lifting a leg, lifting an arm, or incorporating hip dips or rotations, you can engage different muscles and increase the challenge. The side plank is a core-strengthening exercise that can enhance your balance, stability, and alleviate lower back pain.

What are the Early Intervention Benefits?

This exercise provides numerous early intervention benefits for the body, making it an ideal addition to any fitness routine. By specifically targeting the obliques, hips, and shoulders, it can help to tone and strengthen these areas. This exercise also improves core stability and balance, making it a great way to prevent lower back pain and injury.

In addition, this exercise offers versatility by allowing you to perform variations such as lifting a leg, lifting an arm, or incorporating hip dips or rotations. These modifications can help to engage different muscle groups and increase the challenge level.

Overall, the side plank is an effective and accessible exercise that offers significant benefits for your body. By incorporating it into your routine, you can improve your core strength, balance, and stability while reducing the risk of injury.

These exercises are to improve health and fitness.
If you have an injury or illness, consult with a health care professional before attempting.

More Tools & Resources from Peak Ergonomics
Contact Us About Reducing Workplace Injuries
Healthy Employees are the Bottom Line!

The side plank can improve your core strength, balance, and stability while reducing the risk of injury.


Dead Bug Exercise

Dead Bug Exercise  |  Early Intervention Ergonomics

What is the Dead Bug Exercise?

The Dead Bug Exercise is a popular core exercise that targets the muscles of the abdominal area and lower back. Furthermore, it is commonly used in fitness training, physical therapy, and rehabilitation programs. Interestingly, the exercise gets its name from the way it resembles a dead bug lying on its back with its legs and arms in the air.

Here’s how to perform the Dead Bug Exercise:

  1. Start by lying flat on your back on a mat or the floor. Bend your knees and lift your legs so that your thighs are perpendicular to the floor. Your lower legs should be parallel to the floor, creating a 90-degree angle at the knees.
  2. Raise your arms straight up toward the ceiling, extending them directly above your shoulders. Additionally, ensure that your palms are facing each other.
  3. Brace your core muscles by drawing your belly button in toward your spine. This will help stabilize your spine throughout the exercise.
  4. Begin the movement by simultaneously extending your right leg forward and lowering your left arm overhead until they are a few inches above the floor. Keep your lower back pressed into the floor throughout the movement to maintain stability.
  5. Return your leg and arm back to the starting position and repeat the movement on the opposite side, extending your left leg and lowering your right arm.
  6. Continue alternating sides in a controlled manner, maintaining proper form and alignment. Exhale as you extend your leg and arm, and inhale as you return to the starting position.

This exercise helps to strengthen the deep core muscles, improve stability, and promote better posture. It can be modified to suit different fitness levels by adjusting the range of motion or adding resistance, such as holding a stability ball or using resistance bands.

Early Intervention Benefits

The Dead Bug Exercise offers several early intervention benefits. Here are some of them:

  • Core Strengthening: The Dead Bug Exercise primarily targets the muscles of the core, including the rectus abdominis, transverse abdominis, and obliques. By engaging these muscles, it helps improve core strength and stability. A strong core is essential for maintaining proper posture, supporting the spine, and enhancing overall functional movement.
  • Spinal Stability: The exercise promotes spinal stability by challenging the muscles that surround and support the spine. It helps develop a strong and stable core, which can reduce the risk of back pain and injuries. By improving spinal stability, this exercise can also contribute to better posture and alignment.
  • Balance and Coordination: The alternating leg and arm movements in the Dead Bug Exercise require coordination and balance. Moreover, regularly practicing this exercise can enhance neuromuscular coordination, thereby helping you improve your balance and body control not only in the workplace but also in various other activities.
  • Injury Prevention: The Dead Bug Exercise can help prevent injuries by strengthening the core and improving stability. Moreover, a strong core provides a solid foundation for movements, thereby reducing the risk of excessive strain on the lower back. Additionally, it can help improve body mechanics and decrease the likelihood of overcompensation by other muscles, ultimately minimizing imbalances and potential injuries.
  • Rehabilitation and Posture Correction: The Dead Bug Exercise is commonly used in physical therapy and rehabilitation programs. It can be effective in rehabilitating and strengthening the core muscles after certain injuries or surgeries. Additionally, by targeting the muscles responsible for maintaining good posture, the exercise can assist in correcting postural imbalances and promoting a more aligned and stable body position.

Things to Remember

It’s important to perform the Dead Bug Exercise with control and avoid arching your back or allowing your lower back to lift off the floor. As always, consult with a qualified fitness professional or healthcare provider before starting any new exercise program.

Remember, while the Dead Bug Exercise offers numerous benefits, it’s important to perform it with proper form and technique to maximize its effectiveness and minimize the risk of injury. If you have any specific concerns or pre-existing conditions, consult with a qualified fitness professional or healthcare provider to ensure it’s suitable for you.

These early intervention exercises are to improve overall health & fitness as well as help reduce work-related injuries.

If you have an injury or illness, consult with a health care professional before attempting.

Contact us for more information on how we can help your employees stay safe.

Resources

More Tools & Resources from Peak Ergonomics
Contact Us About Reducing Workplace Injuries
Healthy Employees are the Bottom Line! – Learn More!

The Dead Bug Exercise can help prevent injuries by strengthening the core and improving stability. A strong core reduces lower back strain.


Supine Crunch Exercise

Supine Crunch Exercise for Healthy Back & Abs

What is a Supine Crunch?

A supine crunch is an effective core strengthening exercise that targets the rectus abdominis muscle group. This exercise is performed while lying on your back with your knees bent and your feet flat on the floor. The supine crunch involves lifting your upper back off the floor towards your knees while keeping your lower back in contact with the floor.

To perform a supine crunch, start by lying on your back with your knees bent and your feet flat on the floor. Place your hands behind your head and contract your abdominal muscles to lift your head and shoulders off the ground. Keep your elbows wide and pointing outwards to prevent your neck from straining.

Exhale as you lift your head and shoulders, and inhale as you lower them back to the starting position. Focus on engaging your abs and avoiding any jerky or sudden movements. Repeat for the desired number of repetitions.

Supine crunches are a great way to improve core strength and stability, which can help prevent back pain and improve posture. They are also a low-impact exercise that can be modified to suit your fitness level. Beginners can start with fewer repetitions and work up to more as they gain strength. Advanced exercisers can add weight or resistance to increase the challenge.

Note:  you can also do an oblique crunch by reaching the outside of the opposite side of one knee. Typically hold it for 2-3 seconds. Do the entire sequence on each side for 5 repetitions.

Early Intervention Benefits of this Exercise

The supine crunch exercise primarily targets the abdominal muscles. By performing it regularly, several early intervention health benefits can be offered, such as:

  1. Improved core strength. The supine crunch exercise engages the rectus abdominis, obliques, and other core muscles, leading to a stronger and more stable core.
  2. Increased flexibility. The exercise involves moving the upper and lower body simultaneously, which can improve flexibility and range of motion in the hips and lower back.
  3. Reduced risk of injury. A strong core can help stabilize the spine, reducing the risk of lower back pain and injury.
  4. Better posture. Strong core muscles help support the spine and improve posture, reducing the risk of neck and shoulder pain caused by poor posture.
  5. Improved athletic performance. A strong core is essential for most athletic activities. Furthermore, by incorporating supine crunches into a regular exercise routine, one can improve overall athletic performance.
  6. Weight loss and improved body composition. As a resistance exercise, the supine crunch can help build lean muscle mass in the abdominal area, which leads to improved body composition and weight loss over time.

While the supine crunch can be a beneficial exercise, it should be performed correctly to avoid injury. It’s recommended to consult with a qualified fitness professional to ensure proper form and technique.

These early intervention exercises are to improve health and fitness.
If you have an injury or illness, consult with a health care professional before attempting.

More Tools & Resources from Peak Ergonomics
Contact Us About Reducing Workplace Injuries
Healthy Employees are the Bottom Line! – Learn More!

Supine Crunch Exercise

Hamstring Stretch

Hamstring Stretch |  Early Intervention Ergonomics

What is the Hamstring Stretch?

The hamstring stretch is a popular exercise that targets the hamstring muscles, which are located at the back of the thigh. This stretch is performed in a standing position, making it convenient and accessible for people of all fitness levels. By incorporating this stretch into your routine, you can improve flexibility, reduce muscle tension, and potentially alleviate lower back pain.

This is an excellent stretch that replenishes nutrients and re-oxygenate the hamstring muscles in the lower extremity. Perform this stretch to give your body a rest when performing activities that involve lifting, carrying, foot pedal use, prolonged standing or prolonged walking.

To perform the hamstring stretch, follow these simple steps:

  1. Please use a chair or a countertop to maintain your balance.
  2. Begin by standing up straight with your feet hip-width apart.
  3. Take a step forward with your right foot, keeping both legs straight.
  4. Place your left hand on the chair for safety & stability.
  5. Slowly hinge forward at the hips, maintaining a flat back and keeping your chest lifted.
  6. Continue bending forward until you feel a gentle stretch in the back of your right thigh.
  7. Hold the stretch for 3-5 seconds and relax.
  8. Repeat the stretch on the other leg by stepping forward with your left foot.

Early Intervention Benefits

The hamstring stretch offers numerous early intervention benefits for your overall well-being and safety. By incorporating this stretch into your morning exercise routine, you can enjoy improved flexibility, reduced muscle tension, enhanced work performance, and potentially decreased risk of hamstring injuries. Stretching your hamstrings regularly can also help alleviate lower back pain, promote better posture, and increase blood flow to the muscles. Discover the advantages of this stretch and how it can contribute to your overall fitness goals and injury prevention strategies.

Things to Remember

Remember, it’s essential to perform the hamstring stretch safely and avoid bouncing or jerking movements, as this can lead to injury. Additionally, if you have any pre-existing conditions or concerns, consult with a healthcare professional before incorporating this stretch into your routine.

Incorporating this stretch into your exercise regimen can help enhance your overall flexibility and promote healthy muscle function. Add this stretch to your warm-up or cooldown routine for optimal results. Enjoy the benefits of improved hamstring flexibility and greater mobility in your daily activities!

These exercises are to improve overall health & fitness as well as reduce work-related injuries.
If you have an injury or illness, consult with a health care professional before attempting.

Contact us for more information on how we can help your employees stay safe.

More Tools & Resources from Peak Ergonomics
Contact Us About Reducing Workplace Injuries
Healthy Employees are the Bottom Line! – Learn More!

Safely improve your mobility, flexibility and prevent injuries with the hamstring stretch. Perform this stretch correctly for optimal results.


Lower Trunk Rotation Stretch

Lower Trunk Rotation Stretch  |  Early Intervention Ergonomics

What is the Lower Trunk Rotation with Supine IR Quadratus Stretch?

The Lower Trunk Rotation with Supine Internal Rotation (IR) Quadratus Stretch is an effective stretching exercise that specifically targets the muscles in the lower trunk and hips. This exercise is frequently employed in rehabilitation and sports training settings to improve mobility and flexibility in the hip and lower back regions. To perform this stretch, follow this step-by-step guide:

  • Begin by lying on your back in a supine position on a flat surface like a mat or a bed.
  • Extend both legs fully along the floor.
  • Bend your right knee and place your right foot flat on the floor, while keeping your left leg extended.
  • Extend your arms straight out to the sides, parallel to the floor.
  • Slowly and gently lower your right knee across your body towards the left side, while ensuring your shoulders and left foot stay in contact with the surface.
  • Maintain a relaxed and comfortable position, avoiding excessive twisting or strain in your lower back.
  • Hold the stretch for 15 to 30 seconds, experiencing a gentle stretch in the muscles of your lower back and hip.
  • Return your right knee to the starting position and repeat the stretch on the opposite side.

A Beneficial Addition to this Stretch

For an added benefit, you can incorporate supine internal rotation of the quadratus lumborum (QL) muscle:

  • After lowering your right knee towards the left side, keep your right foot in contact with the surface and internally rotate your right hip.
  • This movement will cause a slight rotation of your lower trunk, effectively targeting the quadratus lumborum muscle on the right side.
  • Hold the stretch with the internal rotation for 15 to 30 seconds.
  • Return your right knee to the starting position and repeat the stretch on the opposite side, incorporating internal rotation as well.

It’s crucial to note that if you have any pre-existing injuries or medical conditions, or if you feel pain or discomfort while performing this stretch, it is advisable to consult a qualified healthcare professional or physical therapist before attempting it. They can provide personalized guidance based on your specific needs, ensuring that you execute the exercise correctly and safely.

Early Intervention Benefits

The Lower Trunk Rotation with Supine Internal Rotation (IR) Quadratus Stretch offers several early intervention benefits. Here are some of the key advantages:

  • Improved lower back and hip flexibility: By regularly performing this stretch, you can effectively target the muscles in the lower trunk and hips, including the quadratus lumborum. This muscle plays a crucial role in the lateral flexion and rotation of the spine. As a result, you can experience an increase in flexibility and range of motion in these areas. This, in turn, reduces the risk of stiffness and facilitates improved movement patterns.
  • Enhanced spinal mobility: The rotational aspect of this stretch helps improve spinal mobility, particularly in the lower back region. It allows for greater rotation and movement between the vertebrae, which can contribute to a healthier and more functional spine.
  • Injury prevention: By increasing flexibility, range of motion, and spinal mobility, the Lower Trunk Rotation with Supine IR Quadratus Stretch can help prevent injuries, especially in the lower back, hips, and surrounding muscles. The tightness and limited mobility in these areas can have adverse effects, such as compensatory movements and excessive stress on other structures. As a result, this increases the vulnerability to strains, sprains, and various musculoskeletal issues. However, by regularly incorporating this stretch into your routine, you can effectively counteract these risks. This stretch helps in maintaining optimal mobility and thereby significantly reduces the likelihood of experiencing such injuries.
  • Core muscle activation and stability: During this stretch, your core muscles, including the abdominals and obliques, work to stabilize the pelvis and spine. By engaging these muscles, you can improve core strength and stability, which are crucial for maintaining proper posture and preventing excessive strain on the lower back.

Things to Remember

It is vital to perform this stretch with proper technique and actively avoid any movements or positions that induce pain or discomfort. Moreover, if you have any underlying medical conditions or concerns, it is highly recommended to consult with a healthcare professional or a qualified physical therapist. Their expertise can provide personalized guidance, ensuring the exercise is suitable for your specific needs and circumstances.

These early intervention exercises are to improve overall health & fitness as well as help reduce work-related injuries.
If you have an injury or illness, consult with a health care professional before attempting.

More Tools & Resources from Peak Ergonomics
Contact Us About Reducing Workplace Injuries
Healthy Employees are the Bottom Line! – Learn More!

The Lower Trunk Rotation Stretch can help prevent injuries by increasing flexibility, range of motion and spinal stability.


Seated Hip Rotator Stretch

Seated Hip Rotator Stretch – Early Intervention Ergonomics

What is the Seated Hip Rotator Stretch?

The seated hip rotator stretch is a highly effective stretching exercise that can help increase flexibility and mobility in your hip joints. To perform this stretch, start by sitting on a sturdy chair. Cross your right leg over your left, placing your ankle on your left knee. Grab the right knee with both hands and pull it gently towards your left shoulder. Hold for 3-5 seconds and repeat on the opposite side. Perform this stretch to give your body a rest when performing activities that involve lifting, carrying, foot pedal use, prolonged standing, prolonged sitting or prolonged walking. This stretch is particularly useful for individuals who spend extended periods of time sitting, as it can help alleviate stiffness and tension in the hips.

Early Intervention Benefits of this Stretch

The seated hip rotator stretch is an excellent early intervention exercise that can help strengthen the hip muscles thus improving stability and preventing injuries in the hips, knees, and ankles. Strong hip muscles can also reduce knee pain and lower back pain. Stretches can help to improve hip flexibility and range of motion.
In addition to the benefits mentioned above, studies have found that greater hip external rotator strength allows better dynamic control and hip function upon landing.

Insufficient hip internal rotation can lead to gait issues. When other parts of the lower body compensate for insufficient hip internal rotation, it might increase your risk of an injury. Some hip internal rotation exercises and stretches can put pressure on your knees. If you feel pain in your knee at any time, you should stop immediately.

If you have an injury or illness, consult with a health care professional before attempting.

These early intervention exercises are to improve overall health and fitness.

More Tools & Resources from Peak Ergonomics
Contact Us About Reducing Workplace Injuries
Healthy Employees are the Bottom Line! – Learn More!

Seated hip rotator stretch is for those who spend extended periods of time sitting, as it can alleviate stiffness and tension in the hips.


Wall Squat

Wall Squat  |  Early Intervention Ergonomics

What is the Wall Squat?

This exercise promotes strength for the hips and knees. Wall squats are an effective exercise for building strength in your glutes, hamstrings, and quadriceps—especially your inner thighs. In addition to the legs, wall squats also activate your abdominal muscles to help build core strength. They help build muscular endurance as well since they are an isometric exercise, meaning the body remains in a static position throughout the workout. Wall squats are also a convenient home workout.

To perform a wall squat, you stand with your back against a wall, feet shoulder-width apart, and slide your back down the wall until your thighs are parallel to the floor. Your knees should be bent at a 90-degree angle, and your back should be flat against the wall. You hold this position for a set amount of time or until your muscles fatigue. This exercise is a great way to build lower body strength and endurance.

Early Intervention Benefits

Wall squats have several benefits, including:

  • Strengthening of the leg muscles: Wall squats are an effective way to strengthen the muscles in your legs, including your quadriceps, hamstrings, and glutes. These muscles are essential for activities like walking, running, and jumping.
  • Improved posture: Wall squats help to improve your posture by engaging the muscles in your back and core. By keeping your back flat against the wall and maintaining proper alignment, you can help to prevent back pain and improve your overall posture.
  • Increased joint mobility: Squats can help to increase the mobility of your hip, knee, and ankle joints. This increased mobility can help to reduce the risk of injury and improve your overall range of motion.
  • Enhanced balance and stability: Wall squats require you to maintain your balance and stability, which can help to improve your overall balance and stability. This can be particularly beneficial for older adults, as it can help to reduce the risk of falls.
  • Improved bone density: Weight-bearing exercises like wall squats can help to improve bone density, which can reduce the risk of osteoporosis and other bone-related conditions.

Overall, wall squats are a great exercise for improving lower body strength, balance, and stability, and can provide several important health benefits.

Things to Remember

It’s important to note that while these exercises can be beneficial, it’s crucial to perform them with proper form and within your pain-free range of motion. If you have any underlying back, knee or hip conditions, it’s advisable to consult with a healthcare professional or a physical therapist before incorporating these exercises into your routine.

If you experience any pain or discomfort during the exercise or have specific concerns, it’s advisable to consult with a healthcare professional for guidance tailored to your individual needs.

These early intervention exercises are to improve overall health & fitness as well as help reduce work-related injuries.

If you have an injury or illness, consult with a health care professional before attempting.

Contact us for more information on how we can help your employees stay safe.

Healthy Employees ARE the Bottom Line!

More Tools & Resources from Peak Ergonomics
Contact Us About Reducing Workplace Injuries
Healthy Employees are the Bottom Line! – Learn More!

Wall squats are an effective way to strengthen the muscles in your legs, including your quadriceps, hamstrings, and glutes. These muscles are essential for activities like walking, running, and jumping.


Dead Bug with Band

Dead Bug with Band  |  Early Intervention Ergonomics

What is the Dead Bug with Band Exercise?

The dead bug with band exercise is beneficial for core stability and strength, as well as improving coordination and balance. The resistance band adds an extra challenge by providing tension that you must work against. It also helps engage the muscles of the upper body while performing the exercise.

To perform the dead bug with a band exercise, you will need an exercise resistance band like a therapy band.                            Here’s how to do it:

  1. Start by lying on your back on an exercise mat or the floor. Bend your knees and bring them up so that your thighs are perpendicular to the floor. Your lower legs should be parallel to the floor, with your calves parallel to the ceiling.
  2. Hold the exercise resistance band with both hands, and wrap it around a solid stable surface. This creates tension in the band.
  3. Begin the exercise by engaging the latissimus dorsi muscle by pulling the band down to where your hands and arms are perpendicular to the floor (see video above) so that you feel that your abs are nice and tight.
  4. Bring one knee up then the other knee up. Keep them both bent. This is the beginning position of the exercise.
  5. Keeping everything tight and engaged, slowly bring one heel down and touch the floor and then back up.
  6. Repeat the movement on the opposite heel.  Do both sides for the desired amount of repetitions.
  7. As your muscles grow stronger, you can straighten out your leg a little more when touching the heel to the floor.

Early Intervention Benefits

The dead bug with band exercise offers numerous early intervention benefits. By incorporating this exercise into your routine, you can enhance core strength, improve stability, and promote overall body coordination and balance. Let’s delve into the specific advantages of this exercise:

  1. Core Strengthening: The dead bug with band targets the muscles of your core, including the abdominal muscles, lower back, and hip flexors. Strengthening these muscles can help improve posture, stabilize the spine, and enhance overall functional strength.
  2. Injury Prevention: A strong core plays a crucial role in injury prevention. By strengthening the muscles around your spine and pelvis, this exercise can help reduce the risk of back pain and injuries. It also improves the stability of your hips, which can contribute to better movement mechanics and lower the likelihood of hip-related issues.
  3. Improved Stability and Balance: The dead bug exercise challenges your core stability and requires coordination between the upper and lower body. By practicing this exercise regularly, you can enhance your body’s ability to stabilize and maintain balance, reducing the risk of falls or injuries during your daily work activities.
  4. Enhanced Performance: The dead bug with band exercise is beneficial for athletes and fitness enthusiasts. It helps improve overall body control, stability, and coordination, which can translate into better performance in various work activities.
  5. Increased Body Awareness: Performing the dead bug exercise requires conscious engagement of specific muscle groups. This increased body awareness can carry over into your daily life, helping you maintain proper posture, move efficiently, and make conscious choices about body alignment and positioning during other exercises or work activities.

Things to Remember

As with any exercise, it’s essential to maintain proper form and start with a resistance level that is appropriate for your fitness level. If you’re new to this exercise, you may want to begin without the resistance band and gradually incorporate it as you become more comfortable and stronger. Be sure to maintain proper form throughout the entire exercise. As with any exercise, consult with a qualified fitness professional if you have any underlying health conditions or concerns. 

These early intervention exercises are to improve overall health & fitness as well as help reduce work-related injuries. If you have an injury or illness, consult with a health care professional before attempting.

Contact us for more information on how we can help your employees stay safe.

Resources

More Tools & Resources from Peak Ergonomics
Contact Us About Reducing Workplace Injuries
Healthy Employees are the Bottom Line! – Learn More!

By strengthening the muscles around your spine and pelvis, the dead bug with band exercise can help reduce the risk of back pain and injuries.


Side Lying Thoracic Rotation

Side Lying Thoracic Rotation & Overhead Sweep

What is the Side Lying Thoracic Rotation exercise?

The Side Lying Thoracic Rotation is an effective exercise for targeting the thoracic spine, shoulders, and hips. To perform this exercise, lie on your side with your bottom arm extended in front of you and your top arm resting on your hip. Bend your knees at a 90-degree angle and keep your feet together on the ground. Slowly rotate your top arm towards the ceiling while lifting your top knee towards the ceiling, all while keeping your eyes on your hand. Hold the stretch for a few seconds, then slowly lower your arm and leg to the starting position. Repeat the exercise on the other side. This low-impact exercise is ideal for improving thoracic mobility, increasing shoulder range of motion, and reducing the risk of upper body injury. You can modify this exercise to suit all fitness levels with regular practice.

Early Intervention Benefits of this Exercise

The Side Lying Thoracic Rotation exercise offers numerous early intervention health benefits, making it an excellent addition to any exercise routine. It specifically targets the thoracic spine, improving its flexibility and mobility, while also increasing shoulder range of motion and hip mobility. Additionally, this exercise strengthens and stabilizes the upper body muscles, reducing the risk of injuries to the shoulders, back, and neck. By regularly practicing this exercise, you can improve your overall posture and reduce the risk of postural imbalances. Overall, this exercise is a low-impact exercise that can be modified to fit any fitness level and is highly recommended for anyone looking to improve their mobility and reduce the risk of injury.

These early intervention exercises are to improve health and fitness.
If you have an injury or illness, consult with a health care professional before attempting.

More Tools & Resources from Peak Ergonomics
Contact Us About Reducing Workplace Injuries
Healthy Employees are the Bottom Line!

The Side Lying Thoracic Rotation is an effective exercise for targeting the thoracic spine, shoulders, and hips.


Pelvic Tilt

Pelvic Tilt | Early Intervention Ergonomics

What is the Pelvic Tilt exercise?

The pelvic tilt exercise is a simple and effective exercise that targets the muscles in the lower back and the core. It helps to improve posture, strengthen the abdominal muscles, and stabilize the pelvis. Here’s how you can perform the pelvic tilt exercise:

  1. Lie on your back on a mat or a comfortable surface with your knees bent and feet flat on the floor, hip-width apart. Keep your arms relaxed at your sides.
  2. Take a deep breath in and, as you exhale, gently press your lower back into the floor, tilting your pelvis backward. Imagine flattening your lower back against the mat.
  3. Hold this position for a few seconds while maintaining a relaxed breathing pattern. Focus on engaging your abdominal muscles during the hold.
  4. Slowly release the tilt and return to the starting position.
  5. Repeat the exercise for a desired number of repetitions.

It’s important to note that the pelvic tilt exercise should be performed with control and without straining. Avoid excessive arching of the back or lifting the hips off the floor. Start with a few repetitions and gradually increase as your strength improves. If you have any underlying medical conditions or concerns, it’s always a good idea to consult with a healthcare professional before starting a new exercise routine.

Early Intervention Benefits

Performing the pelvic tilt exercise can also be beneficial in reducing work-related injuries. Here are some early intervention benefits of this exercise:

  • Core Stability for Heavy Lifting: Many work environments involve lifting, carrying, or moving heavy objects, which can put strain on the lower back. The pelvic tilt exercise strengthens the core muscles, including the deep abdominal muscles, providing stability and support during lifting tasks. This can help reduce the risk of lower back injuries and strains.
  • Improved Posture during Desk Work: For individuals who spend long hours sitting at a desk, maintaining proper posture is crucial in preventing work-related injuries such as back pain, neck strain, and postural imbalances. Regularly practicing pelvic tilts can help improve posture by promoting a neutral pelvis position, reducing the likelihood of slouching and related issues.
  • Reduced Risk of Musculoskeletal Disorders: Work-related musculoskeletal disorders (MSDs) are common among individuals who perform repetitive tasks or have poor ergonomics at their workplace. The pelvic tilt exercise enhances body awareness and encourages proper alignment of the spine, reducing the strain on muscles, joints, and ligaments. This can help mitigate the risk of MSDs such as lower back pain, hip discomfort, and muscle imbalances.
  • Increased Body Mechanics Awareness: By engaging the core muscles and focusing on proper pelvic alignment, the pelvic tilt exercise promotes body mechanics awareness. This heightened awareness can translate into improved movement patterns and mechanics during work activities, reducing the risk of acute injuries and chronic strain on the body.
  • Injury Rehabilitation and Prevention: For individuals recovering from work-related injuries or looking to prevent them, the pelvic tilt exercise can be part of a comprehensive rehabilitation or prehabilitation program. It gently activates the core muscles, aids in recovery, and promotes stability and strength in the lower back, reducing the chances of reinjury or further strain.

Things to Remember

It’s important to note that while the pelvic tilt exercise can be beneficial for reducing work-related injuries, it is advisable to consider other ergonomic factors. For example, using proper lifting techniques, adjusting workstations, and incorporating regular breaks and stretching routines into your daily work routine. Contact us here at Peak Ergonomics for more information and further assistance in reducing work-related injuries.

The Pelvic Tilt exercise can help reduce the risk of MSDs such as lower back pain, hip discomfort, and muscle imbalances.

These early intervention exercises are to improve overall health & fitness and help reduce work-related injuries.

If you have an injury or illness, consult with a health care professional before attempting.


Knee to Chest Stretch (Single/Double)

Knee to Chest Stretch

What is the Knee to Chest Stretch?

This stretch is an early intervention stretching exercise that targets the lower back and hips.

Here’s how to do it:

  1. Lie down on your back on a comfortable surface, such as a yoga mat or a carpeted floor.
  2. Bend your knees and plant your feet firmly on the ground.
  3. Take a deep breath in, and as you exhale, slowly lift one knee towards your chest.
  4. Use your hands to gently pull your knee towards your chest. Gently pull until you feel a stretch in your lower back and hip.
  5. Hold the stretch for 3-5 seconds.
  6. Slowly release your leg and return it to the starting position.
  7. Repeat on the other leg.

You can perform this stretch a few times on each leg, depending on your comfort level. This stretch can help improve flexibility, reduce tension in the lower back, and improve circulation to the hips and legs.  If you have an injury or illness, consult with a health care professional before attempting.

What are the Early Intervention Benefits of this Stretch?

The knee to chest stretch provides a variety of early intervention health benefits, including:

  1. Improved flexibility: Firstly, it can improve flexibility by targeting the lower back, hips, and glutes, thereby increasing range of motion and flexibility in these areas.
  2. Reduced tension and pain: Additionally, this stretch can reduce tension and pain by gently stretching the muscles in the lower back and hips, providing relief from discomfort.
  3. Improved posture: Furthermore, tight muscles in the lower back and hips can contribute to poor posture, which can be improved by regularly performing this stretch.
  4. Increased circulation: Moreover, this stretch can increase circulation by helping blood flow to the hips and legs, which can promote healing and reduce inflammation.
  5. Stress relief: Finally, the deep breathing and gentle stretching involved in the knee to chest stretch can also provide stress relief and promote relaxation.

These early intervention exercises are to improve health and fitness.

It’s important to note that while the knee to chest stretch is generally safe for most people, it may not be appropriate for those with certain injuries or medical conditions. If you have any concerns about the safety of this stretch, be sure to consult with a healthcare provider.

More Tools & Resources from Peak Ergonomics
Contact Us About Reducing Workplace Injuries
Healthy Employees are the Bottom Line! – Learn More!

Knee to chest stretch helps promote range of motion and flexibility to the lower back and hips


One-Leg Standing

One-Leg Standing  |  Early Intervention Ergonomics

What is the One-Leg Standing Exercise?

The one-leg standing exercise, also known as the single-leg stance, is a balance exercise that involves standing on one leg while maintaining stability. It is a simple yet effective exercise that helps improve balance, coordination, and overall lower body strength.

To perform the one-leg standing exercise, follow these steps:

  1. IMPORTANT: In order to maintain safety, make sure to use a sturdy chair or countertop to lightly hold onto during this exercise in order to maintain your balance.
  2. Stand tall with your feet shoulder-width apart and arms by your sides.
  3. Choose one leg to start with and slightly lift the other leg off the ground, bending it at the knee.
  4. Find a focal point in front of you and focus your gaze on it to help maintain balance.
  5. Engage your core muscles and maintain an upright posture throughout the exercise.
  6. Hold this position for about 60 seconds.

Remember to perform the exercise on both legs to ensure balance development on both sides of the body.

Early Intervention Benefits

The one-leg standing exercise, offers several early intervention benefits, primarily focusing on balance, stability, and lower body strength. Here are some of the key benefits:

  • Balance improvement: Performing the single-leg stance challenges your body’s ability to maintain stability on one leg. By practicing this exercise regularly, you can enhance your balance and proprioception, which is your body’s awareness of its position in space. Improved balance is essential for daily activities, sports performance, and fall prevention, particularly for older adults.
  • Core muscle activation: Balancing on one leg requires significant engagement of the core muscles, including the abdominal muscles, lower back muscles, and hip stabilizers. These muscles work together to maintain a stable and upright posture during the exercise. Over time, this can lead to improved core strength and stability.
  • Lower body strength development: The single-leg stance targets the muscles in the standing leg, including the quadriceps, hamstrings, glutes, and calf muscles. These muscles are responsible for maintaining the position and supporting your body weight during the exercise. By regularly performing the single-leg stance, you can strengthen these muscles, which can improve overall lower body strength and stability.
  • Injury prevention: Strengthening the muscles involved in balance and stability can help reduce the risk of falls and injuries, particularly in activities that require single-leg support, such as running, jumping, and changing directions quickly. By practicing the single-leg stance, you can improve your body’s ability to handle the demands of these activities, decreasing the likelihood of accidents.
  • Rehabilitation and injury recovery: The single-leg stance is often used in physical therapy and rehabilitation programs to help individuals recover from lower body injuries, such as ankle sprains or knee injuries. By gradually reintroducing weight-bearing and challenging balance, the exercise aids in restoring stability, strength, and confidence in the injured limb.

Things to Remember

As with any exercise, it’s important to listen to your body and avoid pushing beyond your limits. If you have any concerns or pre-existing medical conditions, it’s recommended to consult with a healthcare professional before starting a new exercise routine.

It’s important to note that individual results may vary, and it’s always recommended to consult with a healthcare professional or a qualified fitness trainer before starting any new exercise program, especially if you have pre-existing medical conditions or concerns. They can provide personalized guidance and adapt the exercise to your specific needs and abilities.

These early intervention exercises are to improve overall health and fitness as well as reduce work-related injuries.
Remember: If you have an injury or illness, consult with a health care professional before attempting.

More Tools & Resources from Peak Ergonomics
Contact Us About Reducing Workplace Injuries
Healthy Employees are the Bottom Line! – Learn More!

Single-leg standing can strengthen the muscles involved in balance and stability which in turn will help reduce the risk of falls and injuries


Calf Stretch

Calf Stretch  |  Early Intervention Ergonomics

What is the Calf Stretch?

The calf stretch is a simple stretching exercise that targets the calf muscles. It is important to have something to support your balance during this stretch to ensure stability and prevent falls. Here are the instructions for performing the calf stretch:

  1. Find a sturdy wall, chair, or any elevated surface that can provide support.
  2. Step forward with the left leg, keeping the back leg straight and the heel flat on the ground.
  3. Make sure that your toes are pointed straightforward like you’re on skis.
  4. While keeping your back straight and core engaged, shift your weight forward onto the front leg and slowly lean forward, maintaining contact with the support.
  5. Continue leaning forward until you feel a gentle stretch in your calf muscle. You should feel the stretch along the back of your lower leg.
  6. Hold the stretch for about 3-5 seconds, focusing on maintaining your balance and feeling a comfortable stretch. Breathe deeply and relax into the stretch.
  7. After the desired duration, gradually return to the starting position by pushing through the support and bringing your body back upright.
  8. Repeat the stretch with the right leg forward and repeat steps 1-7.

Perform the standing calf stretch to give your body a rest when performing activities involving lifting, carrying, foot pedal use, prolonged standing, or prolonged walking.

Early Intervention Benefits

The standing calf stretch offers several early intervention benefits. Here are some of them:

Health Benefits:
  • Improved Flexibility: The standing calf stretch targets the calf muscles, specifically the gastrocnemius and soleus. Regularly performing this stretch can increase the flexibility of these muscles, allowing for better range of motion in ankle movements and overall lower body flexibility.
  • Enhanced Muscle Function: Stretching the calf muscles helps improve their elasticity and promotes better muscle function. This can lead to improved performance in workplace activities that involve lifting, carrying, foot pedal use, prolonged standing, or prolonged walking.
  • Reduced Muscle Tension: Tight calf muscles can contribute to muscle tension and discomfort. By regularly stretching the calves, you can help alleviate muscle tightness and reduce the risk of cramping and discomfort in the lower legs.
Injury Prevention Benefits:
  • Decreased Risk of Calf Strains: Stretching the calf muscles before engaging in physical activities can help reduce the risk of calf strains. This is especially important for activities that involve sudden bursts of speed or jumping.
  • Improved Ankle Stability: The standing calf stretch also targets the Achilles tendon, which plays a crucial role in ankle stability. By stretching the calf muscles and promoting flexibility in the Achilles tendon, you can improve ankle stability and reduce the likelihood of ankle sprains.
  • Balanced Lower Body Mechanics: Tight calf muscles can alter lower body mechanics, leading to compensatory movements and increased stress on other muscles and joints. Regularly stretching the calves helps maintain proper muscle balance, which can reduce the risk of imbalances and associated injuries.
  • Injury Rehabilitation: The standing calf stretch is also beneficial during injury rehabilitation, particularly for calf strains or Achilles tendonitis. Gradually incorporating this stretch into a rehabilitation program can aid in recovery and prevent future injuries.

Things to Remember

Remember to never bounce or force the stretch beyond your comfort zone, as it may lead to injury. Having a stable support, such as a wall or sturdy chair, ensures that you can maintain balance throughout the exercise and perform the stretch safely. If you have any specific concerns or pre-existing conditions, it’s advisable to consult with a qualified healthcare professional before starting any new stretching routine. These early intervention exercises are to improve overall health & fitness as well as help reduce work-related injuries.

If you have an injury or illness, consult with a health care professional before attempting.

Contact us for more information on how we can help your employees stay safe.

Resources

More Tools & Resources from Peak Ergonomics
Contact Us About Reducing Workplace Injuries
Healthy Employees are the Bottom Line! – Learn More!

Calf stretch leads to improved work-related activities involving lifting, carrying, foot pedal use & prolonged standing and walking.


Quadruped Thoracic Rotation

Quadruped Thoracic Rotation  |  Early Intervention Ergonomics

What is the Quadruped Thoracic Rotation Exercise?

The quadruped thoracic rotation exercise is a movement that targets and mobilizes the thoracic spine, which is the middle portion of the spine located between the cervical (neck) and lumbar (lower back) regions. This exercise is commonly used in many exercise routines to improve thoracic mobility, increase range of motion, and reduce stiffness or pain in the upper back.

Here’s how to perform the quadruped thoracic rotation exercise:

  1. Start by positioning yourself on all fours (quadruped position) on an exercise mat or the floor. Your hands should be directly under your shoulders, and your knees under your hips.
  2. Ensure your back is in a neutral position, with a slight natural curve in your lower back.
  3. Place one hand behind your head, with your elbow pointing out to the side. This will be your starting position.
  4. Slowly rotate your upper body by leading with your elbow. Focus on rotating through your thoracic spine while keeping your hips and lower back stable. Avoid twisting or excessively arching your lower back.
  5. Continue the rotation until you feel a stretch or mild tension in your upper back and shoulder area.
  6. Hold the end position for a few seconds, maintaining control and feeling the stretch.
  7. Return to the starting position by rotating back to neutral, and then repeat the movement on the opposite side.
  8. Perform the exercise for the desired number of repetitions or as recommended by your trainer or therapist.

It’s important to note that if you have any existing back or shoulder injuries or conditions, it’s recommended to consult with a healthcare professional or a qualified fitness trainer before attempting this exercise. They can provide personalized guidance and adapt the exercise to your specific needs and capabilities.

Early Intervention Benefits of this Exercise

The Quadruped Thoracic Rotation exercise offers several early intervention health benefits for the body. Here are some of the advantages:

  • Improved Thoracic Mobility: This exercise specifically targets the thoracic spine, helping to increase its mobility and range of motion. The thoracic spine is designed to rotate, and this exercise promotes better movement in that area, which can alleviate stiffness and improve overall spinal function.
  • Increased Spinal Flexibility: By actively rotating the upper body while maintaining stability in the lower back and hips, the exercise promotes flexibility and suppleness in the spine. Improved spinal flexibility can contribute to better posture and reduced risk of injuries.
  • Enhanced Core Stability: The Quadruped Thoracic Rotation exercise engages the muscles of the core, including the abdominals, obliques, and spinal stabilizers. These muscles work to maintain stability in the torso while the upper body rotates, improving core strength and stability.
  • Improved Shoulder Mobility: As the exercise involves rotating the upper body and reaching with the arm, it helps to enhance shoulder mobility and flexibility. It can be particularly beneficial for individuals who spend extended periods in seated positions or those involved in activities that require repetitive shoulder movements.
  • Posture Correction: Regularly performing this exercise can assist in correcting poor posture, particularly rounded or slouched shoulders. By mobilizing and strengthening the thoracic spine, it helps to counteract the effects of sedentary lifestyles and desk-bound work.
  • Reduce Injuries: A mobile and flexible thoracic spine can help distribute forces evenly throughout the spine, reducing the risk of strain or injury. By incorporating the Quadruped Thoracic Rotation exercise into your routine, you can promote better spinal health and minimize the likelihood of back or shoulder issues.

These early intervention exercises are to improve overall health and fitness and help reduce work-related injuries.
If you have an injury or illness, consult with a health care professional before attempting.

More Tools & Resources from Peak Ergonomics
Contact Us About Reducing Workplace Injuries
Healthy Employees are the Bottom Line! – Learn More!

Quadruped Thoracic Rotation will help increase range of motion, and reduce stiffness or pain in the upper back.